So basically I would put the glue between where two pieces of wood meet and then put pocket screws in right after to make sure for a tight fit when the glue dries? Do I have a lot of time before the wood glue starts to dry or skin over?Just make sure you use a quality wood glue like titebond 2. the glue has more holding strength than the screws. the screws just hold the pieces together while the glue dries.
Navigation
Install the app
How to install the app on iOS
Follow along with the video below to see how to install our site as a web app on your home screen.
Note: This feature may not be available in some browsers.
More options
You are using an out of date browser. It may not display this or other websites correctly.
You should upgrade or use an alternative browser.
You should upgrade or use an alternative browser.
All you woodworkers out there
- Thread starter ndz98
- Start date
- Tagged users None
Depends on temperature and humidity. but generally you have several minutes before the glue sets up. if you're on the face of the sun like I am, then you have a lot less time.
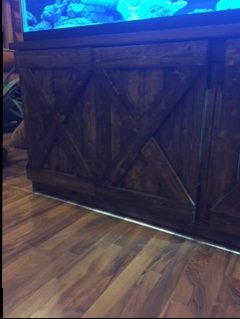
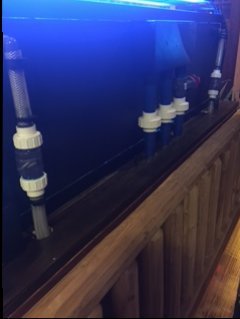
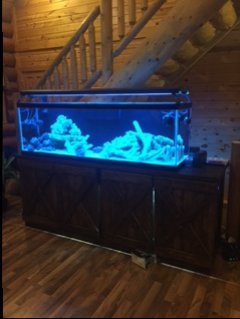
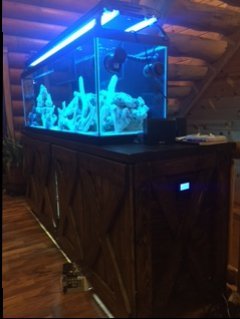
My stand is built out of basic 2x6 lumber that was only like $3 a board and the doors are 1x4's, and 1/2" plywood on back, bottom and inside top...really cheap and easy to build, probably like $230 in materials. I made it bigger than the stand and drilled holes through the top of the back, this made it easy to do the overflow drains, because I just shot them straight down and only needed to add one 90 degree fitting, the other two drains run straight into the sump. I also made it 36" tall to fit all the equipment in it and mounted the Apex controller on the side. You really only need basic tools like skill saw, or chop saw works even better, especially for the miters. Trim nailer and compressor are nice, but you could screw everything. Also need speed square, drill bits to drill for drains, drill to screw boards together and install hinges, and other basic tools. I would suggest drawing it out to scale with an architectural ruler and grid paper, that way you know how much materials to purchase and have a game plan. If you are a carpenter, you prob don't need to do this, but it makes everything easier having a plan. Good luck my friend and have fun while you are building it! 


You could always put shims over the carpet too.I would die for a stand that nice. What do you do to compensate for any possible irregularities in the leveling of the wood since there is no foam to set underneath? Also I read that carpeting can sometimes make a tank stand uneven because the floor underneath the carpet is not level. It said you could rip back the carpet and shim it. But that's not an option for me because I'm renting this place and I don't think they would be too happy if I did that lol. So do you think the carpet is going to affect the leveling if any at all?
Also what types of pocket screws do you use for birch? Fine or coarse? And what length for 3/4 plywood?
That's a pretty stand you've got! Was it $230 in just wood or all the tools involved too?My stand is built out of basic 2x6 lumber that was only like $3 a board and the doors are 1x4's, and 1/2" plywood on back, bottom and inside top...really cheap and easy to build, probably like $230 in materials. I made it bigger than the stand and drilled holes through the top of the back, this made it easy to do the overflow drains, because I just shot them straight down and only needed to add one 90 degree fitting, the other two drains run straight into the sump. I also made it 36" tall to fit all the equipment in it and mounted the Apex controller on the side. You really only need basic tools like skill saw, or chop saw works even better, especially for the miters. Trim nailer and compressor are nice, but you could screw everything. Also need speed square, drill bits to drill for drains, drill to screw boards together and install hinges, and other basic tools. I would suggest drawing it out to scale with an architectural ruler and grid paper, that way you know how much materials to purchase and have a game plan. If you are a carpenter, you prob don't need to do this, but it makes everything easier having a plan. Good luck my friend and have fun while you are building it!


Brew12
Electrical Gru
View BadgesExcellence Award
Reef Tank 365
Article Contributor
Moderator Emeritus
North Alabama Reef Club
Article Administrator
My Tank Thread
Beautiful stand! And I bet you aren't even close to fully loading it to capacity.Pocket hole screws, wood glue and NO top piece. this was for a 250g tank.


Assuming that it is made from 3/4" birch I ran it through an engineering calculator. It would easily support 4000lbs+. It looks like the screws and glue would blow out due to buckling before you could overload the wood itself.
Brew12
Electrical Gru
View BadgesExcellence Award
Reef Tank 365
Article Contributor
Moderator Emeritus
North Alabama Reef Club
Article Administrator
My Tank Thread
I find that a good quality compound miter saw is the most useful woodworking tool I have. I use it more than any other woodworking tool.One of the first things I am wanting to build is my tank stand because I am starting a new build very soon. I want to make it out of something like 3/4 Birch plywood. No 2 x 4's. If I have this clear, all I should need without getting all fancy, is a circular saw, kreg jig, pocket screws, level, square, wood glue, wood glue, and a guide of some sort to make straight cuts.
Clamps. You forgot clamps. Gotta have clamps.
If you're truly wanting to get 'into' woodworking, and not just be able to build one project, I'd recommend a table saw, a sliding miter saw, and a good router.
I built my 60 cube stand without 2x4's, but I did use some solid poplar corners, dado'd out for rabbited plywood joints. No screws, just solid techniques and good glue. It could double as a stool for an elephant.


Oh yea! Forgot all about the clamps!Clamps. You forgot clamps. Gotta have clamps.
If you're truly wanting to get 'into' woodworking, and not just be able to build one project, I'd recommend a table saw, a sliding miter saw, and a good router.
I built my 60 cube stand without 2x4's, but I did use some solid poplar corners, dado'd out for rabbited plywood joints. No screws, just solid techniques and good glue. It could double as a stool for an elephant.


Isn't that essentially what this is?If you're not going to use a table saw, this thing is great.
https://www.amazon.com/E-Emerson-To...4&sr=8-1&keywords=emerson+straight+edge+clamp
https://m.lowes.com/pd/Kreg-Rip-Cut-Circular-Saw-Guide/3654122
How do you cut out a piece from the middle of plywood with a miter saw? That's why I said a circular saw because I thought that was the only way to cut out a piece from the middle.I find that a good quality compound miter saw is the most useful woodworking tool I have. I use it more than any other woodworking tool.
How do you cut out a piece from the middle of plywood with a miter saw? That's why I said a circular saw because I thought that was the only way to cut out a piece from the middle.
No, the one I posted is just a clamping straightedge, yours is actually better and very reasonably priced. I haven't really been in the market for tools in about 10 years. Wonder what other cool new stuff I've missed
How do you cut out a piece from the middle of plywood with a miter saw? That's why I said a circular saw because I thought that was the only way to cut out a piece from the middle.
While you can use a circular saw to cut a piece out of the middle, a jigsaw is a better option in my opinion. I think that Brew12 is speaking in general for woodworking, not necessarily for this project.
Ah I understand now.While you can use a circular saw to cut a piece out of the middle, a jigsaw is a better option in my opinion. I think that Brew12 is speaking in general for woodworking, not necessarily for this project.
Brew12
Electrical Gru
View BadgesExcellence Award
Reef Tank 365
Article Contributor
Moderator Emeritus
North Alabama Reef Club
Article Administrator
My Tank Thread
Exactly. Although for this project it would be very useful for any finishing trim work that would be done. I have a circular saw but very rarely use it. I find a table saw and jig saw to be much more useful.While you can use a circular saw to cut a piece out of the middle, a jigsaw is a better option in my opinion. I think that Brew12 is speaking in general for woodworking, not necessarily for this project.
Yea, I agree, a jigsaw works really good. Drill a hole in the corners and cut out with a jig saw. I love my multi tool, if you have never seen one Google Fein multi tool...it oscillates (vibrates real fast, but not like a sawsall, more like an electric toothbrush) and works great for plunge cutting. You can put a pc of flooring on the ground like tile or wood and put the blade on top of tile and cut the door jambs (casing) off at the exact height you want them. It worked great doing all the electrical work in a log house, plunge cutting a 4"x 3" x 3 inch deep hole in a 1 foot log to install a metal electrical box--that would have taken forever without a multi-tool!
Would a jig saw make a better, finer cut than a circular saw?Exactly. Although for this project it would be very useful for any finishing trim work that would be done. I have a circular saw but very rarely use it. I find a table saw and jig saw to be much more useful.
Would a jig saw make a better, finer cut than a circular saw?
I'm glad you brought that up. A cut is only going to be as good as the blade you're using. Don't use old dull blades or even the new stock blade (fine for rough work but not finish work).
For the circular saw get a decent finish blade like this.
https://www.amazon.com/D0760A-Diabl...ywords=diablo+finish+blade&tag=donations09-20
The jigsaw will give you a clean cut with the right blade too but keeping it straight takes a little practice if you don't have any experience with one. Don't waste your money on a crappy Black & Decker you'll regret it later. Any of the big names are probably fine but I LOVE my Bosch. I got mine in a combo pack that came with an excellent palm sander. If I remember correctly it was about $100. Keep your eyes peeled for combo deals.
Similar threads
- Replies
- 24
- Views
- 718
- Replies
- 7
- Views
- 240


