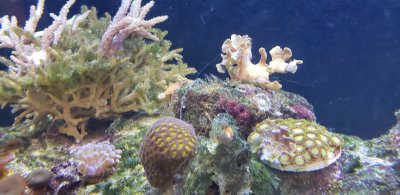
Apartment 180 Gal (re)build

kstripp

Community Member
View Badges
Joined
Mar 29, 2020
Messages
58
Reaction score
97
Rating - 0%
0   0   0
Hmm.... so about a year ago, my wife spotted a reef tank in the company classifieds
where we work. 180 gallons, all equipment and livestock included. The former
owner was heading off to college, and those things don't fit in dorm rooms.

While I was growing up, my mom had a reef tank - so I knew from experience that
they have the potential to be a lot of work. Unfortunately, it also left me wanting
to have one again. So with only a couple months left in planning our wedding, my
wife talked me in to getting it. Great timing, right?

Well, in early June last year, the parents of said college kid decreed that it had
to go before they took a July 4th vacation, so things suddenly moved quickly.
My wife and I moved shelves, tripple checked with the apartment manager, and on
the recommendation of the previous owner, found a local aquarium service guy to
help / take care of the move.

So we got the tank broken down, the livestock transferred to holding tanks at the
guy's store front, and all the equipment moved in and set up in our apartment.

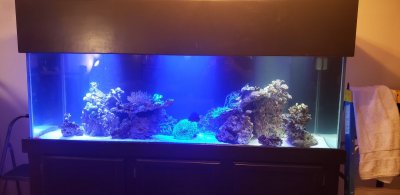
20190625_175706.jpg


20190627_094918.jpg


We put in sand and the rocks that didn't have any coral colonies, then water, conditioner,
and salt. Then

20190627_095839.jpg


20190627_100302.jpg


20190627_120125.jpg


Then after about a few days of running the sytem, all the livestock was moved in

20190702_151719.jpg


Fish:
* Purple tang
* Maroon clownfish
* Yellowtail blue damsel
* Pajama cardinal
* Coral catshark (sigh... this tank is really not big enough for that....)

Coral:
* Kenya tree coral
* Leather (the ones flopped over, more on them later)
* Hammer
* Fungia
* Zoanthids
* Pavona

Clean up crew:
* Long spine sea urchin
* Sea cucumber

Well, that'll be it for this post...
Let's just say there were a lot of "definitely not doing it that way again"s in there.
(Unfiltered water? 4 days to "cycle"?) Next up will be the first equipment failure, just a few
days in!

I think this thread should have the subtitle:
Why do something right the first time that you can re-do it when it is harder?
 

Mastiffsrule

Where ever you go, there you are, so be nice 2 you
View Badges
Joined
Feb 10, 2019
Messages
8,440
Reaction score
33,572
Location
Charlotte
Rating - 0%
0   0   0
Hi,

Rock work came out nice. Look like the same 180 dual overflow I have. Nice size tank to work with. Keep us posted once you start with your stocking list.
 

fishguy242

Cronies..... INSERT BUILD THREAD BADGE HERE !!
View Badges
Joined
Jan 21, 2020
Messages
47,259
Reaction score
278,080
Location
Illinois
Rating - 100%
1   0   0
great start!!
 
OP
OP
K

kstripp

Community Member
View Badges
Joined
Mar 29, 2020
Messages
58
Reaction score
97
Rating - 0%
0   0   0
Okay - next installment on the tank.

The aquarium service guy just brought all the livestock that he had been holding at his store front and we had it in the tank, and family was about to arrive later that day.

I take the dog out for a walk and when I get back, the tank is dark, pumps are off - complete shutdown. Upon inspection, the GFCI had tripped. Tried a single reset - tripped immediately... so definitely a real problem. (and now I'm glad I took the time to put that in before the tank arrived...) Started unplugging things until it would stay on, and found that the culprit was the return pump.

So... with family about to show up... time to find a replacement pump. Extra fun because I was not yet familiar with any of the LFS in the area, and I needed something much bigger than either Petsmart or Petco carried.... but did manage to find one.

That evening's fun was guiding my mom and aunt through making dinner (some host, right?) while I had my head stuck under the tank trying to replace an externally plumbed return pump without flooding the apartment. Yipee!

Unfortunately I don't seem to have any photos of that adventure. But the new pump (Sedra I think... whatever that store happened to have) has been working fine since.

Next up, a little over a week later... the GFCI tripped again. Next post!
 
OP
OP
K

kstripp

Community Member
View Badges
Joined
Mar 29, 2020
Messages
58
Reaction score
97
Rating - 0%
0   0   0
Now we're just over a week later, and the GFCI tripped again. This time it turned out to be one channel in one of the lights.
We never cared for those lights anyway, because they formed 3 beams with significant dark spots between. Now we also had one that could only do white, and one that could only do actinic... so it was time to get new lighting.

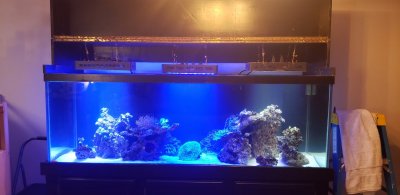
20190711_192706.jpg 20190711_192717.jpg

After doing some research, we figured the Orbit Marine lights looked like a good value, so we put those in. What a difference!

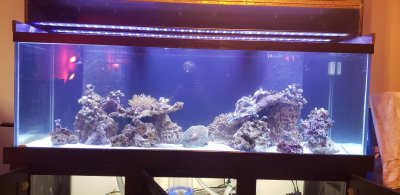
20190711_210246.jpg

Unfortunately it also shows just how badly the leathers on the right side were doing after the move. They never did perk up. We ended up cutting off a couple tips and sticking them in the skeleton of the birds nest on the left (because we couldn't get them to stick to plugs or the rock... we're new at this...). Those tips perked up and have grown considerably since. By mid August (next photo), the original colony of leathers had vanished completely, but the new ones (still stuck in the birds nest skeleton) look great.

20190818_151137.jpg

But..... hellooo aiptasia.... :-(
And hair algae...

20190818_151207.jpg

20190711_192706.jpg 20190711_192717.jpg 20190711_210246.jpg 20190818_151137.jpg 20190818_151207.jpg
 

fishguy242

Cronies..... INSERT BUILD THREAD BADGE HERE !!
View Badges
Joined
Jan 21, 2020
Messages
47,259
Reaction score
278,080
Location
Illinois
Rating - 100%
1   0   0
time for a clean up crew,lower po4 ,corals looking good
 
OP
OP
K

kstripp

Community Member
View Badges
Joined
Mar 29, 2020
Messages
58
Reaction score
97
Rating - 0%
0   0   0
Bit overdue for an update here... by early fall, GHA had reached plague proportions. Lots of manual removal, but not making much impact. Nitrates were sky high, so I tried getting them under control with biopellets, but I think both the reactor and its pump were undersized. I never was able to tumble them properly, and there was no apparent affect on the nitrates. Switched to NO3PO4X, and got them under control and down to reasonable levels by late fall - now I can keep it between about 1 and 10ppm.

With that, the GHA issue has receded, only to be replaced by lush fields of aiptasia. We tried killing them off with AiptasiaX... oops. More fields of aiptasia.

Got some peppermint shrimp in the tank around January, but no apparent effect... in fact, didn't see them again for a couple months. Got an aiptasia eating filefish, and so far he seems to be doing well, but hasn't shown any interest in the aiptasia.

So we decided to try Berghia Nudibranchs... it took them a while to get established, but once they did... WOW what a difference. Talk about being anemone eating machines...

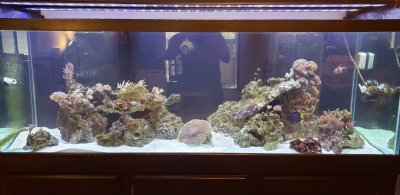
So here is a pic of the tank today. Definitely still have issues (is that purple stuff cyano?), but at least the GHA and aiptasia problems are coming under control. And apparently none of the fish wanted to be seen. They're hiding under the rocks, though the shark's tail gives him away...

20200529_174614.jpg


Next up will be starting the rebuild the thread title refers to. A little while ago during a water change, I noticed that the check valve on the return line no longer functioned. It never closed well to begin with, bouncing for several minutes before finally closing. This time though, it didn't close at all, and the sump would have overflown had we not already been pulling out water for the change.

Clearly something needs to be done about that! It seems I'll be doing an in place rebuild of the plumbing.
 
OP
OP
K

kstripp

Community Member
View Badges
Joined
Mar 29, 2020
Messages
58
Reaction score
97
Rating - 0%
0   0   0
I've been thinking about how to handle the plumbing rework for quite a while. Other than the critical need to remove the power loss siphoning risk, I'd also like to improve things a bit if possible. I'm not a fan of having to constantly change my NO3POX dosing, so ideally I'd like a nutrient export method that is more or less self regulating.

From what I've seen around here and other places on the web, I think that mostly means biopellets or macro algae (reactor, ATS, fuge...), or maybe even zeovit. I really like the idea of a refugium, but I don't see a straight forward way to put a sufficiently sized one in the stand. The sump itself isn't set up for one, and after doing some quick cardboard mockup tests, there is no way I can replace the sump without doing a full tank tear down. The rest of the space is taken by the ATO reservoir and space for electrical. Since I'm not decided on what route I'll go, I'd like to leave options in the plumbing rework, so that means a manifold.

The plumbing is also kind of noisy, so quieting it down would be great too.

So for this re-plumb job, here are my requirements and constraints:
* Eliminate back-siphon overflow risk
* Use existing tank fittings, which means two bottom drilled holes per overflow tower
--> using additional over the side fittings is fine by me - just no new drilling because the tank is already filled and alive

Along the way, I would also like to
* Quiet the plumbing down
* Add a manifold for flexibility

With those in mind, I sketched up a schematic of what I'd like to do
System_Diagram.png


Once I had that plan, I decided to go all out and cad it up - my excuse being that once I start, I want to be able to get it all done in a day or two (the tank is inhabited after all). Also because I may have the tendency to over design things ;-)
After several false starts, here's what I came up with:

Screenshot at 2020-05-30 10-41-16.png


I made this in Onshape, so if you want to explore the model in 3D, you can see it at this link

I'm sure there are simpler ways I could have done this, but this design gives a "modified herbie" per overflow (not modeled, but it will be a full siphon on the smaller hole, and a durso style open channel on the larger hole). There is just enough room behind the tank for a simple over the edge return, so I went with that.
 
OP
OP
K

kstripp

Community Member
View Badges
Joined
Mar 29, 2020
Messages
58
Reaction score
97
Rating - 0%
0   0   0
Nope, first floor on cement slab. Literally the same cement slab that supports the apartment complex itself.

Yeah, I love the prusa, though I'm still fairly inexperienced with it. I had a non-pusament fillament give it indigestion causing the hot end repair in that picture.
 
Last edited:

LiqrSicc

Community Member
View Badges
Joined
Jul 15, 2019
Messages
40
Reaction score
18
Rating - 0%
0   0   0
Yeah man, we're upstairs and got our request for a 90gal shut down by the landlord. Will have to wait for our own home. That's a sick tank , man. I wish my cad skills were on par!
 
OP
OP
K

kstripp

Community Member
View Badges
Joined
Mar 29, 2020
Messages
58
Reaction score
97
Rating - 0%
0   0   0
Bummer.... we lucked out with the cement floor and with really nice management. We actually may have mildly irritated the manager by triple checking it was actually okay.

Well, I'll take that as a compliment, but I'm definitely no mechanical designer. The real pros would walk circles around that... probably while blindfolded.
 
OP
OP
K

kstripp

Community Member
View Badges
Joined
Mar 29, 2020
Messages
58
Reaction score
97
Rating - 0%
0   0   0
Time for some updates. At some point it is time to stop planning and just execute. I took the week of July 4th off work since we had a couple holiday days anyway, and spent most of it preparing for and doing the plumbing job. I spent the first few days laying everything out, double checking fits as best I could, and gluing the sub-assemblies between unions.

20200620_162930.jpg
20200701_173345.jpg


20200702_112218.jpg


The first step on the tank itself was to swap over the return lines. I made a temporary connection direct from the (new!) return pump to the riser that goes over the back of the tank. That allowed me to pull out several old large hoses that were in the way of the new manifold. Turns out a couple old wine corks were perfect for keeping much water from going down the old return hoses.

20200702_215952.jpg


With most of the old tubing out, there was room for fit checking everything else, and get the manifold installed.

20200703_162255.jpg
20200703_171758.jpg


Yes... I was measuring things with calipers.... but for the most part things fit pretty close to the plan!
Though... the sump did need to be moved over one inch.

20200704_181417.jpg


All told the tank was disconnected from the sump for about 7 hours once I pulled out the original drain lines, about half of which was waiting as long as I could stand for the four pvc glue joints that I couldn't do ahead of time. I had a bubbler in the tank to help carry it over.
20200704_181424.jpg


And... the (mostly) finished product! The plastic hangers are temporary until I can measure and print new brackets, as the original ones from the cad model didn't quite fit.

20200704_204132.jpg


20200704_204138.jpg


Once I put the standpipes in a couple days later (one durso, one full siphon per overflow), the drains are now virtually silent. It only takes a minute or so for the air to purge, at which point it is quiet enough I can hear the MP40s.. so pretty good. And the best part - when I cut power, the tank siphons through the return line until the water gets below the outlet... and then stops, with plenty of capacity left in the sump. Mission accomplished!

Now I need to make those brackets, then clean up that nasty mess of wiring.
 
OP
OP
K

kstripp

Community Member
View Badges
Joined
Mar 29, 2020
Messages
58
Reaction score
97
Rating - 0%
0   0   0
Well... sad news. A couple weeks ago, I went to feed the tank in the morning, and found that the shark had passed. No idea why, but I strongly suspect that water quality was a contributing factor. There has also been an explosion of what looks to my inexperienced eye like cyano.

20200814_113648.jpg
20200814_113707.jpg


Due to space constraints, we never had a good water mixing station set up, and would just buy it from a local LFS. Once the pandemic caused closures though, that option seems to have disappeared (they are now only open by appointment for water fill ups, only have someone there if there is an appointment, and of course scheduling one is by phone... which nobody will answer if they're not there. Go figure.). So long story short, water quality has definitely gone down since quarantine started in March. So now we're figuring out how to build a mixing station on the patio.. hopefully that will facilitate better maintenance.

In the meantime though, a more troubling issue has cropped up. It seems that the seemingly leak free joints to the bulkheads are not actually leak free.

20200814_114009.jpg


These had to be screw joints because using PVC cement inside is a no-go (the fumes could be quite harmful to our parrot). So while I could glue all other joints outside, those had to be done in place, and therefore had to be threaded.
But apparently I can't make leak free threaded joints on bulkheads. Three out of the four were OK when originally installed last year, but one leaked. I tried re-doing it with fresh tape, didn't work (and apparently is a bad idea anyway). I tried with rectorseal #5 (https://www.lowes.com/pd/RectorSeal-No-5-Pipe-Thread-Sealant-Sealant/3134515), still leaked, but so slowly that I decided to stop messing with it.

When I re-did the plumbing, I used non hardening sealant (Spears Blue, https://www.mcmaster.com/4586K9/), and that is what is shown in the photo.

Any suggestions on making this joint leak free?
 

fishguy242

Cronies..... INSERT BUILD THREAD BADGE HERE !!
View Badges
Joined
Jan 21, 2020
Messages
47,259
Reaction score
278,080
Location
Illinois
Rating - 100%
1   0   0
hi,wrap threads tight and to top of thread w teflon tape,careful not to over tighten ,will crack bulkhead
 

fishguy242

Cronies..... INSERT BUILD THREAD BADGE HERE !!
View Badges
Joined
Jan 21, 2020
Messages
47,259
Reaction score
278,080
Location
Illinois
Rating - 100%
1   0   0

TOP 10 Trending Threads

NASO TANGS OR POWDER BLUE TANGS...WHICH DO YOU PREFER?

  • Naso Tangs!

    Votes: 19 37.3%
  • Powder Blue Tangs!

    Votes: 25 49.0%
  • This is too hard!

    Votes: 3 5.9%
  • Other (please explain).

    Votes: 4 7.8%

New Posts

Back
Top