Big Jon's nano upgrade

12gallonsofhex

Valuable Member
View Badges
Joined
Jan 5, 2019
Messages
1,394
Reaction score
7,146
Location
Roseville
Rating - 0%
0   0   0
THE STORY
Well, I am just over 3 months into my current tank and now that it's doing good it's time for an upgrade.

I will be transferring the rock, sand, and livestock from the 12 gallon hex into the new 20 gallon long. I will also be using the ancillary hardware minus the hob protien skimmer and hob filter.

I will be doing as much DIY as I can on this build. I want to build an overflow, drill the tank, build the stand, retrofit the sump, and build a cool moveable/adjustable led light mount.

THE BUILD
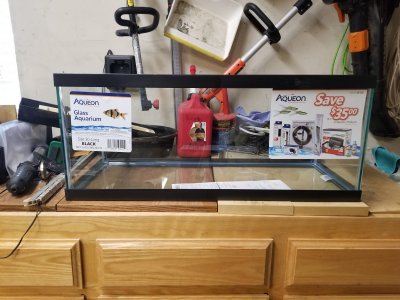
I purchased the 20l durring the buck a gallon sale. I will be drilling the tank for an overflow and using a 10 gallon tank for a sump for now. Nothing fancy on the sump for now, just filter floss, a basket for media, a protien skimmer, and a fuge like portion.
I am also building the stand out of free lumber. Their are tons of free entertainment centers and other big furniture being given away on craigslist and many of them are made with furniture grade plywood. I went this miser route after shopping for wood at the big box store. It's crazy that I could buy a stand for less than what I could buy the materials. This tank will be in the living room so a 2x4 stand is not gonna cut it.

I hope you enjoy this build with me. I will keep it up to date as I go, and share the fails along with the wins. I will also share the transfer of my reef into this new build when the time comes. Here is a link to my current tank https://www.reef2reef.com/threads/12-gallon-hex-gets-a-2nd-life.540764/ 20190324_143030.jpg
 
OP
OP
12gallonsofhex

12gallonsofhex

Valuable Member
View Badges
Joined
Jan 5, 2019
Messages
1,394
Reaction score
7,146
Location
Roseville
Rating - 0%
0   0   0
To build the stand I purchased this used table saw for $25 and this used sliding compound mitre saw for $40. I also picked up this free dinged up table to use for building materials. It's made of 1" by 2" solid pine. I plan to rip it into 1x4 to build the bones of my stand before sheeting it in plywood.
20190417_165824.jpg
20190417_125916.jpg
20190417_125906.jpg
 
OP
OP
12gallonsofhex

12gallonsofhex

Valuable Member
View Badges
Joined
Jan 5, 2019
Messages
1,394
Reaction score
7,146
Location
Roseville
Rating - 0%
0   0   0
I got the boards ripped and started to build the stand in between feeding my newborn today. I lucked out with good sharp blades on these used saws. I used a $15 pocket hole jig from Amazon and it is working great. I was not too sure about the repurposed lumber idea but after ripping it down I am starting to like it. Stay tuned, hoping to get the stand framed up tomorrow.
20190418_125840.jpg
20190418_170301.jpg
15556410913373822436834400694615.jpg
20190418_182135.jpg
 
OP
OP
12gallonsofhex

12gallonsofhex

Valuable Member
View Badges
Joined
Jan 5, 2019
Messages
1,394
Reaction score
7,146
Location
Roseville
Rating - 0%
0   0   0
I made good progress on the stand today. I built a jig to quickly build the legs square and true. The frame is done, just have to build a panel inside the left opening to mount controllers and switches and build doors/panels to cover the opening. I designed the stand to fit perfectly flush with the tank, and may use a small moulding to hide the lower tank frame. This is the first home project I have built with proper tools like the compound mitre saw, table saw, and pocket hole jig. The overall quality is much better than I have done in the past. I am quite happy with the build so far.
20190421_185229.jpg
20190421_185359.jpg
20190421_190016.jpg
20190421_165327.jpg
20190421_165337.jpg
20190421_180320.jpg
 
OP
OP
12gallonsofhex

12gallonsofhex

Valuable Member
View Badges
Joined
Jan 5, 2019
Messages
1,394
Reaction score
7,146
Location
Roseville
Rating - 0%
0   0   0
Getting closer to finishing the stand. I got the doors built today. This is the only wood I purchased for this project. Now I have to make a decision to put hinges on the doors, or make removable panels, or a combination based on how often I will need to get to the area. Definitely need to hinge the left side where my controller rack is. If anyone has experience with removable panel, please lend me your insight.
20190423_160019.jpg
20190423_160955.jpg
20190423_161445.jpg
20190423_163411.jpg
 
OP
OP
12gallonsofhex

12gallonsofhex

Valuable Member
View Badges
Joined
Jan 5, 2019
Messages
1,394
Reaction score
7,146
Location
Roseville
Rating - 0%
0   0   0
The Good;
My parts came in this morning to finish my stand. I decided to hinge the left side panel because I will be accessing the controller wall daily. The right panel I made blocks to align the panel, and used 4 catch magnets to hold it on. I dont think I will need to get into that side very often. The front 2 panels were connected using a piece of 1/4 ply cut to perfectly match the hole in the front of the stand. I wanted the look of a center post between the panels without having a center post in my way while doing maintenance. I then used the remaining 8 catch magnets to hold it in place. The panels come off and go on fairly easy, but not so easy that they can be accidentally knocked off.

The Bad;
Things were going so well that I started to design my overflow, mostly copied from the fijicube, and build a jig to drill the tank. I went to drilling just as all the vids on YouTube show. I used lots of water and little pressure. 5 minutes in, right when water started dripping in the tank, there was a pop.

The Ugly;
I had a fit and threw a couple of tools over a $20 Petco tank. Lol.

The Upside;
I have lots of glass to practice drilling on now.
20190426_135838.jpg
20190426_152620.jpg
20190426_161611.jpg
20190426_161623.jpg
20190426_161700.jpg
20190426_161714.jpg


20190426_165127.jpg


20190426_165839.jpg
 
OP
OP
12gallonsofhex

12gallonsofhex

Valuable Member
View Badges
Joined
Jan 5, 2019
Messages
1,394
Reaction score
7,146
Location
Roseville
Rating - 0%
0   0   0
I went out and bought another 20long from Petco. Following some advice from members on R2R, I successfully drilled the tank a little differently. I used duct tape on the back side, and used a piece of wood backing. I also set it up in my drill press and built some stands to hold the tank in place. Thank God it's a nano tank, lol.
I also built a small overflow weir, and the outer overflow box. I water tested the external box, but still need to test the entire tank. I plan to do testing later today.
Thanks for taking a look!
20190428_125017.jpg
20190428_165002.jpg
20190428_165014.jpg
20190428_121743.jpg
 
OP
OP
12gallonsofhex

12gallonsofhex

Valuable Member
View Badges
Joined
Jan 5, 2019
Messages
1,394
Reaction score
7,146
Location
Roseville
Rating - 0%
0   0   0
Picked up a 10 gal to make a sump with. I am going to run one main chamber for a fuge that overflows to a media basket area and into the return chamber. Nice and simple. I also got some blackout vinyl for the back glass. I had a ton left so I blacked out the bottom glass too just in case I want to run bare bottom in the future.
20190430_153423.jpg
20190430_153429.jpg
20190430_162630.jpg
20190430_162636.jpg
20190430_163331.jpg
 
OP
OP
12gallonsofhex

12gallonsofhex

Valuable Member
View Badges
Joined
Jan 5, 2019
Messages
1,394
Reaction score
7,146
Location
Roseville
Rating - 0%
0   0   0
It looks like your little helper has been an excellent supervisor! That has turned out great!
I am very happy to say that she is at home in the garage with me and doesnt mind the noise. I hope she continues to be so I can teach her how to build, repair, and maintain things.

Thanks Katrina! I am more of a welder/ fabricator/ mechanic. I have not worked with wood and glass much so this has been a cool build for me.
 
OP
OP
12gallonsofhex

12gallonsofhex

Valuable Member
View Badges
Joined
Jan 5, 2019
Messages
1,394
Reaction score
7,146
Location
Roseville
Rating - 0%
0   0   0
I got the DIY cover done today. I used a HD DIY screen frame kit and clear mesh. To make the cutout for the return line, I made a piece of acrylic that was just big enough to allow the return to be put through. I then sanded the back side, taped it to the top of the screen, and then flipped the assembly over and carefully epoxied the mesh screen to the acrylic cutout. After it cured I cut the mesh screen from inside the acrylic hole.
20190504_172811.jpg
20190504_224021.jpg
20190504_224033.jpg
 
OP
OP
12gallonsofhex

12gallonsofhex

Valuable Member
View Badges
Joined
Jan 5, 2019
Messages
1,394
Reaction score
7,146
Location
Roseville
Rating - 0%
0   0   0
I got some more goodies for the new build. I think this is the last of the hardware. I got my fuge lights this weekend. I was originally going to run a hanging led grow light bulb, but after I ordered it Amazon had a lightning deal on this 2 panel thing. I decided to run one panel on the front of the fuge, and the other on the side. I am hoping to get better macro growth with this set up. I used strips of acrylic, and good 3m double sided automotive moulding tape to attach them to the glass. I then had to make a jumper harness to run the power. I just used wire with stripped and soldered tips to push into the pigtail where the jumper pins would go.
20190505_125828.jpg
20190505_125836.jpg
20190505_202405.jpg
 

TOP 10 Trending Threads

Back
Top