Extension Tubes and Macro Photography:
Part 1 (Process & Practice)
by @maroun.c
Macro photography is the photographic art of capturing small objects up close and personal and revealing detail that is invisible to the naked eye. Special equipment and optimal technique is required for good macro photography, yet results can be very rewarding.
Whether we understand or consider ratios, macro photography by definition is all about the ratios of the size of the subject to the size of the image on the camera sensor.
photo Credit Formation of an image in a digital camera | Download Scientific Diagram (researchgate.net) edited
pictures above shows how image is formed when a picture is taken, magnification ratios are the ratio of the image on the sensor and the original image size, in the case of a true macro image the ratio would be 1:1 or in other words size of image captured onthe sensor is equal to size of the object.
It is not the intention in this article to dwell into the physics of macro-photography, but in short a 1:1 macro picture means that the size of the subject on the camera sensor is the same as the subject size (life-size) magnification or true Macro. Respectively a 1:2 ratio means subject appears half of its real size on the camera sensor.
Many formulas, calculators… exist to calculate the magnification ratio physically but that is out of the scope of this article. For those interested in ratios I find the easiest way is to take a shot of a graduated ruler then view it at 100% without cropping on a PC and comparing the ruler picture size to its real size.
Going back to aquarium photography, macro photography is an integral part of aquarium photography, be it for reefers wanting to take closeups of their coral to show their real beauty or for frag traders or stores who want to showcase the best representation of their corals to potential buyers.
At times a closeup is more than enough to showcase a coral or fish, yet many times a real macro is desired and a good macro photo of a coral or an invert raises interest as we start seeing details we fail to see sometimes in real life.
There are many techniques to get closeups, macros or even higher magnification macro pictures. All have their advantages and their limitations and adding to that the limitations of aquarium photography, good macrophotography comes out as a very challenging form of photography.
A lens that focuses close enough and a higher megapixel camera to be able to digitally crop a bit might be more than enough for many yet it still comes at a cost as the minimum requirement would be:
Interchangeable lens camera (camera that allows you to change lenses)
With the many choices of lenses and cameras and how specific aquarium macro photography gets, committing to a camera and lens choice isn’t an easy task and trying multiple choices before committing isn’t always possible.
Looking at many threads where people ask about a cost effective method to acquire great macros you see advice mentioning 60mm macro lenses, 100-105 macro lenses and most threads will mention the low cost and trusted 50mm lens coupled with extension tubes. Many advise the 50mm1.8 and extension tubes without even having tried them even!
Comparing the different options would involve multiple criteria:
Cost
Limitations
Magnification ratio
Effect on lighting
Focusing range or distance to subject range
Depth of field
Magnification ratio.
So without dwelling into the physics of things we will try to go over multiple ways to get macro or close up pictures and discuss advantages , limitations and what makes them usable or not in the specific context of aquarium photography,
As the article is basically focusing on extension tubes, we will have more focus on them but will definitely consider other techniques (ones relevant to aquarium photography) advantages and limitations of relevant options to aquarium photography.
I will experiment only with the equipment I have but which I believe is a good representation of the most frequently proposed solutions for Macro phtography:
Tripod Manfrotto 190
A professional tripod and decent brand have used it for the last 15 years without issues. keep in mind a tripod might be carrying 3-5K worth of gear easily, so it is in ones best interest to invest in a quality tripod with a quality head to protect our investment as well as to have good stability
Tripod head Manfrotto MHXPRO-3W
Also a professional head which is capable of holding and stabilizing around 26 pound or 12 KG of gear.
Camera Nikon Z7ii
Mirrorless camera which is a pro Camera body. Mirrorless Camera offer an advantage for macro photography, as they don’t have a mirror that flips into and out of position when you press the shutter, so it saves you the motion created with mirror move. Yet pressing the shutter can sometimes create a bit of motion so you can chose to shoot with delay timer when shooting corals or still objects or invest in a remote trigger.
Lenses
50mm 1.8
is the first lens any photographer is advised to get when he posts any question on which lenses he should consider. Typically lower price than other lenses, 1.8 fixed max opening is a blessing for lower light situations or for being able to secure higher speed. Background blur is amazing with this lens. Unfortunately Nikon decided to push the price of all its new mirrorless series lenses where the 50mm 1.8 retails at around 630 usd where as most previous 50mm 1.8 retailed around 200-250 usd at max. on the bright side the new 50mm 1.8 is much better built and image quality has clearly come a long way.
105 Nikon macro lens
Dedicated macro lens from Nikon, pricing wise close to the DSLR version before it was discontinued but at current prices new the mirrorless 105 lens sells for around 1100 usd where as the DSLR version sells around 500 usd. There has been a quality improvement on the new mirrorless version and weirdly lens is way lighter.
I would have wanted to try the kit lens which is typically the 24-120 F4 as most people get it with the camera body however I don’t have it and instead have the 24-70 which is a pro lens and not a fair comparison, also a zoom lens will have a different performance in different focal length due to inherent physics, it will also have lower image quality than a prime lens like the 50mm 1.8 which might affect our assessment of the general image quality using extension tubes.
Lighting for the controlled shots (ruler shots)
As lighting and shadow can change with daytime I used a diffused on camera flash, flash was set on manual output to keep things stable and this allows us to check limitations of flash use on aquarium shots as with extension tubes, many times with longer lenses flash shadow can be seen when too close to a subject.
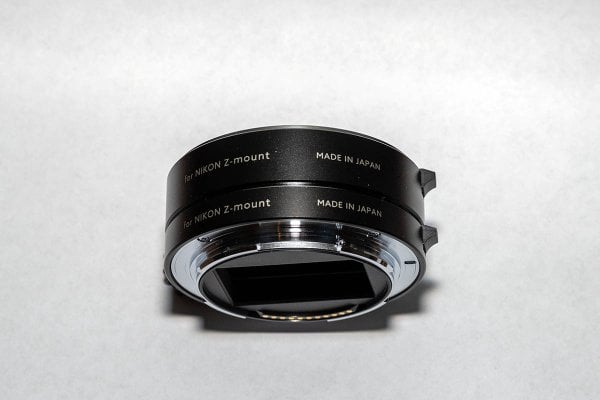
Kenko extension tubes 10-16mm for Nikon Mirrorless camera
Last and most relevant to the scope of this article Kenko extension tubes for Nikon Mirrorless cameras, these are more expensive than their DSLR counterparts:
Kenko extension tubes for DSLR cameras (DG version) sell for around 130 usd for a set of three extension tubes (12-20-36 mm and possibility to stack them for a max of 68mm extension tube)
Kenko extension tubes for Nikon Mirorless cameras or the Z lens version sell for around 220 usd for a set of 2 tubes (10-16mmand possibility to stack them for a maximum of 26mm extension tube)
Extension tubes as the name implies ae hollow empty tubes which work by moving the lens away from the camera for more magnifiction, they don't have any glass elements to affect image quality and we will check their effects in the following series of tests.
The newer Z version for mirrorless cameras although much more expensive and limited to 2 tubes only and a max tube length of 26mm only, is however way better built than the plasticky older version for DSLR cameras which felt very loose and also failed to support heavier lenses without causing issues due to compression of the tubes on the electronic contacts. At least this is the experience I had with my older set of tubes that I used on my older DSLR.
photo credit Kenkoglobal.com
image formation and added magnification with Extension tubes
I don’t really miss the DSLR version 36mm tube or ability to stack all 3 tubes together as:
-36 mm made the minimum focusing distance too close to front glass and limited the corals I could focus on, stacking up to 68 mm max resulted in crazy magnification yet focusing, and shallow DOF made it very challenging and that is for non aquarium subjects.
For aquarium use maybe a bit longer tubes would have still provided additional benefit like ability to focus even closer for super shallow frag tanks yet managing motion would have become very difficult.
To start with our testing, we went with few controlled shots on a graduated ruler to assess effect, advantages and limitation of shooting with different lenses I have with and without extension tubes.
For the first exercise we shot perpendicular at a ruler to look at following criteria:
focusing distance (minimum and maximum)
this guides the closest we can get to a coral in a tank and the farthest away we can focus on a coral .
- magnification easy to compare magnification we get using lens alone and with extension tubes.
- Effect on light allowed to go through the lens, lens with extension tubes as this will affect the aperture, Shutter speed and ISO to use.
Table below summarizes min and max focusing distance as well as parameters used in all pictures. I kept aperture, shutter speed , ISO constant to avoid affecting the final exposure. I had to add a constant light source (on camera flash) to overpower ambient lighting and exclude daylight changes from pictures)
| Lens | ExtTube | Min focus distance cm | Min focus distance inch | Max focusing distance cm | Max focusing distance inch | Aperture | Shutter speed | ISO | Flash power |
| 50mm | 0 | 28 | 11.2 | Infinity | Infinity | 6.3 | 100 | 640 | 1/128 |
| 50mm | 10 | 14.5 | 5.8 | 31 | 12.4 | 6.3 | 100 | 640 | 1/128 |
| 50mm | 16 | 10.3 | 4.12 | 19.5 | 7.8 | 6.3 | 100 | 640 | 1/128 |
| 50mm | 26 | 8.3 | 3.32 | 12.8 | 5.12 | 6.3 | 100 | 640 | 1/128 |
| 105mm | 0 | 13.5 | 5.4 | Infinity | Infinity | 6.3 | 100 | 640 | 1/128 |
| 105mm | 10 | 12.5 | 5 | 130 | 52 | 6.3 | 100 | 640 | 1/128 |
| 105mm | 16 | 12 | 4.8 | 80 | 32 | 6.3 | 100 | 640 | 1/128 |
| 105mm | 26 | 11.5 | 4.6 | 51 | 20.4 | 6.3 | 100 | 640 | 1/128 |
Here are the pictures shot with above parameters
My observations looking at the above table and shots are the following:
Lenses comparison:
-50mm lens
which is a sharp prime lens and capable of 1.8 fixed aperture, focuses at a closest distance of 11.2 inches or 28 cm. This is not a bad distance to be close to corals in the tank, maybe one needs to back up lens a bit from tank for corals in front part of the tank which isn’t a huge deal.
Yet when it comes to frag tanks most of which are 10-15 inches high this means you need to be above water level when taking top-down shots. This adds the challenge of light reflection and water movement from touching the water or fish moving…
-105 mm macro lens
focusing minimum focusing distance is at 5.4 inches or 13.5 cm, so basically half the minimum focusing distance of the 50mm lens, which is expected being a dedicated macro lens.
-50 mm lens is a 1.8 max aperture VS 2.8 max aperture for the 105 macro lens, the 50 mm lens hence will allow shooting at a bit darker conditions or allow faster shutter speeds when used at 1.8mm. this has its own disadvantages still, mainly reduced depth of field which could be a desirable thing in some photography types, yet in aquarium photography we still want to see a bit more DOF and we most frequently shoot at the 5.6-8 aperture range for more of the subject in focus. So the faster 1.8 isn’t really a huge advantage in aquarium photography. Yet at 50% of the price of a 100 or a 105 macro lens this is something to look at. A logical intermediate solution would be a 60mm macro lens which is also available with most camera manufacturers, as well as third party lenses like the 90mm macro lens from Tamron.
The 105mm macro is more than enough for most tanks that are less than 20-24 inches unless you really want 1.1 macro shots of corals in the middle or back of the tank or if you have deeper front to back tanks. Another disadvantage of macro lenses is that they can be a bit slower to focus, that was the case of my older 105 macro lens meant for DSLR cameras, yet it was very much improved with the newer mirrorless version. Also macro lenses come with a very steep learning curve for autofocusing and reduced depth of field at same aperture vs normal lenses.
Extension tubes considerations.
Adding extension tubes to the equation somehow magnifies the effect of both, the advantages and disadvantages each lens has as above. With exercise above we were shooting perpendicular at the ruler so, depth of field and focusing ease and accuracy are not visible so will be assessed in the next exercise.
Extension tubes on 50mm prime lens
- Adding a 10mm extension tube allowed us to focus around 50% closer (11.2 inch Vs 5.8 inches) which is a huge advantage, added magnification is clearly visible looking at the picture with 50mm and the one with 50mm and 10 mm ext tube.
- Adding the 16mm or the 26 mm extension tube instead of the 10 mm dropped the closest focusing distance from (5.8 inch with 10 mm ext tube) to 4.1 inch (16 mm ext tube) and 3.3 inch (26 mm ext tube) which I believe is a minimum gain. Adding 10 mm extension tube did add a considerable magnification gain, adding the 16 and 26 mm tubes did indeed add more magnification yet the overall gain was minimum when we consider the disadvantages we will consider below.
- Loss of light going through with the addition of extension tubes and the additional light loss with more tube length added is very visible looking at the pictures:
- Picture with 50mm is much brighter than one with 50mm and 10 mm extension tube, adding 16 mm or 26 mm tube further increase the loss of light. While not a huge deal when taking pictures with flashes or of stationary subjects, this is much harder to deal with in aquariums where lighting is limited for photography and where use of flash isn’t always appreciated as it washes out coral colours and is harder to deal with because of reflections.
- One thing to note is flash was on the camera and was getting closer with each shot (extension tubes allowed us to get closer) so basically with closer shots we get a bit more light from the flash, this means in reality light loss is even more than what we see in above shots.
Extension tubes on 105 mm Macro lens
- A noticeable increase in magnification compared to the 50 mm lens, the 105 macro lens provide comparable magnification to the 50mm with 16mm extension tube, yet with much more light allowed in looing at how much brighter the picture with the 105mm is compared to 50mm with Extension tubes.
- One more noticeable consideratoin is the limited effect of extension tubes on minimum focusing distance when placed on a macro lens, which is understandable as macro lenses are already designed to focus close. Min focusing distance of 105 macro lens without extension tubes is 5.4 inches or 13.5 cm adding a 10 mm tube drops minimum focusing distance to 5 inches or 12.5 cm, 16 and 26 mm tubes only reduce the minimum focusing distance by further 0.2 inches more each, which is a negligible improvement in focusing distance as well as a minimal improvement in magnification added. Compared to the loss of light we get with addition of tubes, their use on top of a 105mm macro lens would be questionable. This assessment is mainly for aquarium photography, for other uses like insect photography where ring flashes are used for more light and the ability to use smaller F stops as we’re shooting under daylight with additional flashes and where any added magnification is appreciated, use of longer tubes might have more appreciated effects compared to the disadvantages it has.
- One last thing noted is that the 105 with the 26mm tube, caused us to be so close to the object that the flash caused lens shadow on the bottom part of the picture, this is not an issue with the 50mm where we don’t notice this effect even as shot is taken at 3.32 inches from subject vs 4.6 inches for the 105 most likely as the 105 is a much longer lens in size than the smaller 50mm.
- While parameters and distances were the same for both tests, Flash exposure was a bit higher as with the camera tilted the flash was facing the object... As we know from physics and from the previous test that extension tubes will decrease light going through we won't focus on that aspect in this test and only focus on magnification and Depth of field.
- 50mm
- Looking at the pictures we see a good effect on magnification for the extension tubes on the 50mm lens as we saw in previous test. The effect on the shallow depth of field with tubes is also very evident for the 50mm so overall on the 50mm the camera is focusing much closer, magnification gain with tubes is very clear, on the negative side depth of field does become shallow and we lose some light with addition of the tubes. To note that focusing struggles a bit and camera has to hunt a bit back and forth to lock focus when using tubes which is understandable ad not an issue if not shooting fish. We didn’t have to use manual focus on any of the shots but focusing on corals or in aquarium might be a bit more tricky than focusing on a graduated ruler where the graduation is much more contrasty and easier to lock focus than corals or fish.
- 105 mm
- The same exercise on the 105 was quite revealing, the 105mm picture without any tubes is more magnified that the 50mm with 26mm of tubes, exposure is brighter on the 105 alone and depth of field is a bit shallower than the 50mm with 26mm extension tubes. We see minimal gain in both magnification and a bit shallower DOF when we add extension tubes. One additional back draw is more focus haunting for the camera yet this is expected and as for the 50mm is not an issue unless shooting fish. We didn’t have to use manual focus for any of the shots where the camera haunted back and forth but ended up focusing each time.
- The 105mm lens alone offers so much magnification and DOF is so much shallower even without tubes which explains the learning curve on macro lenses. Shots would have to use smaller apertures (larger A numbers) to get more of the subject in focus which will come at the price of shutter speed and ISO as lighting is limited in aquarium photography and use of flash isn’t always possible.
- One more aspect to look at is max focusing distance which is the farther possible distance from subject. Looking at the table the max focusing distance of the 50 mm without tubes like any lens is infinity yet this comes at the cost of less magnification. Adding tubes reduces the max focusing distance when adding 10-16-26 mm tubes respectively to 12.4-7.8 and 5.12 inches which is rather a huge limitation for aquarium photography where many of our corals would be beyond 12.4 inches. Basically many corals beyond certain distance won’t be able to be photographed using tubes and this is something to consider if one is really after macro shots.
- For the 105 we saw a proportional reduction of max focusing distance so 105 alone focuses up to infinity as well, adding 10-16 and 26 tubes brings the maximum focusing distance to 52, 32 and 20.4 inches. For tank photography I don’t see these values being any limitation except maybe the 26mm for reefers with very deep front to back tanks, yet with the previously discussed negligible gain in magnification I don’t see the real value of adding more than 10mm tube on a 105 macro lens.
- So looking at the above and before going to aquarium shots our conclusion was that the 50 mm with extension tubes is very much capable of great macros, focusing distance is very much reduced, which is a plus for top down shots and shallower tanks for example. Loss of light can be a limiting factor yet limiting tubes used to 10mm or 26 would be a good compromise or more magnification, ability to shoot closer to subjects. 105 macro lenses would benefit very little from adding tubes.
- One last test before going to aquarium shots was using the 50mm and 105mm alone and digitally cropping to see how much magnification we can get.
- Digitally cropping has its own effects on images by reducing the pixels in a picture in severe crops which might make pictures noisy or unusable. The amount of magnification we can get before we start seeing severe image degradation will be affected by how sharp our initial image is and also by how much resolution is there in those pictures based on the camera MP. Higher MP cameras will allow more cropping and more magnification of pictures before degradation is visible. It is highly unlikely one would have to crop pictures from a 105mm lens but we will also check it to see if the gain is worth it as this can be replicated for reefers with 60mm macro lenses which might not be able to shoot corals beyond certain distance at 1:1 resolution and where magnification will start getting limited.
- Keep in mind camera used for this exercise is the Nikon Z7ii which is a 45.7 MP camera, that is a much higher resolution than many cameras commonly used for aquarium photography so digital cropping might not be that effective for other cameras.
- In below pictures 50mm and 105 mm have been cropped by 50%, further cropping was possible as it’s a high MP camera so we kept it at only 50% crop to make it relevant to common 20-25MP cameras images being cropped, then images were resized to 1200 pixels on the larger side of the picture to match all the pictures in the article.
- Looking at the pictures and mostly at the 50mm original and digitally cropped pictures, there is considerable magnification to be gained from digital cropping especially on high MP cameras. Again this is more relevant for aquarium photography where pictures are mainly not intended to be printed and are mostly to be viewed on forums or social media where a resolution of 1200x800 is more than sufficient for screen viewing on PC and even less is more than enough for social media which is mostly viewed on tiny mobile phone screens.
Part 2 of this article, which includes pictures of corals and the conclusion can be found at the following link:
Extension Tubes and Macro Photography: Part 2 (Coral Pictures)