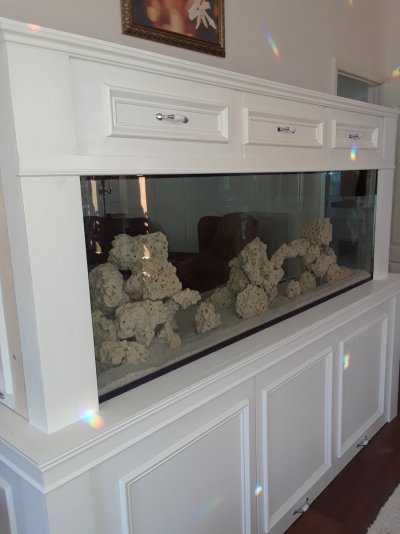
180 Gallon In-wall build

Psychedelic Fins

Active Member
View Badges
Joined
Oct 26, 2020
Messages
100
Reaction score
152
Location
Plant City
Rating - 0%
0   0   0
Backstory: My first fish tank was a 29 gallon (that became a 55 gallon) freshwater tank in college in the 1980s. First job, a couple of apartment/house moves later, a kid or two, and I was back in the hobby again in 2002. This time saltwater. I had a 90 gallon peninsula tank with some hammers/GSP/mushrooms. Deep sand bed, live rock, wet/dry filter, pretty standard stuff in the early 2000s. And then life got in the way and circumstances led me out of the hobby in 2007 for what I thought would be a short time.

Fast forward to 2020. With Covid keeping us home more, it seemed like the perfect time to take the plunge (pun intended) back into the hobby. In September, Mrs TampaMark and I were talking and she agreed to getting a tank. Nights of negotiations later, after countless hours looking for inspiration online, and after measuring three potential sites for a variety of tank size possibilities, it was finally settled. We were going to build a 180 gallon in-wall tank between the living room and our bedroom. The tank would be flush with the living room wall (where the TV currently was), and I would build a stand in our bedroom that housed the sump and equipment beneath the display tank.

Truthfully, I wasn't worried about the aquarium side of the project (at least not yet). My former tank was mildly successful over the 5 years I had owned it. The corals grew (some even thrived), although I did have one issue with fish death (dang powder brown tang - which I posthumously named after my first wife for convincing me to get it even though I knew better. Net result - my bad! I knew better. But yes, the name stuck!), and I managed the algae issues that I battled throughout (my first refugium!). I felt quite confident that the it would be like riding a bicycle and it would be easy to get back on. More on that later.

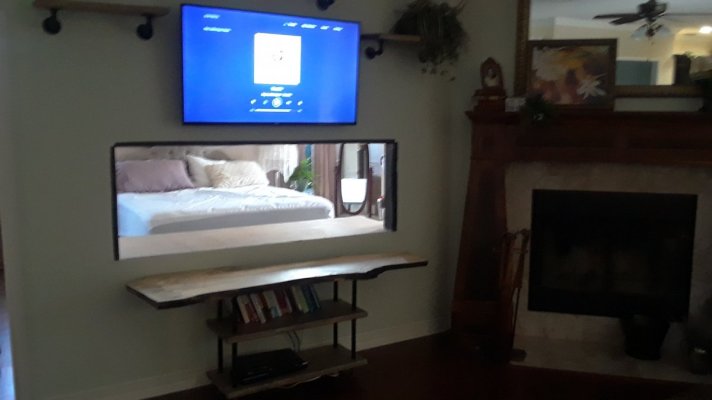
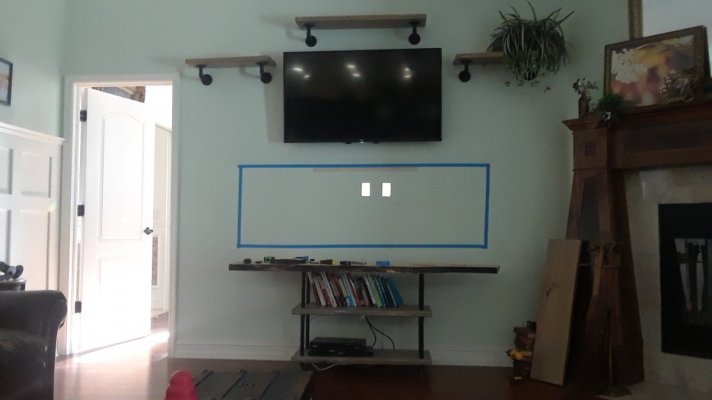
What was mildly worrisome was the hole in the wall that I was going to make. I have been a woodworker for 20+ years and have done many house renovations, but cutting a hole in a perfectly good wall seemed extreme. The picture is after I had purchased a smaller TV and hung it above where the tank would be located. I liked the dimensions, I like the idea, it was time to get to work.
20201110_092302.jpg
 

Futuretotm

Well-Known Member
View Badges
Joined
Aug 4, 2016
Messages
597
Reaction score
755
Location
Tampa, FL
Rating - 0%
0   0   0
My current and very first tank is a 5 foot 139 gallon currently. Last night in bed, I spoke to my wife about putting in a 10 foot in the wall when the kids are all grown up (kid is 3, one is pending). Little does she know I want to do what you're doing in a year or two.

Best of luck, keep updating us. One word of advice, go bigger.
 
OP
OP
Psychedelic Fins

Psychedelic Fins

Active Member
View Badges
Joined
Oct 26, 2020
Messages
100
Reaction score
152
Location
Plant City
Rating - 0%
0   0   0
My current and very first tank is a 5 foot 139 gallon currently. Last night in bed, I spoke to my wife about putting in a 10 foot in the wall when the kids are all grown up (kid is 3, one is pending). Little does she know I want to do what you're doing in a year or two.

Best of luck, keep updating us. One word of advice, go bigger.
We settled on the 180 after going back and forth. One post that struck me was from someone who was downsizing due to the work involved. He felt too big and he was working too much to enjoy the hobby. Six foot long works best for us. I went 24 inches wide. 30 would have been better, but ate up too much of our bedroom.
 
OP
OP
Psychedelic Fins

Psychedelic Fins

Active Member
View Badges
Joined
Oct 26, 2020
Messages
100
Reaction score
152
Location
Plant City
Rating - 0%
0   0   0
Once I decided on the in-wall tank, it was time to peel back the wall to see what I had to work with. Because it was going to be located on the television wall in the living room, I was certain there would be some cable management that would be required. I had electric boxes in both the living room and my bedroom that were on different circuits, so I also knew I would be able to split power between two circuits. I just didn't know where the wiring was fed from.

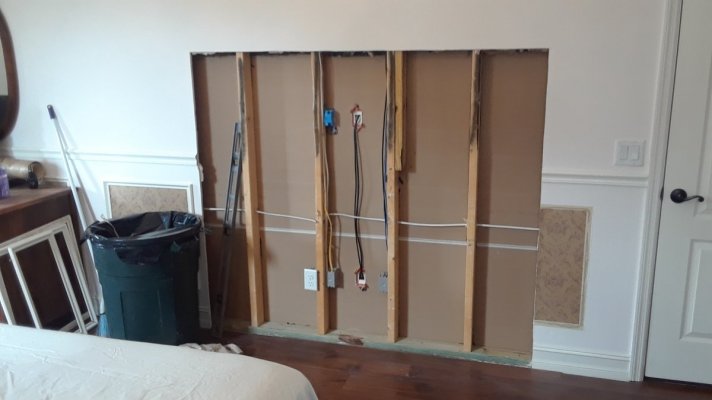
After peeling the bedroom wall and removing the sound insulation, the picture shows what I had. One outlet in the living room that went up to the TV on the wall. I also had some HDMI cables that fed through the wall from the floor to up high. In the bedroom, I had a single outlet fed from elsewhere in the bedroom that also fed some light switches that would be remaining (to the right of the tank in this picture.

The plan was to take the bedroom wiring and lower it to be hidden behind the stand and take the living room outlet and HDMI cables and snake them around the opening that I would cut for the tank. I would keep the bedroom outlet in the stand and add another outlet in the stand from the living room circuit to give me a second outlet. Before any of that, however, I needed to cut out a hole and install a header to support the upper non-loadbearing wall.

Side note: I originally cut the opening 73 inches wide by 63 inches tall. I knew the tank I wanted was going to be approximately 72 inches long and 24 inches tall. After reconsidering how I wanted to tie the stand into the existing wall studs, this was adjusted a little wider later.
 

Attachments

  • 20201108_111026 (2).jpg
    20201108_111026 (2).jpg
    86.7 KB · Views: 180
OP
OP
Psychedelic Fins

Psychedelic Fins

Active Member
View Badges
Joined
Oct 26, 2020
Messages
100
Reaction score
152
Location
Plant City
Rating - 0%
0   0   0
Tank Decision: The tank conversation with Mrs. TampaMark started at 90 gallons and went up from there. Wanting to increase the size since my last tank (90g), I was pushing for larger. How large depended on where we were going to locate the tank. With our in-wall decision made, the six foot length worked best. The 90 gallon I had was only 18 inches wide and was a peninsula tank. I always had wished it was wider, so I lobbied hard for the 24 inch width. As I noted in a previous post, 30 inches wide would have been even better, but we couldn't justify giving up the extra space in our bedroom, so 24 inches wide was the winner.

Trouble was, finding that size tank proved more difficult than I imagined. As you all probably know, Covid has made getting supplies/livestock difficult (and more expensive). I worked with several local fish stores and could not locate a 180 gallon tank. One store had a 210 (which was taller), but I couldn't make the space work in the living room with the TV above.

My solution was to look online and find someone to build the tank. I ended up going with Glasscages.com and custom building a 72x24x25 tank that allowed for HOB overflows on each end (what I am comfortable with from my old tank). I ordered low iron glass on both the long viewing sides of the tank. I had read varying reviews about Glasscages, but decided to go with them based on some of the more recent reviews.

Joe (from Glasscages) walked me through the entire process and was great to work with. It took longer that originally described, but not so long that it soured me on their service. He gave me exactly what I wanted at a price that I was happy with. There was a glitch in the assembly process that caused some small seam bubbles. Joe offered to re-do the tank from scratch or give me a discount on my price. After looking at the bubbles (via pictures and video he sent), I decided to take the discount. My plan was to cover the seams with cabinetry anyway. As long as the structural integrity wasn't compromised, I was happy.
 
OP
OP
Psychedelic Fins

Psychedelic Fins

Active Member
View Badges
Joined
Oct 26, 2020
Messages
100
Reaction score
152
Location
Plant City
Rating - 0%
0   0   0
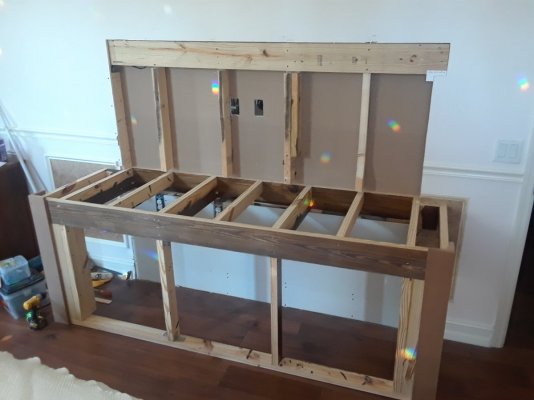
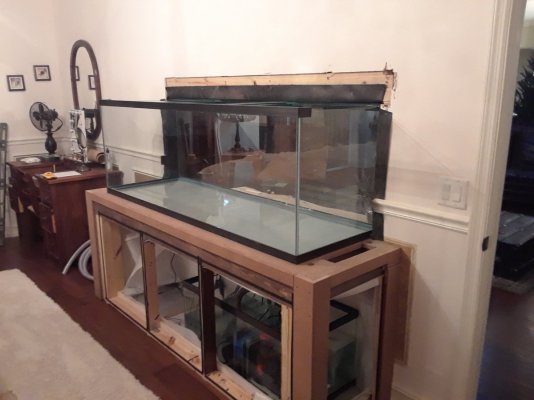
Lots has happened in this picture. Obviously, the stand frame is in place. I will come back later to make it pretty (as least to me and Mrs. TampaMark), The 2x4 studs have been cut and a header has been installed. All wiring has been re-routed. A second outlet has been added. Drywall has been added to the back inside wall of the stand to hide all wiring and stand supports (running sideways in the wall to support the back side of the stand).

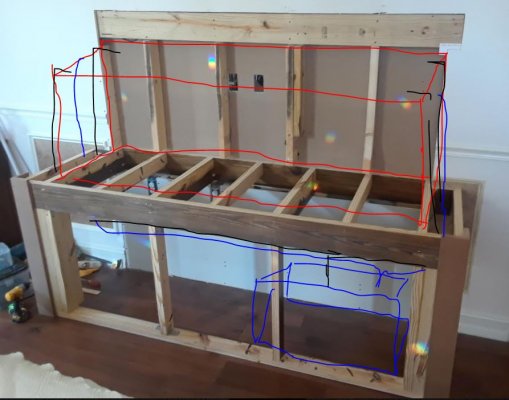
As for the stand, it is made out of 2x6 ( and some 2x4) framing lumber. The stained pieces have been re-purposed from an old waterbed frame that was no longer in use. The second picture shows my plumbing plan. The red pen shows the display tank with a 40 gallon breeder sump (blue pen) that fits snugly underneath. The blue pen also was used to show the proposed drains coming off the dual end overlows. Finally, the black pen shows the proposed return plumbing into all four top corners of the tank.
 

Attachments

  • 20201113_103154.jpg
    20201113_103154.jpg
    111.6 KB · Views: 181
  • Plumbing Guide.JPG
    Plumbing Guide.JPG
    81.6 KB · Views: 212
OP
OP
Psychedelic Fins

Psychedelic Fins

Active Member
View Badges
Joined
Oct 26, 2020
Messages
100
Reaction score
152
Location
Plant City
Rating - 0%
0   0   0
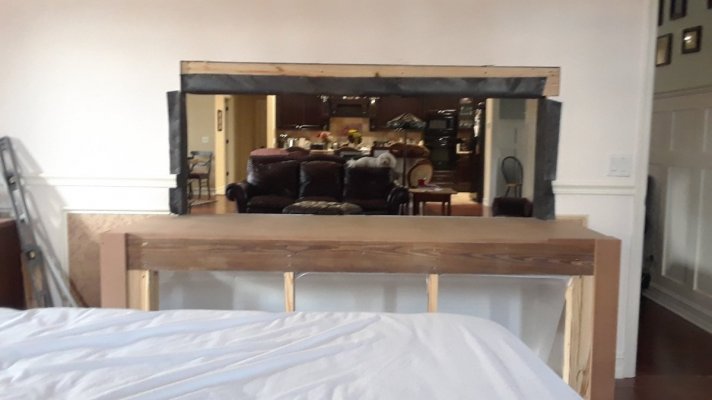
I cut the hole in the wall and waterproofed the openings with some rubber material I had laying around from an outdoor pond project I had done a few years back. I also took some waterproof underlayment that I had leftover from a flooring project and completely lined the underside of the cabinet where the sump would be. Top, sides, and floor. The hope would be any leaks would be contained in the underlayment and not leak onto the floor below.

The last item worth mentioning here is the decision to use MDF in the stand build. As a woodworker, I love its workability and stability. I was concerned, however, using it due to the moisture potential around the tank and sump (hence the underlayment on the underside of the stand to protect it from below). My plan was to install the tank on some underlayment that will lay on top of the MDF and then install a layer of hardwood that butts up to the tank on three sides and is caulked in place. I spent a great deal of time looking online for peoples' experiences and finally decided to go with the MDF. Time will tell if that was a good decision or not. So far, it has worked out fine.
 

Attachments

  • 20201118_141536.jpg
    20201118_141536.jpg
    86.1 KB · Views: 193
  • 20201118_141445.jpg
    20201118_141445.jpg
    78.3 KB · Views: 235
OP
OP
Psychedelic Fins

Psychedelic Fins

Active Member
View Badges
Joined
Oct 26, 2020
Messages
100
Reaction score
152
Location
Plant City
Rating - 0%
0   0   0
Tank Day - as I mentioned, the tank from GlassCages took longer to get than what we originally thought it would. I expected to get the tank the second week of November. Part of the delay was due to the Thanksgiving holiday and part was due to GlassCages having difficulty arranging for shipping to Tampa. Finally, on December 4th, the tank arrived in Tampa. I arranged for some buddies to help me pick it up and install it at the house. Everything worked great. Right up to the moment that I found the opening that I created was 1/8" too short. Aaaagh!

Two things immediately happened. First, I began replaying the entire process to determine why and where I had messed up. I wanted the opening to be as tight as possible around the tank to give it a really sleek look from the living room side. I had (I thought) meticulously measured to provide the perfect opening and was trying to figure out where my math had failed.

The second thing that happened is that my buddies that were helping me went into "guy" mode. As "guys," our default go-to is to fix the problem. Immediately, my three friends offered 14 different solutions to my problem. While helpful (to a point), my frustration level was too high to really listen to my good-hearted friends' suggestions.

I made a command decision that was, in hindsight, a really good one. I thanked them for their help and their suggestions and sent them on their way. I told them I was too frustrated (truth) to figure it out right then and would work the problem later in the week (small lie - I was going to take my time and try to fix it after they left).

In the end, I decided to remove the header (which meant removing the waterproofing), trim it up, and re-install everything. Definitely the right decision. Just awkward to do with a 400 pound glass box sitting 6 inches from the workspace. After I calmed down and ate some lunch, I got to work. It really didn't take too long to fix and the tank slid nicely into place.

I remembered from my prior tank experience, and continue to see preached by everyone in the hobby, that patience is the key to this hobby. While I know that is true, I didn't think that getting my tank installed in the wall would require all the patience that it did.
 

Attachments

  • 20201204_191121.jpg
    20201204_191121.jpg
    123.9 KB · Views: 202

Joe Glass Cages

Passionate Glass Cages’s Team Member
View Badges
Joined
Dec 13, 2019
Messages
1,222
Reaction score
5,777
Location
Dickson, TN
Rating - 0%
0   0   0
Tank Decision: The tank conversation with Mrs. TampaMark started at 90 gallons and went up from there. Wanting to increase the size since my last tank (90g), I was pushing for larger. How large depended on where we were going to locate the tank. With our in-wall decision made, the six foot length worked best. The 90 gallon I had was only 18 inches wide and was a peninsula tank. I always had wished it was wider, so I lobbied hard for the 24 inch width. As I noted in a previous post, 30 inches wide would have been even better, but we couldn't justify giving up the extra space in our bedroom, so 24 inches wide was the winner.

Trouble was, finding that size tank proved more difficult than I imagined. As you all probably know, Covid has made getting supplies/livestock difficult (and more expensive). I worked with several local fish stores and could not locate a 180 gallon tank. One store had a 210 (which was taller), but I couldn't make the space work in the living room with the TV above.

My solution was to look online and find someone to build the tank. I ended up going with Glasscages.com and custom building a 72x24x25 tank that allowed for HOB overflows on each end (what I am comfortable with from my old tank). I ordered low iron glass on both the long viewing sides of the tank. I had read varying reviews about Glasscages, but decided to go with them based on some of the more recent reviews.

Joe (from Glasscages) walked me through the entire process and was great to work with. It took longer that originally described, but not so long that it soured me on their service. He gave me exactly what I wanted at a price that I was happy with. There was a glitch in the assembly process that caused some small seam bubbles. Joe offered to re-do the tank from scratch or give me a discount on my price. After looking at the bubbles (via pictures and video he sent), I decided to take the discount. My plan was to cover the seams with cabinetry anyway. As long as the structural integrity wasn't compromised, I was happy.
Thanks for the mention and support. It was a pleasure to work with you and support your journey. Thanks for your honesty above. We will always support and do the right thing, giving options. Can't wait to see everything all set up and running.
 

Joe Glass Cages

Passionate Glass Cages’s Team Member
View Badges
Joined
Dec 13, 2019
Messages
1,222
Reaction score
5,777
Location
Dickson, TN
Rating - 0%
0   0   0
Tank Day - as I mentioned, the tank from GlassCages took longer to get than what we originally thought it would. I expected to get the tank the second week of November. Part of the delay was due to the Thanksgiving holiday and part was due to GlassCages having difficulty arranging for shipping to Tampa. Finally, on December 4th, the tank arrived in Tampa. I arranged for some buddies to help me pick it up and install it at the house. Everything worked great. Right up to the moment that I found the opening that I created was 1/8" too short. Aaaagh!

Two things immediately happened. First, I began replaying the entire process to determine why and where I had messed up. I wanted the opening to be as tight as possible around the tank to give it a really sleek look from the living room side. I had (I thought) meticulously measured to provide the perfect opening and was trying to figure out where my math had failed.

The second thing that happened is that my buddies that were helping me went into "guy" mode. As "guys," our default go-to is to fix the problem. Immediately, my three friends offered 14 different solutions to my problem. While helpful (to a point), my frustration level was too high to really listen to my good-hearted friends' suggestions.

I made a command decision that was, in hindsight, a really good one. I thanked them for their help and their suggestions and sent them on their way. I told them I was too frustrated (truth) to figure it out right then and would work the problem later in the week (small lie - I was going to take my time and try to fix it after they left).

In the end, I decided to remove the header (which meant removing the waterproofing), trim it up, and re-install everything. Definitely the right decision. Just awkward to do with a 400 pound glass box sitting 6 inches from the workspace. After I calmed down and ate some lunch, I got to work. It really didn't take too long to fix and the tank slid nicely into place.

I remembered from my prior tank experience, and continue to see preached by everyone in the hobby, that patience is the key to this hobby. While I know that is true, I didn't think that getting my tank installed in the wall would require all the patience that it did.
I have enjoyed reading about your journey here. Yes, patience.

Following!
 
OP
OP
Psychedelic Fins

Psychedelic Fins

Active Member
View Badges
Joined
Oct 26, 2020
Messages
100
Reaction score
152
Location
Plant City
Rating - 0%
0   0   0
Sump: I looked at prices of the acrylic sumps for purchase and couldn't justify the expense, so I found a 40 gallon breeder for sale cheap and snatched it up. I also grabbed a couple of 10 gallon tanks that I planned to use the glass from for baffles in the sump. Unbeknownst to me, the 10 gallon tanks were made from tempered glass and did not cut as nicely as I had hoped. Something similar to this:
1609606238533.png


Fortunately, I had some 1/4" plate glass laying around that cut like a champ and I created the baffles needed for my sump design. Working with the aquarium sealant was easy (although a little messy) and it is strong as can be.

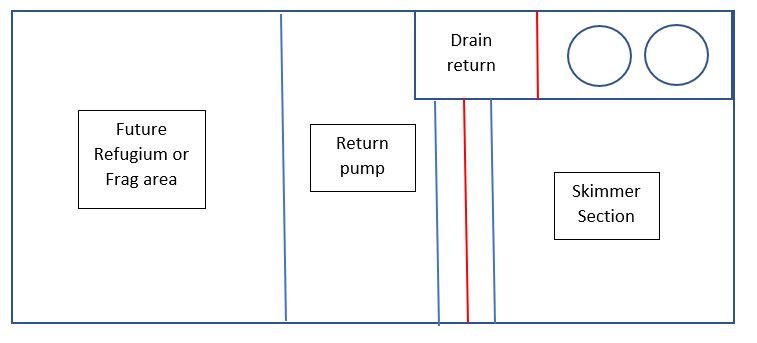
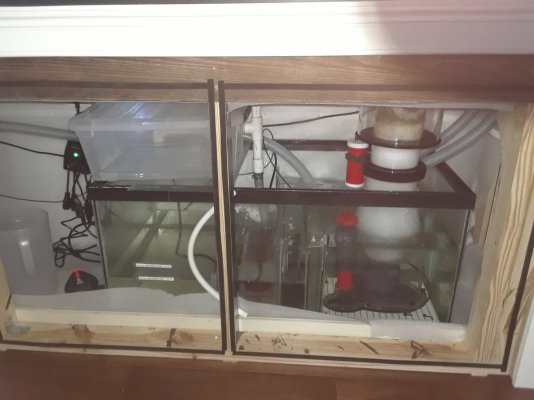
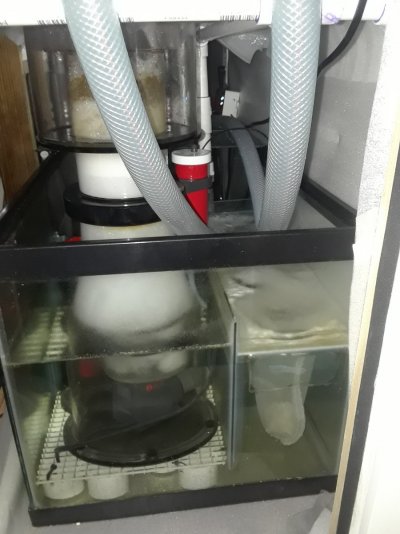
The drain lines from the display dump water in a chamber in the sump that then spill over into two filter socks that then feed the skimmer chamber. I selected the Reef Octopus 202-S skimmer and built the chamber to it's footprint. The water goes into a return pump chamber to be sent back to the display. I also included an additional chamber in the sump for a future refugium or frag space.

In the diagram attached, the blue lines represent where water flow is directed below the baffle and red lines indicate where water is directed over. I plumbed the return pump (Seltz D 1600 Controllable pump) to allow me to spill water into the refugium/frag area using a ball valve to control water flow. Currently I direct all flow back into the display tank.

Lastly, I decided (at least initially) to go with a gravity fed RODI tank to refill the evaporated water that sits on top of the sump (using some of the 10 gallon tempered glass as a base. Yay!). At some point I will get a bigger storage tank as I need to fill it up every 2-3 days, but it works great for now.

Sump Diagram.JPG 20210102_105015.jpg 20210102_105057.jpg
 
Last edited:
OP
OP
Psychedelic Fins

Psychedelic Fins

Active Member
View Badges
Joined
Oct 26, 2020
Messages
100
Reaction score
152
Location
Plant City
Rating - 0%
0   0   0
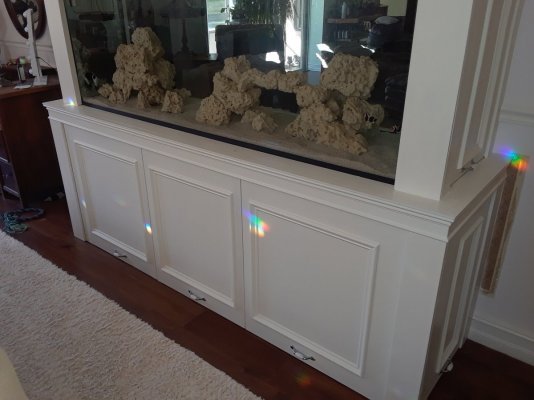
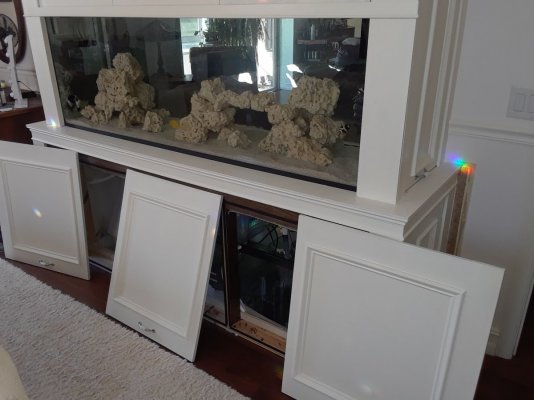
Stand - Building in the wall required me to design and build a stand myself. I wanted the stand to allow for maximum accessibility while also being structurally sound. I also wanted the look of the stand to fit into the design of our bedroom as much as possible.

In a previous post, I showed the structural part of the stand. Constructed of all 2x6 and 2x4 lumber, there is no span greater than 24 inches that isn't supported with a 2x4 or 2x6 that goes to the concrete slab below. I feel real good about the structural integrity. The challenge was to design something that looked good while allowing the access I wanted.

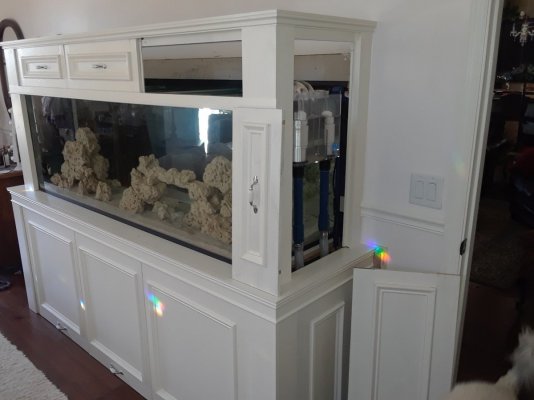
My solution was to create a stand made up of five removable panels - three on the front (each about 24 inches wide, and one on each short end - that slide into place and could be slid out as needed. I designed them to tuck under the top piece of trim and slide snug against the supporting frame. All panels have felt feet to resist damaging the hardwood flooring as they are being slid into place. I also lined the supports with foam tape that will help with noise control and to diminish any vibrations. I initially thought I might add some sort of latching mechanism (magnet catch or velcro) to hold the bottom of the panels in place, but I find it isn't needed.

I made a canopy for the top that mirrored the design. The lights (still on the workbench) will set down inside the top of the canopy when completed. The canopy is supported by the wall and the end supports so as to not add any weight or pressure to the tank itself. There are three small panels across the front used for feeding and access to the tank and two on the ends to access the dual overflows when needed. Without the lights in place, I have total access to the top of the tank, although it requires a good solid step-stool to reach that high.

While only a month in, I am pleased with the result. I trimmed it out to match some picture molding we have in our bedroom (with a couple of pieces needing to be replaced that are shown in the pictures), so Mrs. TampaMark is happy. So far, only on regret. I wish I would have painted the structure white before the install. While you can't tell when the panels are in place, it looks sloppy to me now. I can always paint it in place, but there are too many other projects begging for my attention. Aaah, patience!
 

Attachments

  • 20210104_112325.jpg
    20210104_112325.jpg
    139.6 KB · Views: 175
  • 20210104_112237.jpg
    20210104_112237.jpg
    139.8 KB · Views: 197
  • 20210104_112407.jpg
    20210104_112407.jpg
    115.7 KB · Views: 191
  • 20210104_112517.jpg
    20210104_112517.jpg
    120 KB · Views: 184

CMMorgan

Counting my blessings...
View Badges
Joined
Oct 12, 2020
Messages
3,936
Reaction score
14,842
Location
Punta Gorda
Rating - 0%
0   0   0
Whoa... so you can sit on the couch, look through the tank and see your bed? Good thing the kids moved out.
oh my god omg GIF
Fish tanks are cheaper than therapy. ;) Great looking build though. That was really thinking out of the box. It must be so peaceful.
 
OP
OP
Psychedelic Fins

Psychedelic Fins

Active Member
View Badges
Joined
Oct 26, 2020
Messages
100
Reaction score
152
Location
Plant City
Rating - 0%
0   0   0
Whoa... so you can sit on the couch, look through the tank and see your bed? Good thing the kids moved out.
oh my god omg GIF
Fish tanks are cheaper than therapy. ;) Great looking build though. That was really thinking out of the box. It must be so peaceful.
I screwed magnets into the top of the stand on the bedroom side to hang curtains that cover the tank for when we have overnight guests. I'll probably have some drywall work in my future when we move out in 20 years or so. The next owners may not appreciate my design style :)
 

Dj City

2500 Club Member
View Badges
Joined
Mar 16, 2017
Messages
3,163
Reaction score
3,407
Rating - 0%
0   0   0
Nice build.
The see through into the bedroom though?

Must be nice when it's just you and the Misses.
 
OP
OP
Psychedelic Fins

Psychedelic Fins

Active Member
View Badges
Joined
Oct 26, 2020
Messages
100
Reaction score
152
Location
Plant City
Rating - 0%
0   0   0
Nice build.
The see through into the bedroom though?

Must be nice when it's just you and the Misses.
Kids are all gone - in their late 20s and 30s now. For the occasional guest, we have a curtain that is place on the bedroom side of the tank to preserve our privacy. As I mentioned in my build thread, I know I will be doing some drywall work should we ever decide to sell in the future :)
 
OP
OP
Psychedelic Fins

Psychedelic Fins

Active Member
View Badges
Joined
Oct 26, 2020
Messages
100
Reaction score
152
Location
Plant City
Rating - 0%
0   0   0
Auto Top-Off: I went extremely low-tech with the ATO. I set a plastic storage container on top of the sump that gravity feeds to a float switch in the sump. You can see the container sitting on the sump in one of the earlier posts. I needed to refill the original container every 2-3 days with fresh RODI. I have since daisy-chained a second storage container to the first and can go 7 days before needing to refill. I still run my tank without the lights, so the evaporation rate may change when I turn the lights on. If need be, I can always add another container to meet my needs.
 

JumboShrimp

5000 Club Member
View Badges
Joined
Aug 12, 2018
Messages
5,808
Reaction score
8,249
Rating - 0%
0   0   0
Dead Powder Brown Tang "posthumously named after my first wife"... priceless!! :p

Cabinetry work looks splendid. (And shout-out to Joe at Glass cages!) Looking forward to seeing your fish.
 

TOP 10 Trending Threads

WHAT'S HOLDING YOU BACK FROM BUYING THAT ONE FISH OR CORAL YOU'VE ALWAYS WANTED?

  • I need a bigger tank.

    Votes: 79 44.1%
  • I need a FOWLR tank.

    Votes: 11 6.1%
  • It isn't compatible with the current inhabitants in my tank.

    Votes: 32 17.9%
  • It is not in the budget right now.

    Votes: 61 34.1%
  • It is above my level of care experience.

    Votes: 25 14.0%
  • It is rare/not readily available to the public.

    Votes: 13 7.3%
  • Is is known to not do well in home reefs/it has a high mortality rate in home reefs.

    Votes: 9 5.0%
  • Other (please explain).

    Votes: 19 10.6%
Back
Top