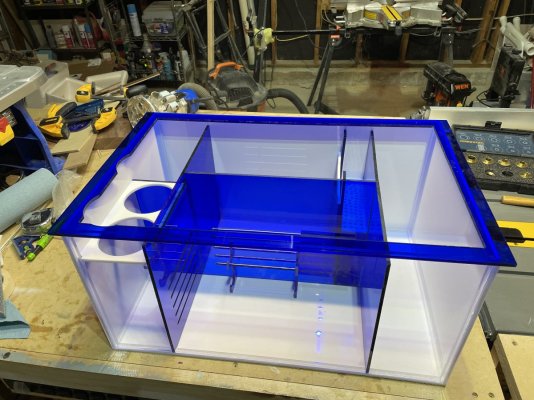
This is my almost finished build and wanted to put some depth markings on the front somehow other than a markerAn engraver, router, scribe with a knife etc. most of the ones you see are done on a cnc machine.
")

Follow along with the video below to see how to install our site as a web app on your home screen.
Note: This feature may not be available in some browsers.

This is my almost finished build and wanted to put some depth markings on the front somehow other than a markerAn engraver, router, scribe with a knife etc. most of the ones you see are done on a cnc machine.

You could just have a vinyl sticker made also.. that’s the safest thing to do it doesn’t weaken or stress the acrylic.Thanks, what I was looking for. So cnc then painted in. I’ve never seen one up close so couldn’t tell if they were scribed or just decals of some sorts.
I thought about that. My neace has a cricut (spelling?) so I’m thinking about just having her print something for me.You could just have a vinyl sticker made also.. that’s the safest thing to do it doesn’t weaken or stress the acrylic.

Acrylic is done this way to make an invisible seam if it’s a face panel etc. to bevel or 45 the perimeter joints it makes it really rough to glue with a solvent and doesn’t normally come out too clean. It’s pretty much a wash because you get more surface area to glue but more risks of bubbles etc. unless you’re using a 2 part glue! Even then it’s a real pain to glue a box and it wants to slip and slide everywhere vs flat you can clamp in place.Recently saw some 45 Degree Mitre jointed glass aquarium( Something like this but much thicker Image) in an Asian owned LFS, never seen them in big box stores and it got me thinking is that possible in acrylic tank build? What are its advantages (if any), if anyone has already done it can you post pictures for us, please.
Didn't even realize about the slip and sliding part, I felt the butt joint solvent welding itself so risky during the drying phase.Acrylic is done this way to make an invisible seam if it’s a face panel etc. to bevel or 45 the perimeter joints it makes it really rough to glue with a solvent and doesn’t normally come out too clean. It’s pretty much a wash because you get more surface area to glue but more risks of bubbles etc. unless you’re using a 2 part glue! Even then it’s a real pain to glue a box and it wants to slip and slide everywhere vs flat you can clamp in place.

I just did a 45 joint for a lighting application, like a diffuser - 3/8" clear with 1/8" white translucent laminated over it, template routed, then used a miter saw to put a 45 on it, sanded and scraped, and angle clamped together. It was difficult (impossible) to get the entire joint in full contact using that technique. I ended up tack welding with solvent then using a gusset and WO40 to solidify the corner.No advantages to a 45 degree corner in terms of solvent control. In this case use of Weldon 42 with the mixing gun and riverters tape (3M) is the only way to accomplish the seam. Very difficult to machine the seam area prior to bonding. Would require a CNC machine in most cases or tilt base router and precision ground straight edges. Not without a higher level of expensive equipment and expertise.


You’ll be fine on a sump with all the baffles etc.. Weldon 3 is fine also.. I like to use .030 pins myself.. I tend to use welding wire of all things lol..Finally made it though this thread. What a doozy! 87 pages and nearly no arguing? Well done!
Big Thanks @Turbo's Aquatics , @Lowell Lemon, @TaylorPilot, @cromag27 for the amazing amount of help you've been.
Hopefully you're up for a few more questions. I'm up in Alberta Canada where we can't seem to get any Plexiglas branded cell cast acrylic so I had to settle for Marga Cipta. I see it mentioned a few times here as "Asian Junk" but also used successfully by @Cabinetman if the solvent is allowed to soak a bit longer.
I'm up for giving it a shot if you think my plans are beefy enough to allow for some margin of error.
It's a small sump - 28" x 10" x 14" high.
"Not quite 3/8" thick acrylic (.354)
Structural baffles
1.25" Eurobraced but not 1 piece (my plastics supplier only had cutoffs for me so I'm limited in material).
I also only have access to Weldon #3 which I understand has less working time than #4. Am I still going to be able to let the solvent sit for 1-2 minutes? Can you recommend specific pin sizes?
I'm very confident in my edge prep. Fine woodworking has been a hobby/side business for quite awhile. I built my router table off my table saw extension with a torsion box assembly to keep it dead flat and square to the bit. I also built a jointer fence on the right side of my table saw fence to use for edge prep. I used 2 playing cards for the thickness offset so that's how much I take off per pass. With a good feed rate I can get perfect edges with a spiral upcut bit.
So, with some welding practice and the right soak times/pin thickness what do ya figure? Should I risk it? I'm also making the stand and I can run the whole top face over my 12" jointer to have a perfectly flat surface for the sump to sit on. Should help a bit.
Thanks in advance!
Greg

Thanks man, just needed someone to say it out loud…lolYou’ll be fine on a sump with all the baffles etc.. Weldon 3 is fine also.. I like to use .030 pins myself.. I tend to use welding wire of all things lol..


there’s no way anyone can tell you if you’ll be “fine” or not. having said that, i’ve used marga cipta without issues.Thanks man, just needed someone to say it out loud…lol
This is true with todays cheap plastic… I normally go about 30-45 seconds max! You’ll notice the pins melt right into the acrylic and the joint sets before you’re ready..there’s no way anyone can tell you if you’ll be “fine” or not. having said that, i’ve used marga cipta without issues.
i would never let liquid weldon sit longer than a minute. it’s possible it will evaporate too much before pulling the pins. for a lot of stuff i’ve actually switched to weldon 42.
Thanks, as long as it’s possible to get a good weld with it. Did you have to use #42 with it or was #3/4 ok?having said that, i’ve used marga cipta without issues.

If you machine the plastic properly it should glue up just fine. If you have gaps or get bubbles it would be good to use 40/42 to make a fillet weld.Thanks, as long as it’s possible to get a good weld with it. Did you have to use #42 with it or was #3/4 ok?
3, but that’s another reason i’d never let it sit for longer than a minute, since 3 has a shorter set time than 4. i prefer 42 for a lot of my products now but it depends on the product. 42 is more difficult to work with, much more expensive but it provides a stronger weld. 42 is not applied using capillary action since it’s an epoxy, which means you get “squeeze out” in the joints.Thanks, as long as it’s possible to get a good weld with it. Did you have to use #42 with it or was #3/4 ok?