Also can it be built and hidden in my closet. That way the wife won't find it and ask me when I got it? Hmmm the idea started as a joke but the more I think about it .......
The glass is a ZooMed 50g low boy 48in×24in×10in. I decided i wanted to run a 40/10 split for the filter and refugium section and the tank. This would give me almost a 5g section for a refugium with how i measured it.
I bought some black acrylic off amazon, making sure itd be long enough to cover the 2ft width
I planned out how big i wanted each section, drew the cuts i needed to make and cut it with the jigsaw. I used a fine tooth blade that is sold for thin metal. When making the measurements, if youre unsure of your abilities make the pieces a hair larger than necessary. You can always trim them if theyre too big, but if you cut too much and have a loose fit, it'll be harder to seal and hold in place for curing.
For assembly i recommend having a second hand. Glue the baffles and seperation plates in first and then the long piece that seperates the filter section and aquarium. I put a bead of silicone around every edge that would make contact before placing it in the tank. I had my brother hold the pieces while i put the last wide plate in. I then put extra silicone in the corner of every joint and ran my finger along them to lightly push it into gaps and get rid of excess. If you smear the silicone anywhere dont worry, it can be cleaned up easily with a razor blade. I also recommend using a small square to make sure all your pieces are mounted perfectly.
I'll update this thread with more progress for anyone interested
Question: (please) This last photo of sump with baffkes and yellow tape measure. The first of three baffle with the 6” long notch cut out is siliconed on all 3 sides. The next large baffle (middle one) is it siliconed on 2 sides and not touching the bottom of the tank? (1”or 2”) Finally, the smallest baffle is that siliconed on 3 sides? And is it set up for a sponge? Thx.
Question: (please) This last photo of sump with baffkes and yellow tape measure. The first of three baffle with the 6” long notch cut out is siliconed on all 3 sides. The next large baffle (middle one) is it siliconed on 2 sides and not touching the bottom of the tank? (1”or 2”) Finally, the smallest baffle is that siliconed on 3 sides? And is it set up for a sponge? Thx.
I decided to go this route also, same acrylic, same return pump, but different baffle setup. I set it up for a single filter sock. Even when I put the sicce 2.0 return pump on minimum flow it eventually sucks the chamber dry. I have no idea where to start with this, any help is greatly appreciated.
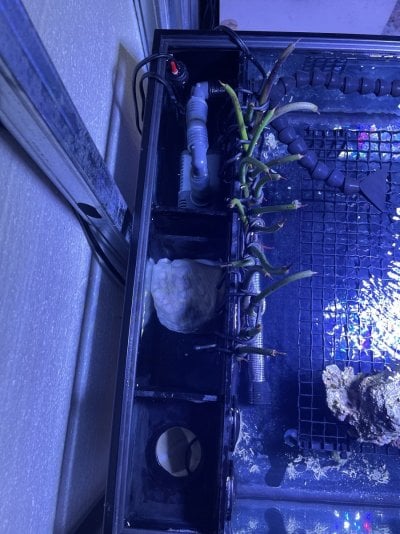
2 strainer intakes near the surface drop water into the filter sock, which goes under one baffle into the media section. From there it flows over the a baffle and under the next into the return pump
2 strainer intakes near the surface drop water into the filter sock, which goes under one baffle into the media section. From there it flows over the a baffle and under the next into the return pump
I cant see the strainers but either the strainers cant flow enough or you just need to add more water. Also make sure you have an ato or top off every day. These low boy tanks evaporate alot of water. I put in around a gallon a day.
Nice job. Those zoo med low boys are such a good deal. I only wish they were slightly deeper but for a budget build with flexible options they're a really great price for what you get. Following along! I like your idea for the compartmentalized "sump"
I cant see the strainers but either the strainers cant flow enough or you just need to add more water. Also make sure you have an ato or top off every day. These low boy tanks evaporate alot of water. I put in around a gallon a day.
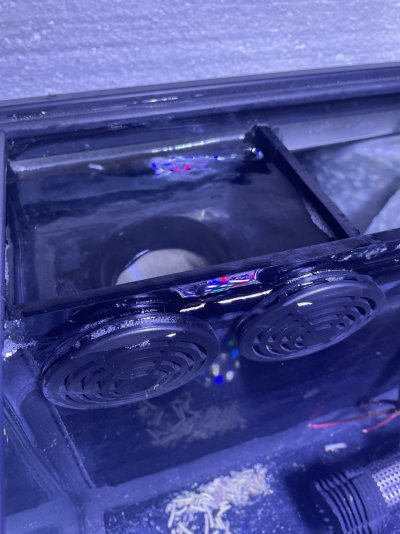
The strainers are quite slim, but the filter sock chamber stays filled to the top (same as tank water level) making me think the filter sock is the choke point. Also for the evaporation I use a large acrylic sheet as a lid and top off manually.
The strainers are quite slim, but the filter sock chamber stays filled to the top (same as tank water level) making me think the filter sock is the choke point. Also for the evaporation I use a large acrylic sheet as a lid and top off manually.
If the filter sock is clogging it, the water should overflow the divider into the next section. But it does seem to be a choke point. I would try adding a bit more water and see what happens.
If the filter sock is clogging it, the water should overflow the divider into the next section. But it does seem to be a choke point. I would try adding a bit more water and see what happens.
I removed the strainers and was able to bump the pump up to max and water levels stayed full, then I added the filter sock and it immediately started going down, so it’s definitely the filter sock, but how would I get more flow through it and still have effective filtration?
I made a basket with egg crate and put some filter floss in It like you said, and so far so good. I really hate to not use a filter sock but maybe I’ll find one that will fit in a coarser mesh, thanks for the help
Hiç sorun değil, tankın arka tarafındaki filtre kısmını da işinize ne gelirse yapabilirsiniz. Bunu yaparken en büyük amacım hareket etmeyi kolaylaştırmaktı ve bunu yapmanın en kolay yolu da buydu. Bu, yeniden başlatıldığında yerel parça takaslarına götürmeyi planladığım bir tank olacak


")