You are doing it right! excited to see the progress.
Navigation
Install the app
How to install the app on iOS
Follow along with the video below to see how to install our site as a web app on your home screen.
Note: This feature may not be available in some browsers.
More options
You are using an out of date browser. It may not display this or other websites correctly.
You should upgrade or use an alternative browser.
You should upgrade or use an alternative browser.
BrokenReefer’s 150G build thread
- Thread starter BrokenReefer
- Start date
- Tagged users None
Thanks! Slow and steady is the mantra.You are doing it right! excited to see the progress.
My deadline is February 25 to have the tab up and running. It would be nice to have some fish in the tank for my daughters birthday.
There are some great fast cycling products that could help you stabilize the tank rather quickly once it is up and running! ( fritz turbo start, dr tims, etc )Thanks! Slow and steady is the mantra.
My deadline is February 25 to have the tab up and running. It would be nice to have some fish in the tank for my daughters birthday.
I grabbed Brightwell MicroBacter 7, that’ll do the trick I think.There are some great fast cycling products that could help you stabilize the tank rather quickly once it is up and running! ( fritz turbo start, dr tims, etc )
You have done all of the research, that will indeed do the trick!I grabbed Brightwell MicroBacter 7, that’ll do the trick I think.
I have made some headway with the stand; however, COVID made a visit to our house and got me and my 2-yr old daughter. So it's been slow going the past week, I have the face frame sanded and ready for primer/paint, the fake drawer front panels are made and test fit in, those look pretty nice - need to work on tweaking the gaps on them. Drywall contractor is on the books for 2-weeks, ya know enough time for this stupid COVID to run its course through the house, he's going to install Mold Tough drywall on the three sides and the ceiling and paint to match the rest of the basement. I'm still undecided if I'll add anything on the walls surrounding the tank, so for now it's paint. And I'm going to pick up a slab, either walnut/cherry/hickory for the countertop. I think that is going to look killer, plus it fits my personal style better.
Oh and using rattle cans in the basement without a tarp on the floor wasn't the smartest idea, there's a ton of dust/overspray from the matte finish paint I used as a basecoat on the framing. ;Facepalm
I'm slowly working on getting sand and other stuff in house so when I get the whole tank stand area finished I can load that beast up and get it cycling.
I forgot to add - fish stocking list. I am torn on it and I'm open to ideas.
My want to have's:
ORA Gladiator/Picasso/Snoflake/Ocellaris - 2
Cleaner Goby - 1
Tang (Blue, Powder Brown, Orange Shoulder) - 1 maybe 2, not sure though never been able to have any in the small tanks I had previous
Anthias (Dispar, Lyretail) - 4-5
As for any others, I'm open to what people would suggest. I'm about a month out from putting any fish in so I have some time to really work through the list.
Looking good! Following along 
Right on! Thanks for tagging on.Looking good! Following along
- Joined
- Feb 1, 2018
- Messages
- 82
- Reaction score
- 87
Look up different wrasse’s they add so much movement and color. Also maybe look at a yellow or purple tang for the tank size.I forgot to add - fish stocking list. I am torn on it and I'm open to ideas.
My want to have's:
ORA Gladiator/Picasso/Snoflake/Ocellaris - 2
Cleaner Goby - 1
Tang (Blue, Powder Brown, Orange Shoulder) - 1 maybe 2, not sure though never been able to have any in the small tanks I had previous
Anthias (Dispar, Lyretail) - 4-5
As for any others, I'm open to what people would suggest. I'm about a month out from putting any fish in so I have some time to really work through the list.
I’m not opposed to either of those, the wrasses worry me a little bit with their penchant for carpet surfing. I still have to figure out some cover for the tank. I’m leaning towards window screening as the optimal.Look up different wrasse’s they add so much movement and color. Also maybe look at a yellow or purple tang for the tank size.
- Joined
- Feb 1, 2018
- Messages
- 82
- Reaction score
- 87
Definitely do a cover on the tank. Any fish can carpet surf and it always seems to be your favorite fish in the tank. The Red Sea diy kit is pretty easy to toss together quickly and looks fine. You can order custom ones but the price goes up exponentially, which I don’t think would be worth it worth it with the style tank you have since you have a rim.I’m not opposed to either of those, the wrasses worry me a little bit with their penchant for carpet surfing. I still have to figure out some cover for the tank. I’m leaning towards window screening as the optimal.
As far as the tangs go I was able to scoop up a baby purple tang a few months ago for a great price and with the price of yellows being crazy high you can get a purple for less
Life being what it is ... my son was born on March 18 and that effectively tabled this project. My wife was none too pleased to have our basement being in the state of disarray that it was, but it was all for a good family project ... or so I tried to have her believe so it made the sting of how much it costs palatable.
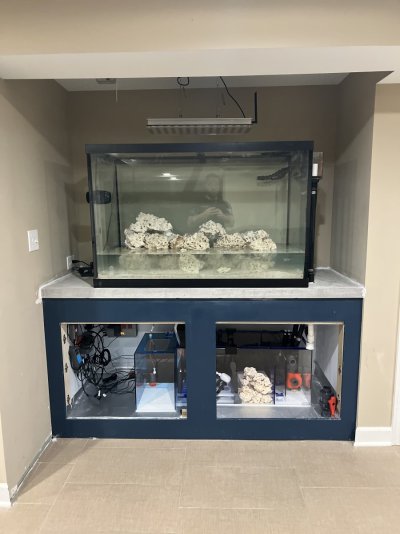
The tank is alive and has been running for two weeks now. Brief summary:
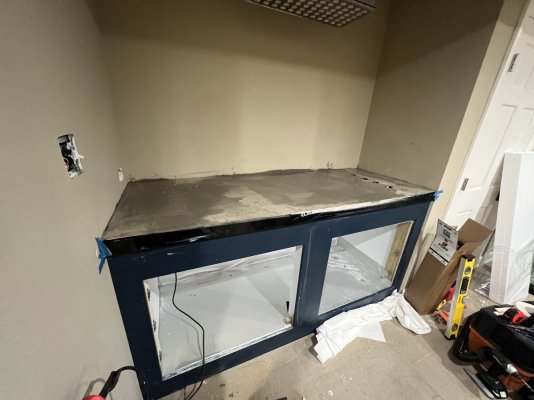
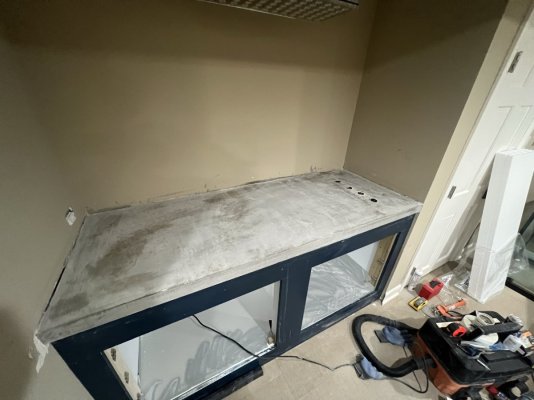
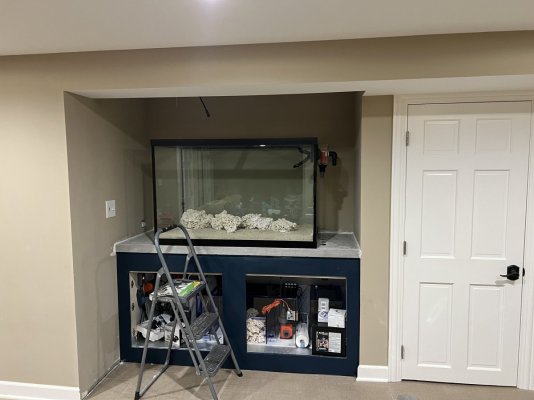
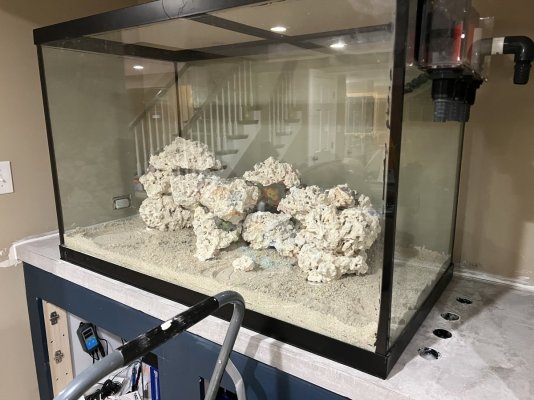
Where I last left it, is where the project sat for months. I went back and forth on what kind of countertop I wanted to install and ended up settling on a concrete top. I purchased a premade form pack from Concrete Countertop Solutions (Z Counter Form) which included the front edge form, rear and side forms, a fiberglass reinforcing mesh, add mix for the concrete, and a few miscellaneous tools. I did have to do a bit of demo before being able to pour the concrete; when the guys finished the drywall, they drywalled the top of the frame (which didn't bother me at the time since I was thinking about making a slab top for it) which isn't compatible with concrete. So, I had to rip that out and add a suitable substrate - I used plywood, I could not find Hardi backer anywhere and I wasn't keen on using Durock cement board. I taped the seam of the plywood to keep prevent any concrete from leaking through it, I also taped and caulked all the seams of the form. Call it overboard but I really did not want to deal with any concrete seepage. I ended up mixing and pouring the concrete while my daughter napped, and my wife took my son out with her shopping ... which I wouldn't recommend. You definitely need to have ample time to let the concrete start to cure out before floating, steel troweling, and finishing. I skipped the last two steps because my daughter ended up waking up when I was using the float. All in all, it wasn't the prettiest when it cured but it was flat... and mostly level. Out of plumb 1/16" in the horizontal over the 72" span.
I sanded the top as best I could, without causing a complete silica mess in my basement, and went about cleaning up the basement. Oh, I forgot to mention that I added four (4) cut-outs for the three drainpipes and one return pipe. That worked out pretty well, in my opinion, I use oversized PVC pipe and cut to fit after everything cured up. I did make a couple mistakes which I'll have to pay for: 1) I didn't do a good job caulking the exposed form edge on the rear and sides... I cannot, no matter how hard I try, make a nice caulk joint; 2) I got caulk on the concrete top in the front and tried to wipe it up, but it's silicone and well ... it just smeared. So, I'll have to scrape that up and patch the corner; 3) one of the PVC tubes went in crooked and I didn't realize it.
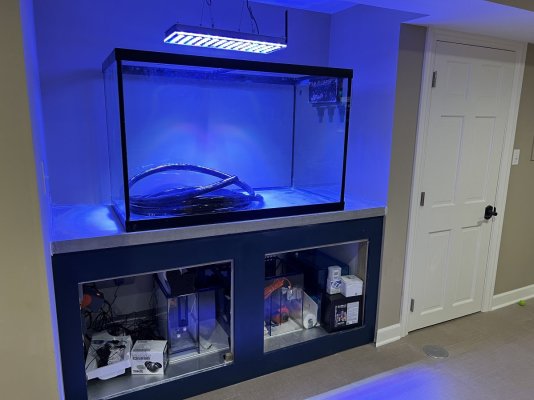
After the top set for two weeks I enlisted the help of my brothers-in-law to lift the big beast onto the stand, which was a good day for me. I bought a 1/8" rubber gym mat for under the stand, I figured that would be a good buffer between the not-so-forgiving concrete and the glass bottom; also, I thought it would help to span any small inconsistencies in the flatness.
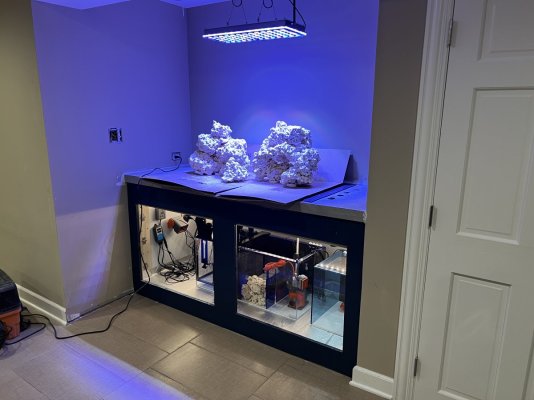
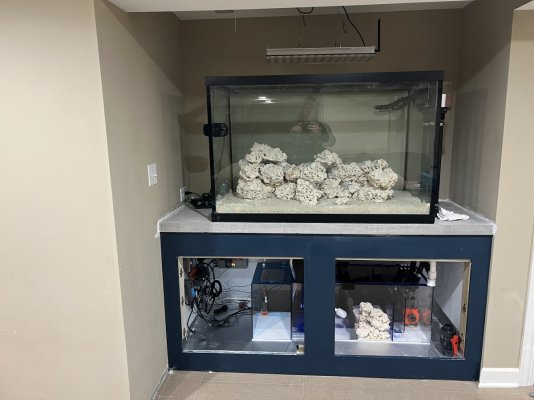
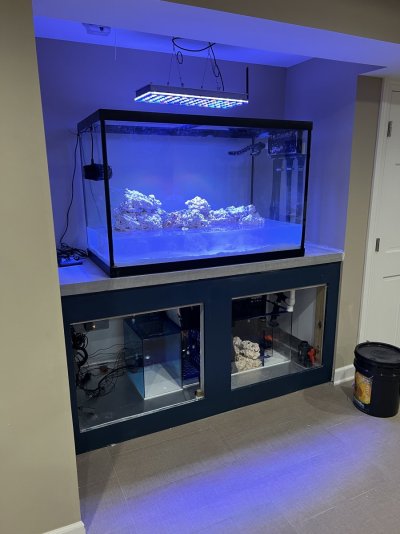
The light system I went with is the Orphek Icon, so I set about getting the fixture located, anchor points installed, and hung up. I think I will eventually have to re-do this setup just to make it look cleaner, but all in in all it went great. Centered over tank front to back and side to side - electrical was run in the ceiling which makes that connection even easier. I installed a weatherproof outlet cover over it as insurance just to see how the evaporation would be and I think I can get rid of it. Doesn't seem too bad.
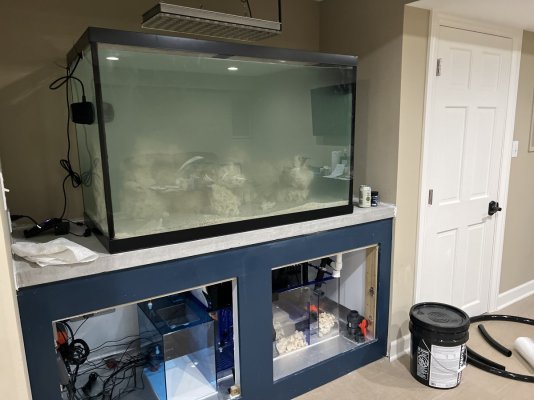
The sump, TriggerSys Platinum 34, went in easy breezy - until I went to do the plumbing. I planned on using vinyl tubing to keep bends to a minimum; however, that quickly proved a bad idea, so I had to pivot and get PVC and fittings. Thankfully BRS is always open and loves those small 2 sch80 PVC orders. I also had planned on running the sump with the drain compartment on the right side, directly below the overflow, but the design of the sump prevented me from doing that... probably because I bought a blemished one, I wasn't able to specify orientation. No matter, I'm very happy with how it all ended up. Plumbing took me two days to lay out and another two days to fully glue in, there's only so much stinkI my wife can tolerate before it becomes a problem. Remember how I said that the one return drop went in crooked, well this is where it almost kicked me in the teeth. My trickle drain is in that chamber and with the angle it made all my connections, pre-glue up, challenging but doable ... after glue-up, nothing fit properly. I think it was me over pressing the fittings and messing up the angles, but I had to make another quick pivot (read trip to hardware store) and use vinyl tubing to make that angle work. all in all, the plumbing won't win me awards for being beautiful, but it is functional.
<End Post 1>
The tank is alive and has been running for two weeks now. Brief summary:
Where I last left it, is where the project sat for months. I went back and forth on what kind of countertop I wanted to install and ended up settling on a concrete top. I purchased a premade form pack from Concrete Countertop Solutions (Z Counter Form) which included the front edge form, rear and side forms, a fiberglass reinforcing mesh, add mix for the concrete, and a few miscellaneous tools. I did have to do a bit of demo before being able to pour the concrete; when the guys finished the drywall, they drywalled the top of the frame (which didn't bother me at the time since I was thinking about making a slab top for it) which isn't compatible with concrete. So, I had to rip that out and add a suitable substrate - I used plywood, I could not find Hardi backer anywhere and I wasn't keen on using Durock cement board. I taped the seam of the plywood to keep prevent any concrete from leaking through it, I also taped and caulked all the seams of the form. Call it overboard but I really did not want to deal with any concrete seepage. I ended up mixing and pouring the concrete while my daughter napped, and my wife took my son out with her shopping ... which I wouldn't recommend. You definitely need to have ample time to let the concrete start to cure out before floating, steel troweling, and finishing. I skipped the last two steps because my daughter ended up waking up when I was using the float. All in all, it wasn't the prettiest when it cured but it was flat... and mostly level. Out of plumb 1/16" in the horizontal over the 72" span.
I sanded the top as best I could, without causing a complete silica mess in my basement, and went about cleaning up the basement. Oh, I forgot to mention that I added four (4) cut-outs for the three drainpipes and one return pipe. That worked out pretty well, in my opinion, I use oversized PVC pipe and cut to fit after everything cured up. I did make a couple mistakes which I'll have to pay for: 1) I didn't do a good job caulking the exposed form edge on the rear and sides... I cannot, no matter how hard I try, make a nice caulk joint; 2) I got caulk on the concrete top in the front and tried to wipe it up, but it's silicone and well ... it just smeared. So, I'll have to scrape that up and patch the corner; 3) one of the PVC tubes went in crooked and I didn't realize it.
After the top set for two weeks I enlisted the help of my brothers-in-law to lift the big beast onto the stand, which was a good day for me. I bought a 1/8" rubber gym mat for under the stand, I figured that would be a good buffer between the not-so-forgiving concrete and the glass bottom; also, I thought it would help to span any small inconsistencies in the flatness.
The light system I went with is the Orphek Icon, so I set about getting the fixture located, anchor points installed, and hung up. I think I will eventually have to re-do this setup just to make it look cleaner, but all in in all it went great. Centered over tank front to back and side to side - electrical was run in the ceiling which makes that connection even easier. I installed a weatherproof outlet cover over it as insurance just to see how the evaporation would be and I think I can get rid of it. Doesn't seem too bad.
The sump, TriggerSys Platinum 34, went in easy breezy - until I went to do the plumbing. I planned on using vinyl tubing to keep bends to a minimum; however, that quickly proved a bad idea, so I had to pivot and get PVC and fittings. Thankfully BRS is always open and loves those small 2 sch80 PVC orders. I also had planned on running the sump with the drain compartment on the right side, directly below the overflow, but the design of the sump prevented me from doing that... probably because I bought a blemished one, I wasn't able to specify orientation. No matter, I'm very happy with how it all ended up. Plumbing took me two days to lay out and another two days to fully glue in, there's only so much stink
<End Post 1>
<Start post 2>
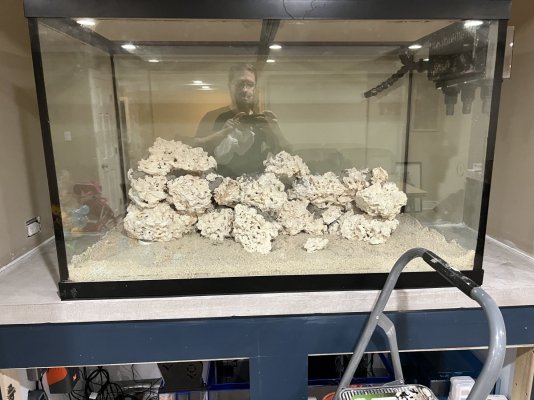
So, with the plumbing done on the drain plumbing, I was able to work out the return pretty easily - that was vinyl tubing from the pump to the loc-line. Return pump is a COR-15, which is nice ... except that isn't the standalone version so I was forced, read that as not me being as distraught as you may think, to get the Neptune Apex system. Good thing for me the A3 just came out and they were having some nice incentives for it, I scooped up the A3 Pro for a decent (enough) price. This is a slick system, liquid level sensor, optical leak detector, ORP/pH/temp probes, FMM module is on the base unit now (4 FMM ports), with the EB832. Once I was able to get that system in place, I was able to test run the system - I made a few gallons of RO/DI and poured directly into the overflow chambers to do a leak test and I'm glad that I did! I found a couple small leaks that were easily fixed with some knucklehead putting the rubber gasket on the wrong side of the bulkhead. Once those were fixed up, I dumped some in the return chamber and let the pump rip away, no leaks there! Satisfied that I was in the clear, I poured in the sand and leveled it out nice and neat, put the PVC cut-offs in the sand as the rock work base stabilizers, carefully put the rock in the tank (with the help of my daughter of course!) and used the Marco Rocks cement to lock it all together. That was a fun process but also a little annoying with my wife sitting there watching/criticizing/questioning, lol!! Oh yeah, and my daughter always wanting to do what Daddy does - I love it and would never ask for anything different... maybe sometimes just not to have her underfoot as I'm going up and down the step stool.
Once all that had set up and I had enough water mixed up in the 44gal Brute container, I made the first of 4 transfers to the tank. This whole process took me a few days, I made the water overnight when we went to bed, woke up around 5am to turn it off, add the salt and pump to agitate, then went to work and would fill it when I got home. On day 3 of filling up the water, let's say I made a slight error ... I didn't wake up at 5am to turn the water off, instead I woke up at 6:30am, went to turn it off and heard an unfamiliar sound of water splashing. It didn't sound like the water in the garbage can. I was confused, until I turned the light on. I had a small overflow happening!! Thankfully it wasn't that bad, nothing a few towels and a strong floor fan couldn't cover-up. Nothing that my wife needed to know about. Nothing to see here honey, move along now!
I got the water in the tank, set the flow on the primary drainpipe, and turned everything on. Success!! The tank was running!! I wanted to stress test it so I turned the return pump to feed mode and watched how full the tank filled the sump, plenty of room left to breathe - no issues there! Heaters were working, pump was working, now it was time to tweak all the settings and start to get this whole Apex system figured out. (By the way, I don't have it all figured out ... dang thing is complex!)
Sitting in the basement, I said - ok, great, let's get the cycle started. Dumped in the required amount of Fritz Turbostart, and was admiring the tank when I noticed a few drops of water on the concrete. What in the heck was this! The dang overflow bulkheads were leaking, son of a! Ok, well, we know the sump can handle the volume so let's turn the pump off and fix it. Did that, went about the process of backing off the one bulkhead fitting ... shi! You dope, the water level wasn't low enough yet and you just caused a lot more water to get on the countertop. Ok, no problem, paper towels will be your Saviour. Clean-up on aisle dippy do! I get the one bulkhead fitting rethreaded on, gaskets are all in their right places, ok, it was on crooked no big deal - fix that and move on. Now, while this is going on, I hear a little gurgling sound. Didn't know what it was so I look down at my OVERFLOWING SUMP!!! HOLY SH&*BALLS!! WHAT IS HAPPENING.... (did anyone remember me mentioning a backflow valve? No, yeah, dippy do didn't install one). So, at this point my Wife is upstairs in her office working when she hears me yelling profanities... she comes running downstairs thinking I'm mortally wounded, no, not yet my love. The tank, it's draining through the return pump, GO GET ME TOWELS!! She grabbed nearly every towel in our house, and I proceeded to clean up 10-gallons of water from the floor. I instantly knew what happened, turned the loc-line fittings to the ceiling, drilled siphon break holes in them, and kept calling myself every unpleasant name you could think of. Rookie move Phil, rookie move.
So, that's done, I think all is good ... nope, the fricken return pump threaded to barb fitting is leaking. Add pipe thread sealant to it and let's pray it's done.
Made 12 gallons of water, added it to the tank ... redrilled bigger siphon breaks into the loc-line fitting, turned things on and hoped I didn't electrocute myself.
<End Post 2>
<Start Post 3>
With that debacle behind me, I focus on the cycle and getting all my parameters in check. Salinity is good 32.9 ppt, temperature seems good - Inkbird shows 73.8* but Apex shows 78.9*, huh weird but ok let's trust the Apex - day 1 of tank life over.
Day 2, all systems are stable, no leaks in the morning, let's go to work. Come home from work, check the tank again for leaks, no lea.... I'm going to be murdered by my wife, another leak. Ok, well this time we learned, return pump off, loc-line point to ceiling, drain water into Brute can below bulkhead, repair with pipe thread sealant, re-fill, turn things on, life is good.
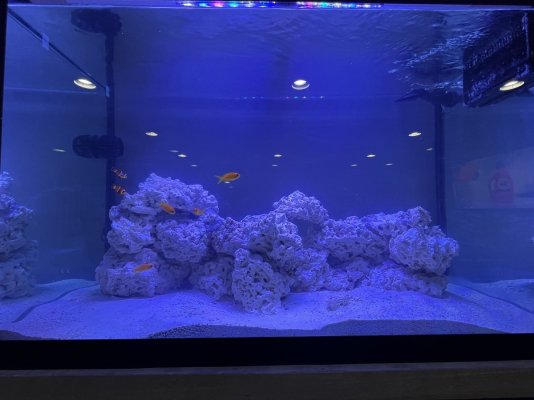
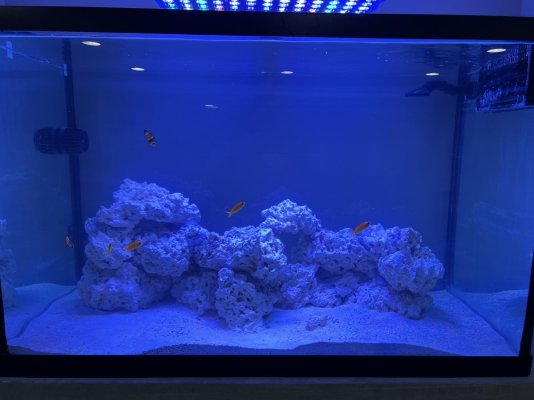
Since all systems were good, I added two Ocellaris clownfish to help with the ammonia process. Monitored them throughout the evening, all fish signs look good, no spikes in any test parameters. We are good - cycle has worked.
I kept tweaking the Apex, found that the temp probe wasn't calibrating properly on my phone app, so I logged into the website and set it there. Re-worked a few settings on the liquid level sensor, plumbed in the ATK system, filled the reservoir with RO/DI, made sure to program the EB832 port to always on, followed Suncrest_Reefs programming guide, everything looks good.
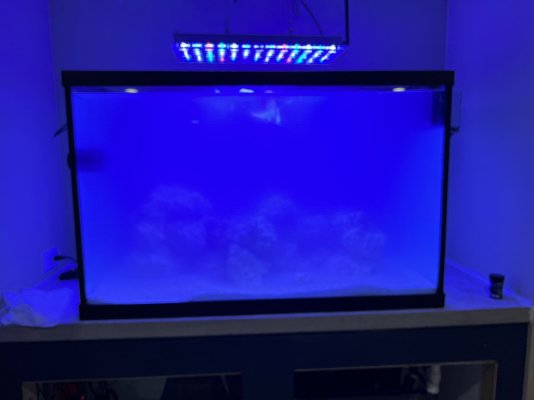
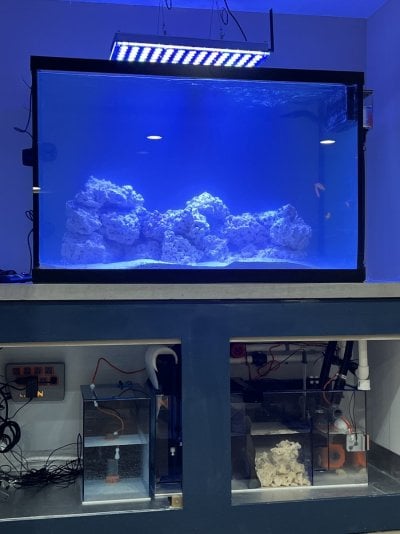
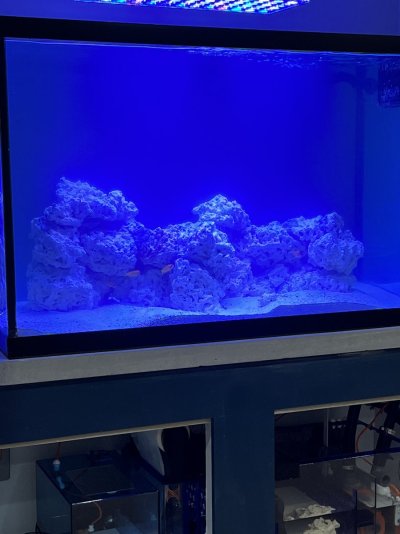
Fast forward 7 days, I'm not patient, went to LFS to see what they had in stock ... and oh my, they are LOADED with Lyretail Anthias - I love these fish, so pretty, vibrant, and active. Sure, I'd love to have 5 of them please. Added 1 male and 4 females to the tank. They are eating mysis and pellets, swimming all over, loving their new life. They play well with the two Clownfish as well.
Oh, and you'll be happy to know that I added a backflow valve to the return line. It's ugly as sin but at least now I won't flood my basement again. I'll add pictures of the tanks progress - I'm typing this on my laptop and those are on my phone.
Thanks for tuning in to the clown show that is my life!
pics?<Start Post 3>
With that debacle behind me, I focus on the cycle and getting all my parameters in check. Salinity is good 32.9 ppt, temperature seems good - Inkbird shows 73.8* but Apex shows 78.9*, huh weird but ok let's trust the Apex - day 1 of tank life over.
Day 2, all systems are stable, no leaks in the morning, let's go to work. Come home from work, check the tank again for leaks, no lea.... I'm going to be murdered by my wife, another leak. Ok, well this time we learned, return pump off, loc-line point to ceiling, drain water into Brute can below bulkhead, repair with pipe thread sealant, re-fill, turn things on, life is good.
Since all systems were good, I added two Ocellaris clownfish to help with the ammonia process. Monitored them throughout the evening, all fish signs look good, no spikes in any test parameters. We are good - cycle has worked.
I kept tweaking the Apex, found that the temp probe wasn't calibrating properly on my phone app, so I logged into the website and set it there. Re-worked a few settings on the liquid level sensor, plumbed in the ATK system, filled the reservoir with RO/DI, made sure to program the EB832 port to always on, followed Suncrest_Reefs programming guide, everything looks good.
Fast forward 7 days, I'm not patient, went to LFS to see what they had in stock ... and oh my, they are LOADED with Lyretail Anthias - I love these fish, so pretty, vibrant, and active. Sure, I'd love to have 5 of them please. Added 1 male and 4 females to the tank. They are eating mysis and pellets, swimming all over, loving their new life. They play well with the two Clownfish as well.
Oh, and you'll be happy to know that I added a backflow valve to the return line. It's ugly as sin but at least now I won't flood my basement again. I'll add pictures of the tanks progress - I'm typing this on my laptop and those are on my phone.
Thanks for tuning in to the clown show that is my life!
Also, a few slight equipment changes.
no skimmer, it wouldn’t fit
600W heaters are too long for the sump, went with dual 300W heaters instead.
TriggerSys 10g auto top off reservoir in cabinet.
LED strip lights in cabinet that also resemble a 70s disco when activated.
no skimmer, it wouldn’t fit
600W heaters are too long for the sump, went with dual 300W heaters instead.
TriggerSys 10g auto top off reservoir in cabinet.
LED strip lights in cabinet that also resemble a 70s disco when activated.
Attachments
-
 16F42F21-2D44-49CE-9B4B-CE17B187F76A.jpeg132.1 KB · Views: 72
 -
 F1319844-EC5E-4ED9-93E5-8899C3066167.jpeg135.4 KB · Views: 71
 -
 C47DB70F-9867-4527-85A0-B297B81BD5A5.jpeg136 KB · Views: 66
 -
 9F8207A5-2459-4398-89AB-6B39FD49097B.jpeg133 KB · Views: 75
 -
 410BD926-6E60-444F-A4DD-3767F10F0EE7.jpeg125.1 KB · Views: 74
 -
 0743C533-944B-4409-8AD0-5F12EF5BE4A4.jpeg199.7 KB · Views: 66
 -
 2D63CD0A-30AE-44D1-B35C-87E6FB77A581.jpeg199.2 KB · Views: 71
 -
 EB6D6E85-E6B5-4656-B8D8-9BDBDE97DBCF.jpeg138.2 KB · Views: 72
More pics
Attachments
-
 334446DC-B35F-4515-BB69-96D4C45474C5.jpeg143.3 KB · Views: 74
 -
 539C6469-1456-4BDB-A8D7-152961D13D44.jpeg141.5 KB · Views: 70
 -
 9136DB39-1945-40DE-A1E2-091D9A7421DF.jpeg130.6 KB · Views: 64
 -
 1BD92201-5AC2-45A7-BFB8-7068BB8FC815.jpeg63.7 KB · Views: 66
 -
 E87CE523-68C4-4F95-A45F-BBEC4C0857D3.jpeg146.9 KB · Views: 63
 -
 EE687E83-E615-457C-9B74-DDB00FF4274D.jpeg133.5 KB · Views: 62
Similar threads
- Replies
- 21
- Views
- 434
- Replies
- 4
- Views
- 159
- Replies
- 8
- Views
- 654
TOP 10 Trending Threads
-
- Poll
- Replies
- 32
- Views
- 446
- Replies
- 54
- Views
- 1,113
- Replies
- 64
- Views
- 521
- Question
- Replies
- 65
- Views
- 683
- Replies
- 51
- Views
- 512
- Replies
- 36
- Views
- 378
- Replies
- 31
- Views
- 398
- Replies
- 106
- Views
- 1,744
- Replies
- 29
- Views
- 473
- Replies
- 26
- Views
- 369


