Neat. I like it. No need for a fancy sump this large but tagging along. I just moved into our first home and will be getting into acrylic again soon. A nice fluorescent purple rim on a sump would be pretty cool 

Follow along with the video below to see how to install our site as a web app on your home screen.
Note: This feature may not be available in some browsers.


Thanks man! Surprisingly enough my at cost is REALLY reasonable, so if you ever want to get one "at cost" for your tank give me a PM, I am looking for a couple of people to get one after I do quality checks so they can give me feedback, in addition to mine. I have Blue, Green, Orange, Yellow, Red, and Purple! I am building a nano one for my office tank so I will post that too. Appreciate the kind wordsNeat. I like it. No need for a fancy sump this large but tagging along. I just moved into our first home and will be getting into acrylic again soon. A nice fluorescent purple rim on a sump would be pretty cool
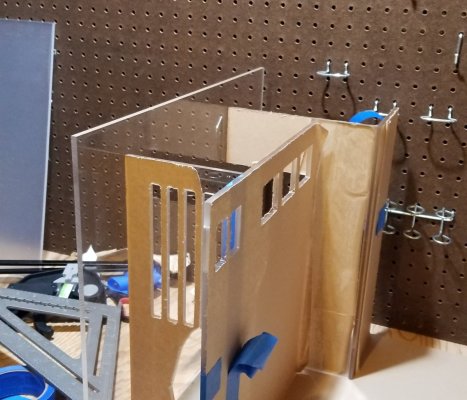
ALSO, Congrats on the home! I am 23 and looking for my first as well and boy has Grand Rapids gotten expensive in the last 8 years, homes went up by like 83k average hoping the market pops a tiny bitSorry, I don't. The laser uses heat to cut the acrylic so flame polishing the edges is not required. You can see some of the acrylic work I did on my 60g cube in my old build thread. The Salt Shield warped within a week, but it was only done out of 1/8" cast acrylic. The auto feeder shelf and shut is still in use today with no warping, it is 1/4" cast acrylic. I think it has not warped because it has has all of the vertical pieces to counter act the warping. The "screen" for the top of the tank was also made out of 1/4" cast acrylic and it had not warped when I removed it from the tank (the original tank sprung a leak and the new tank had a slightly different sized opening so the screen no longer fit). I think the combination of the vertical sections along the outer edges and the holes (to let moisture through) keep them from warping as well.Yes I noticed that with some of the baffles, the rim is entirely sanded and then polished by the shop that does the CNC work, and since the baffles are bonded on all 4 corners, I have my work cut out. Biggest problem now is finding Weld on 4 locally, OF COURSE lol. Will probably have to just order online. Do you have any experience with torch polishing corners?

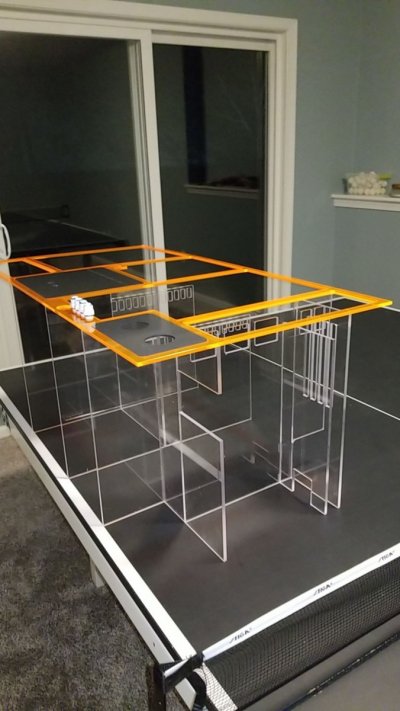
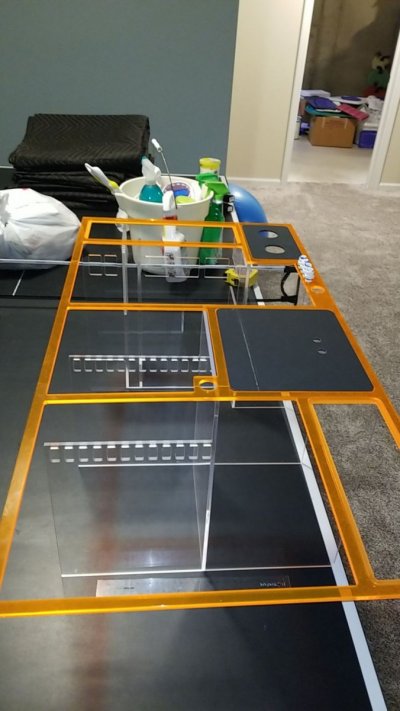
I see, you were using the numbering that I had in my drawing for cutting measurements. Rim helps separate chambersI'm also not 100% sure I understand all of your different chambers on the sump layout...
1. Drain area from the DT
2. Filter sock chamber
3. Skimmer chamber
4. ATO tank
5. ???
6. ???
7. Return pump?
Yeah I had looked into laser cutting before I discovered Sign Shops are very capable with acrylic, I will have to call around the 20 again and see who has a laser for the next builds. Yeah I tackled warping with pvc lids, and having every baffle make contact with the rim, don't know if I will bond the tops to the rim if they are just their for support. Definitely appreciate the foresightSorry, I don't. The laser uses heat to cut the acrylic so flame polishing the edges is not required. You can see some of the acrylic work I did on my 60g cube in my old build thread. The Salt Shield warped within a week, but it was only done out of 1/8" cast acrylic. The auto feeder shelf and shut is still in use today with no warping, it is 1/4" cast acrylic. I think it has not warped because it has has all of the vertical pieces to counter act the warping. The "screen" for the top of the tank was also made out of 1/4" cast acrylic and it had not warped when I removed it from the tank (the original tank sprung a leak and the new tank had a slightly different sized opening so the screen no longer fit). I think the combination of the vertical sections along the outer edges and the holes (to let moisture through) keep them from warping as well.

Thanks. This is similar to how I was thinking of designing my sump for the 200+ FOWLR build I'm working on. I do not plan on running a refugium and my ATO tank is a 25g in a different room, so I would not need those two chambers.I see, you were using the numbering that I had in my drawing for cutting measurements. Rim helps separate chambers
1. Crash area/drain from DT ( top right of the rim, has two bulk heads)
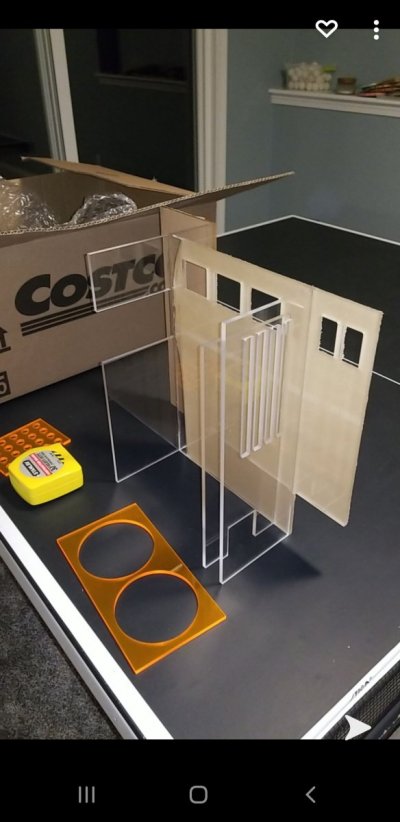
2.Filter Sock Chamber, goes through the filter socks, down through a panel, up through a bubble trap, through some slits and goes down a marine pure ball chamber, or biological media of your choice) second chamber highlighted by the rim on the second far left section/
3. Skimmer, Media Reactor, dosing chamber
4.Ato tank is the top middle section
5. In front of the ATO Chamber is the return pump ( I could move these two chambers to the end, but I wanted my refugium on the end so that I can split the flow 75/25 from the DT, 25% goes to the refugium)
6/7. Refugium. 10 gallons filled. 7 is the area with the lid and bulkhead preventing splash and salt creep
I figured having it go mechanical filtration (socks), biological filtration (marine pure balls), and then the mechanical/chemical filtration (skimmer/reactor) picking up excess bacteria and fine waste particles would make for a clean sump/system. All chambers including the holder for the filter socks, and marine pure balls are accessible for cleaning.
Lasers actually cut with a slight bevel to them, so they are really only good for cutting openings for water to pass though. That and engraving designs/logo into the acrylic. If you get around to engraving (either laser or CNC router) on clear acrylic, mirror the image and engrave from the back side. That will give you a much nicer finish to the engraving. If the engraving is below water level, it does add to the areas that needs to be cleaned from time to time.Yeah I had looked into laser cutting before I discovered Sign Shops are very capable with acrylic, I will have to call around the 20 again and see who has a laser for the next builds. Yeah I tackled warping with pvc lids, and having every baffle make contact with the rim, don't know if I will bond the tops to the rim if they are just their for support. Definitely appreciate the foresight
I definitely will look into that for my logo possibly being engraved into the front panel by the refugium or return chamberLasers actually cut with a slight bevel to them, so they are really only good for cutting openings for water to pass though. That and engraving designs/logo into the acrylic. If you get around to engraving (either laser or CNC router) on clear acrylic, mirror the image and engrave from the back side. That will give you a much nicer finish to the engraving. If the engraving is below water level, it does add to the areas that needs to be cleaned from time to time.


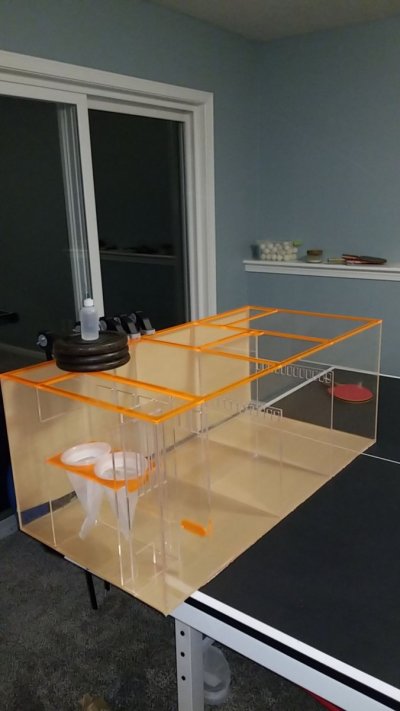
My comment - it looks 'nice'. The question to me is will it be more functional than other sumps on the market? Will the Skimmer container be large enough, will the return area be large enough? What size tank are you aiming for (the display tank) - will that limit your market? Not saying this to be critical - but - it seems like a lot of time is being spent making it look good - but I would suggest you use it with your prototype for a fair length of time once you're actually doing maintenance in the sump, etc - as compared to trying to think all of these things out before its even made. Just a comment.No I understand where you are coming from, thankfully I have access to someone with contacts in the sump industry since they own a service shop, so I get to hear all about what materials not to use. Also, a quick search online can vouch for the fact that chemcast is black listed in the sump industry. I am meeting with Plexicase Tuesday to do just that in fact so I am excited to come closer to a final physical proto-type.
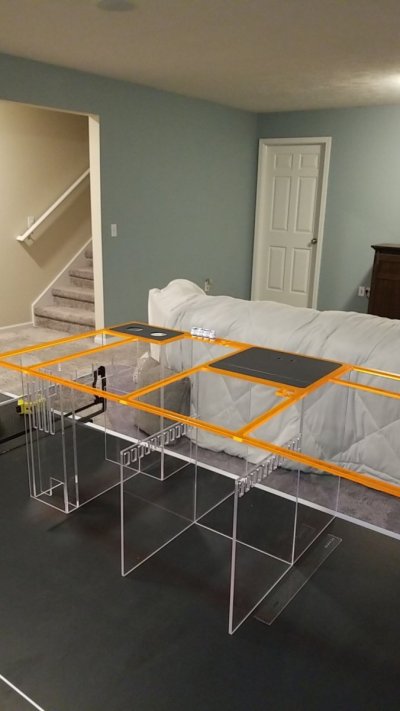
Thank you, it is on a 150 right now, can handle flow up to a 250 gallon display tank, fits anything in-between and lower. Skimmer chamber is large enough for several brands like Eshopps, Reef Octopus, Aquavitros new skimmer, etc. Return area is 9"x9"x11", plenty of room for most return pumps that would be needed on a 55-250 gal. A lot of time went into the planning too. The prototype is running for 6 months but I am fairly confident in the bonding as every edge came out with a mirror finish when the weld on 4 was applied, all it comes down to is running it so any changes I have to the files, I can make them within that time frame.My comment - it looks 'nice'. The question to me is will it be more functional than other sumps on the market? Will the Skimmer container be large enough, will the return area be large enough? What size tank are you aiming for (the display tank) - will that limit your market? Not saying this to be critical - but - it seems like a lot of time is being spent making it look good - but I would suggest you use it with your prototype for a fair length of time once you're actually doing maintenance in the sump, etc - as compared to trying to think all of these things out before its even made. Just a comment.

the colored part is an 1" wide, it doesn't inhibit any maintenance. I have a pretty average cabinet space and was able to work fairly easy removing and replacing skimmer, and I do have a fairly large skimmer, working on the return pump, removing compartments like the sock holder, all lids remove. I listed all of the chambers in the first page incase you care to look, appreciate the questionsAlso curious - is the colored part removable for easier cleaning? Depending on the size of the skimmer - and the height of the cabinet (i.e. the opening below the tank - I can see an issue working with that many comparments/lids while its actually under the tank and working. I.e. Lifting out the skimmer to clean the whole thing - but as some others have said - I don't exactly where things are supposed to go. Good luck with the project.