What do you guys do for doors on diy stand? I really want a sleek modern design since it's going into my living room. Something like a red sea stand. I seen someone use Ikea doors

Navigation
Install the app
How to install the app on iOS
Follow along with the video below to see how to install our site as a web app on your home screen.
Note: This feature may not be available in some browsers.
More options
You are using an out of date browser. It may not display this or other websites correctly.
You should upgrade or use an alternative browser.
You should upgrade or use an alternative browser.
Doors for diy stand?
- Thread starter Heres_doe_
- Start date
- Tagged users None


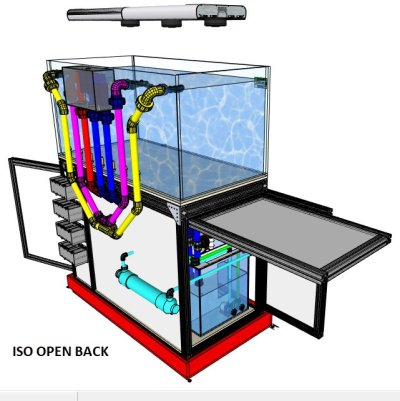
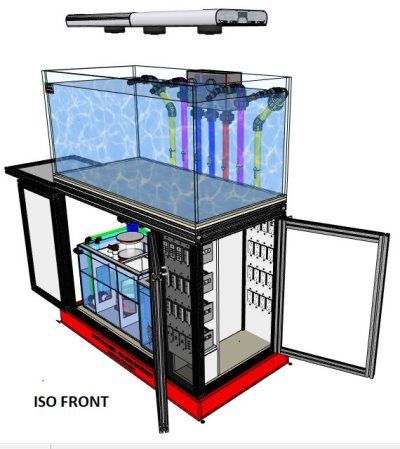
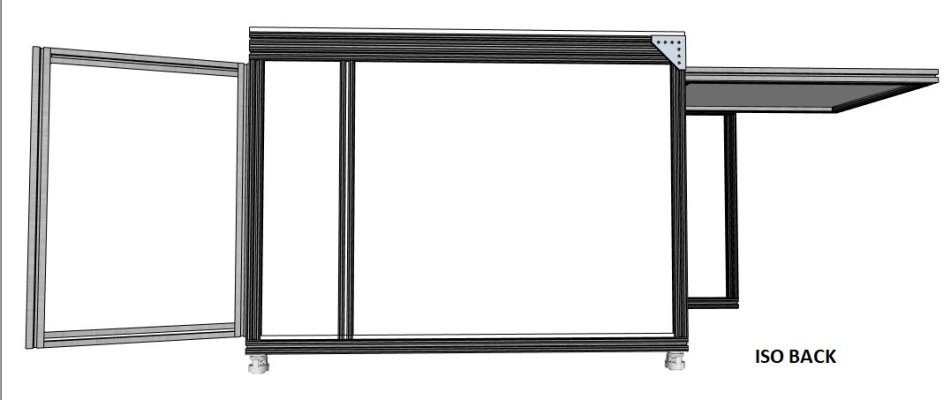
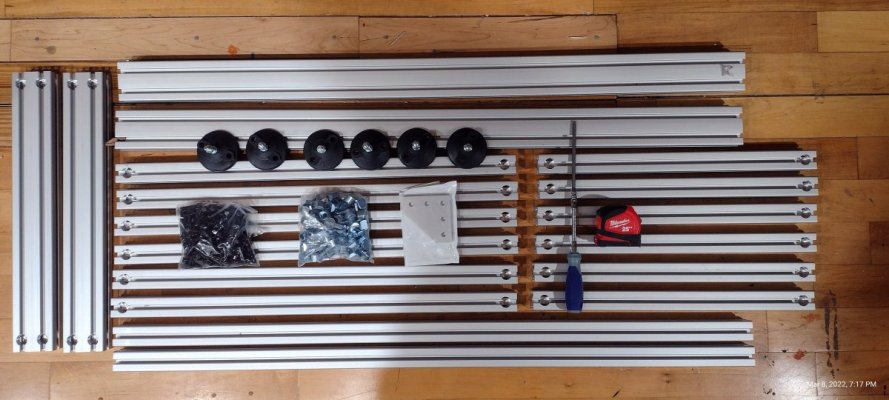
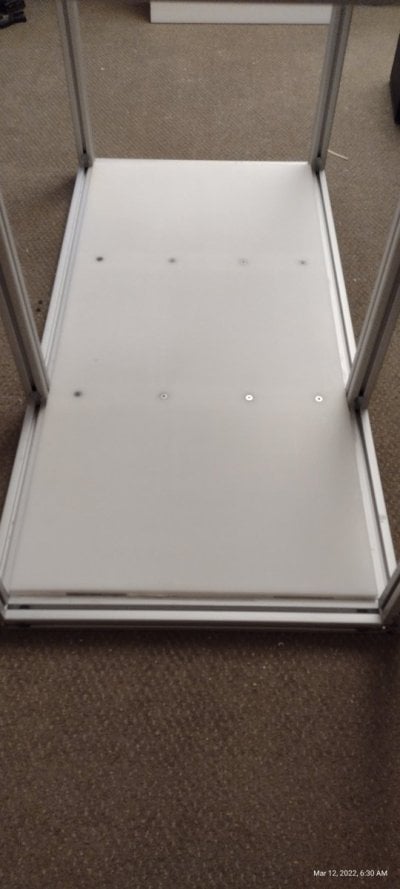
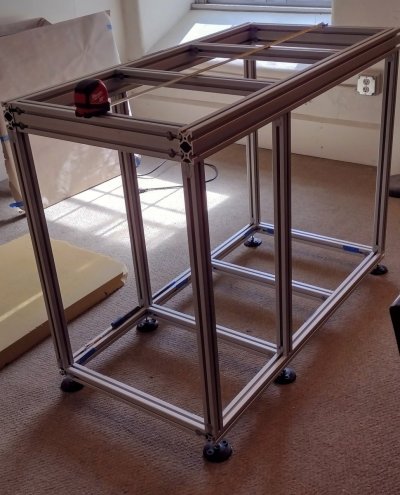
I designed my stand after seeing what Tidal Gardens did with all their builds. Made from 20/20 aluminum extrusion. It's probably the strongest, most durable dead accurate to the millimeter cabinet you could possibly make. It's not cheap but considering it would outlive your own life, I think it's money well spent. Here are the plans for my build. All the components would remain the same just the sizes would be different. Everything is cut to size perfectly. By far the least expensive place to get these components are from.
https://www.tnutz.com/product/ex-1515/
wherever you buy it from, it's all standard sizes within a given specification. For instance, 1.5 inch by 1.5 inch extrusion is named 1515, 1.5 inch by 3 in is named 1530 etc. Definitely be sure to also check out...
https://8020.net/1515.html
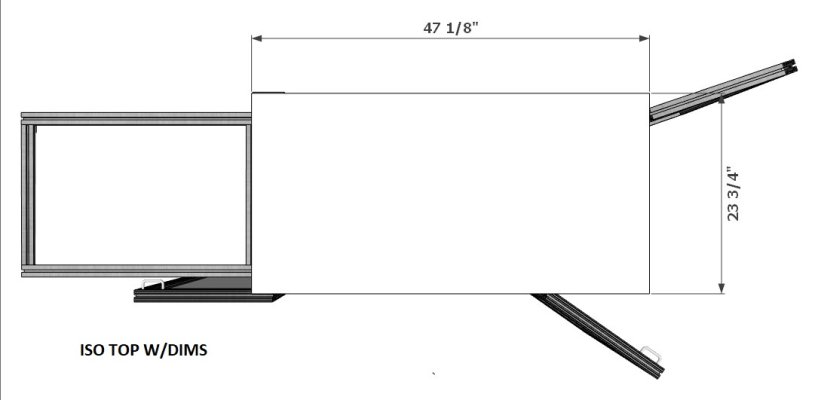
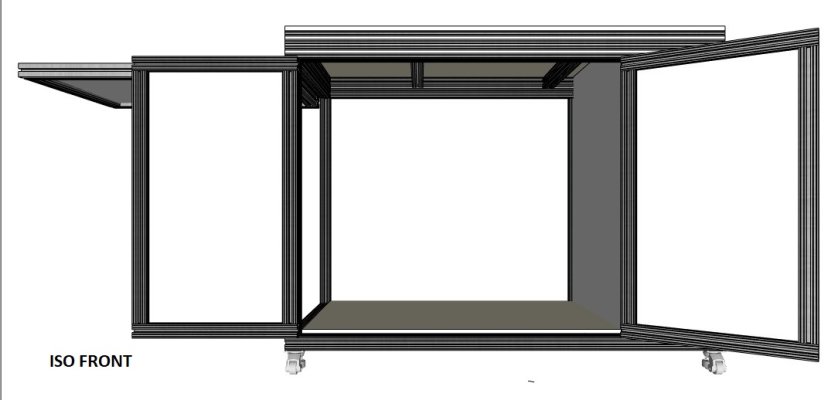
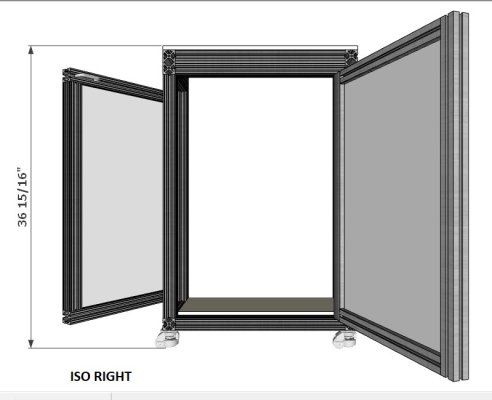
80/20 are the leaders in the industry and are the originators of this type of extrusion. The resources they have are phenomenal, but they are also the most expensive. 1515 from tnutzs is what I used for the vertical, bottom trusses horizontal supports and the four door frames. I used 1530 for the top frame to eliminate any deflection from a 4 ft, 108 gallon tank. No center supports were needed which is very nice. I also wanted to have access to the front and both sides, with the left side opening upwards. This upward opening door allows it to become a functional tabletop with a simple drop down leg to support it. Total cost of this with all the hardware needed which includes fasteners hinges t-nuts and bolts etc, $848. This cost did not include the 1/4 inch white acrylic panels that fit snugly into the slots of the door frames. They also are not cheap. The greatest place for this with hundreds of other choices than white is...
https://www.canalplastic.com/collec...hite-opaque-acrylic-sheet?variant=32920760654
(4) 18x32 panels at $40.50 each was $162. These were slightly oversized but were very easily cut to size with a table saw. You can cut them to the exact dimension if you need to.
A very nice cost saving alternative would be quarter inch plywood. This could then be laminated with whatever you choose. A sheet of what's known as FRP, which is widely used in commercial kitchens to waterproof walls and make them easily cleanable can be purchased at the big boxes. A 4 ft x 8 ft sheet is right around $25.
For the back side of the cabinet I chose to use 3/4 in birch plywood, laminated with the FRP mentioned above. This is useful to anchor some screws into if and when you need to. About $85. This was cut out and made to fit on the inside of the frame.

Standard leveling feet designed specifically for the aluminum extrusion are pretty cheap. The total deflection across the 4 ft beam carrying an approximate load of 1400 lb is negligible with 1530 extrusion. With this only the corners need support. I chose to use machine leveling casters instead. This turned out to be an awesome choice, they look pretty sleek and if necessary I could roll the tank around. Don't try to save money here, I tried that and ended up sending the junk back and replacing them with these, $90...
Again, not cheap, but you said you wanted sleek!
The top and bottom floors are 1/2 in thick HDPE. Several drain holes were drilled into the bottom floor. A 2 ft by 4 ft sheet of this is about $130 each. With the exception of the rear panel, everything in this cabinet is corrosion resistant. I purchased these sheets from Amazon but you could find a less expensive supplier or an alternative.
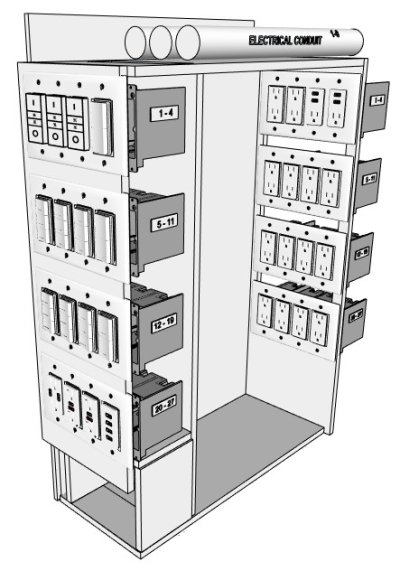
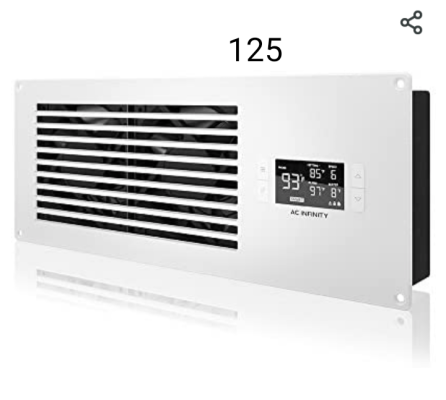
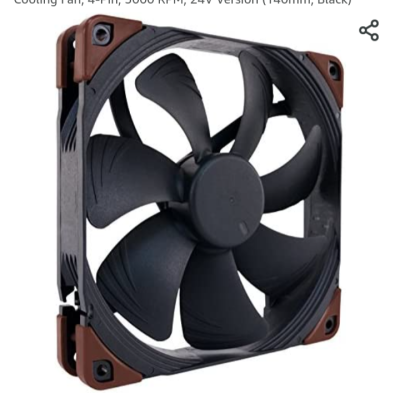
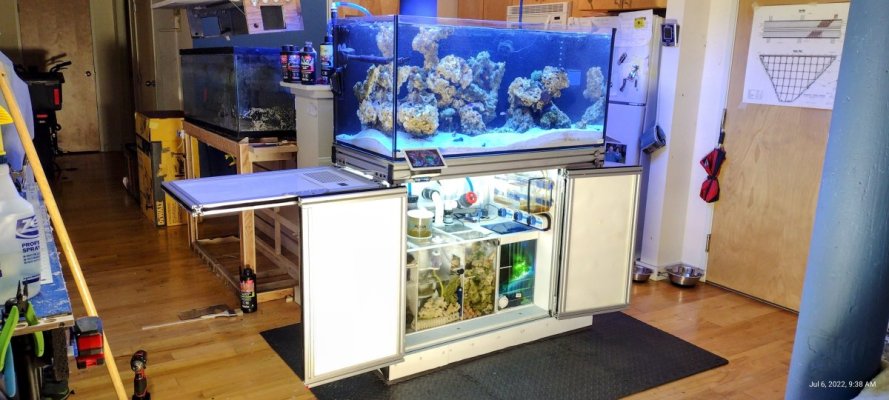
To keep things nice and dry I installed a dual fan panel inside the left door/table and a high output Noctua fan in the right side of the cabinet which is partitioned off from the sump area. This is where all the electronics/power supplies are housed, the "dry side." $120 + $32
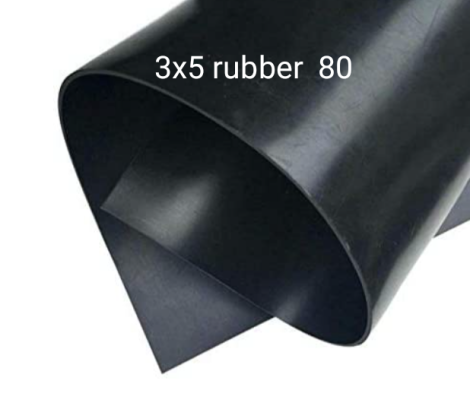
In the event that water escapes, and it will escape, a rubber bladder is installed around the perimeter of the frame in the height made available with the space created by the 4-in machine casters. Water would effectively drain through the holes drilled into the floor and hopefully not fill the approximate 32 gallons of containment underneath. The attachment of this rubber bladder is ridiculously easy with the discovery that the quarter inch acrylic scraps left over were able to be used as an extremely effective wedge pinching the rubber inside the slot of the extrusion. As an added bonus the aluminum extrusions slot acts as a very effective gutter which I also drilled a few drain holes into making it virtually impossible for water to extend beyond the footprint of the cabinet frame. 36-in x 5 ft neoprene rubber, about $80.
Lastly to satisfy your desire for sweetness and perhaps little bling as I do fancy led strip lighting was installed on the ceilings of both compartments both controlled by a motion sensor. I used colored strip lights made by GE Cync (3) $120, and (2) motion switches, $60
That's about it. Total cost of build, $1855.00. This was a fun build, fairly simple, very elegant, extremely robust and dead accurate to the millimeter. Working with aluminum extrusion will definitely make you question why you ever had anything ever made out of wood. Enjoy!
https://www.tnutz.com/product/ex-1515/
wherever you buy it from, it's all standard sizes within a given specification. For instance, 1.5 inch by 1.5 inch extrusion is named 1515, 1.5 inch by 3 in is named 1530 etc. Definitely be sure to also check out...
https://8020.net/1515.html
80/20 are the leaders in the industry and are the originators of this type of extrusion. The resources they have are phenomenal, but they are also the most expensive. 1515 from tnutzs is what I used for the vertical, bottom trusses horizontal supports and the four door frames. I used 1530 for the top frame to eliminate any deflection from a 4 ft, 108 gallon tank. No center supports were needed which is very nice. I also wanted to have access to the front and both sides, with the left side opening upwards. This upward opening door allows it to become a functional tabletop with a simple drop down leg to support it. Total cost of this with all the hardware needed which includes fasteners hinges t-nuts and bolts etc, $848. This cost did not include the 1/4 inch white acrylic panels that fit snugly into the slots of the door frames. They also are not cheap. The greatest place for this with hundreds of other choices than white is...
https://www.canalplastic.com/collec...hite-opaque-acrylic-sheet?variant=32920760654
(4) 18x32 panels at $40.50 each was $162. These were slightly oversized but were very easily cut to size with a table saw. You can cut them to the exact dimension if you need to.
A very nice cost saving alternative would be quarter inch plywood. This could then be laminated with whatever you choose. A sheet of what's known as FRP, which is widely used in commercial kitchens to waterproof walls and make them easily cleanable can be purchased at the big boxes. A 4 ft x 8 ft sheet is right around $25.
For the back side of the cabinet I chose to use 3/4 in birch plywood, laminated with the FRP mentioned above. This is useful to anchor some screws into if and when you need to. About $85. This was cut out and made to fit on the inside of the frame.
Columbia Forest Products 3/4 in. x 4 ft. x 8 ft. PureBond Birch Plywood 165921 - The Home Depot
Veneered construction gives these decorative PureBond Birch Plywood Project Panels the strength, flatness and rigidity to satisfy the most discerning craftsman. Each 7-ply sheet is assembled with a soy-based
www.homedepot.com
Standard leveling feet designed specifically for the aluminum extrusion are pretty cheap. The total deflection across the 4 ft beam carrying an approximate load of 1400 lb is negligible with 1530 extrusion. With this only the corners need support. I chose to use machine leveling casters instead. This turned out to be an awesome choice, they look pretty sleek and if necessary I could roll the tank around. Don't try to save money here, I tried that and ended up sending the junk back and replacing them with these, $90...
Again, not cheap, but you said you wanted sleek!
The top and bottom floors are 1/2 in thick HDPE. Several drain holes were drilled into the bottom floor. A 2 ft by 4 ft sheet of this is about $130 each. With the exception of the rear panel, everything in this cabinet is corrosion resistant. I purchased these sheets from Amazon but you could find a less expensive supplier or an alternative.
To keep things nice and dry I installed a dual fan panel inside the left door/table and a high output Noctua fan in the right side of the cabinet which is partitioned off from the sump area. This is where all the electronics/power supplies are housed, the "dry side." $120 + $32
In the event that water escapes, and it will escape, a rubber bladder is installed around the perimeter of the frame in the height made available with the space created by the 4-in machine casters. Water would effectively drain through the holes drilled into the floor and hopefully not fill the approximate 32 gallons of containment underneath. The attachment of this rubber bladder is ridiculously easy with the discovery that the quarter inch acrylic scraps left over were able to be used as an extremely effective wedge pinching the rubber inside the slot of the extrusion. As an added bonus the aluminum extrusions slot acts as a very effective gutter which I also drilled a few drain holes into making it virtually impossible for water to extend beyond the footprint of the cabinet frame. 36-in x 5 ft neoprene rubber, about $80.
Lastly to satisfy your desire for sweetness and perhaps little bling as I do fancy led strip lighting was installed on the ceilings of both compartments both controlled by a motion sensor. I used colored strip lights made by GE Cync (3) $120, and (2) motion switches, $60
That's about it. Total cost of build, $1855.00. This was a fun build, fairly simple, very elegant, extremely robust and dead accurate to the millimeter. Working with aluminum extrusion will definitely make you question why you ever had anything ever made out of wood. Enjoy!
Attachments
-
 Screenshot (27).jpg118.1 KB · Views: 94
 -
 Screenshot (25).jpg110.8 KB · Views: 76
 -
 Screenshot (29).jpg76.6 KB · Views: 63
 -
 Screenshot (20).jpg43.9 KB · Views: 69
 -
 Screenshot (18).jpg99.5 KB · Views: 54
 -
 Screenshot (23).jpg59.2 KB · Views: 48
 -
 Screenshot (21).jpg69 KB · Views: 42
 -
 Screenshot (22).jpg69.3 KB · Views: 43
 -
 IMG_20220308_191727683~2.jpg146.5 KB · Views: 45
 -
 IMG_20220312_063023302.jpg78.8 KB · Views: 43
 -
 Screenshot_20220622-074949-972.png143.1 KB · Views: 40
 -
 Screenshot_20220815-153014-784.png365.5 KB · Views: 56
 -
 IMG_20220504_155432915~3.jpg35.8 KB · Views: 46
 -
 Screenshot_20220622-074725-617.png205.4 KB · Views: 65
 -
 IMG_20220310_093642942_HDR~4.jpg224.3 KB · Views: 62

I made my own doors for my stand. The first 4 photos are of the doors before assembly and after assembly. The narrow doors are used on the back and are too narrow for a raised panel. The last photo is the tank with the doors attached and stained.


Last edited:

OP
OP
Those look great manI made my own doors for my stand. The first 4 photos are of the doors before assembly and after assembly. The narrow doors are used on the back and are too narrow for a raised panel. The last photo is the tank with the doors attached and stained.
OP
OP
I designed my stand after seeing what Tidal Gardens did with all their builds. Made from 20/20 aluminum extrusion. It's probably the strongest, most durable dead accurate to the millimeter cabinet you could possibly make. It's not cheap but considering it would outlive your own life, I think it's money well spent. Here are the plans for my build. All the components would remain the same just the sizes would be different. Everything is cut to size perfectly. By far the least expensive place to get these components are from.
https://www.tnutz.com/product/ex-1515/
wherever you buy it from, it's all standard sizes within a given specification. For instance, 1.5 inch by 1.5 inch extrusion is named 1515, 1.5 inch by 3 in is named 1530 etc. Definitely be sure to also check out...
https://8020.net/1515.html
80/20 are the leaders in the industry and are the originators of this type of extrusion. The resources they have are phenomenal, but they are also the most expensive. 1515 from tnutzs is what I used for the vertical, bottom trusses horizontal supports and the four door frames. I used 1530 for the top frame to eliminate any deflection from a 4 ft, 108 gallon tank. No center supports were needed which is very nice. I also wanted to have access to the front and both sides, with the left side opening upwards. This upward opening door allows it to become a functional tabletop with a simple drop down leg to support it. Total cost of this with all the hardware needed which includes fasteners hinges t-nuts and bolts etc, $848. This cost did not include the 1/4 inch white acrylic panels that fit snugly into the slots of the door frames. They also are not cheap. The greatest place for this with hundreds of other choices than white is...
https://www.canalplastic.com/collec...hite-opaque-acrylic-sheet?variant=32920760654
(4) 18x32 panels at $40.50 each was $162. These were slightly oversized but were very easily cut to size with a table saw. You can cut them to the exact dimension if you need to.
A very nice cost saving alternative would be quarter inch plywood. This could then be laminated with whatever you choose. A sheet of what's known as FRP, which is widely used in commercial kitchens to waterproof walls and make them easily cleanable can be purchased at the big boxes. A 4 ft x 8 ft sheet is right around $25.
For the back side of the cabinet I chose to use 3/4 in birch plywood, laminated with the FRP mentioned above. This is useful to anchor some screws into if and when you need to. About $85. This was cut out and made to fit on the inside of the frame.
Columbia Forest Products 3/4 in. x 4 ft. x 8 ft. PureBond Birch Plywood 165921 - The Home Depot
Veneered construction gives these decorative PureBond Birch Plywood Project Panels the strength, flatness and rigidity to satisfy the most discerning craftsman. Each 7-ply sheet is assembled with a soy-basedwww.homedepot.com
Standard leveling feet designed specifically for the aluminum extrusion are pretty cheap. The total deflection across the 4 ft beam carrying an approximate load of 1400 lb is negligible with 1530 extrusion. With this only the corners need support. I chose to use machine leveling casters instead. This turned out to be an awesome choice, they look pretty sleek and if necessary I could roll the tank around. Don't try to save money here, I tried that and ended up sending the junk back and replacing them with these, $90...
Again, not cheap, but you said you wanted sleek!
The top and bottom floors are 1/2 in thick HDPE. Several drain holes were drilled into the bottom floor. A 2 ft by 4 ft sheet of this is about $130 each. With the exception of the rear panel, everything in this cabinet is corrosion resistant. I purchased these sheets from Amazon but you could find a less expensive supplier or an alternative.
To keep things nice and dry I installed a dual fan panel inside the left door/table and a high output Noctua fan in the right side of the cabinet which is partitioned off from the sump area. This is where all the electronics/power supplies are housed, the "dry side." $120 + $32
In the event that water escapes, and it will escape, a rubber bladder is installed around the perimeter of the frame in the height made available with the space created by the 4-in machine casters. Water would effectively drain through the holes drilled into the floor and hopefully not fill the approximate 32 gallons of containment underneath. The attachment of this rubber bladder is ridiculously easy with the discovery that the quarter inch acrylic scraps left over were able to be used as an extremely effective wedge pinching the rubber inside the slot of the extrusion. As an added bonus the aluminum extrusions slot acts as a very effective gutter which I also drilled a few drain holes into making it virtually impossible for water to extend beyond the footprint of the cabinet frame. 36-in x 5 ft neoprene rubber, about $80.
Lastly to satisfy your desire for sweetness and perhaps little bling as I do fancy led strip lighting was installed on the ceilings of both compartments both controlled by a motion sensor. I used colored strip lights made by GE Cync (3) $120, and (2) motion switches, $60
That's about it. Total cost of build, $1855.00. This was a fun build, fairly simple, very elegant, extremely robust and dead accurate to the millimeter. Working with aluminum extrusion will definitely make you question why you ever had anything ever made out of wood. Enjoy!
I wanted this but these are so expensive man
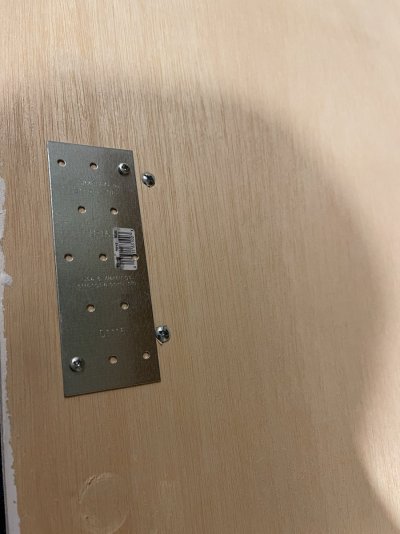
You could always recess magnets into the stand and just make a solid panel that is held on by the magnets and metal tabs instead of trying to mount and level a set of doors!

OP
OP
Exactly what I was thinking i think I'm just going to laminate plywood and put some magnets and call it a dayYou could always recess magnets into the stand and just make a solid panel that is held on by the magnets and metal tabs instead of trying to mount and level a set of doors!
I designed my stand after seeing what Tidal Gardens did with all their builds. Made from 20/20 aluminum extrusion. It's probably the strongest, most durable dead accurate to the millimeter cabinet you could possibly make. It's not cheap but considering it would outlive your own life, I think it's money well spent. Here are the plans for my build. All the components would remain the same just the sizes would be different. Everything is cut to size perfectly. By far the least expensive place to get these components are from.
https://www.tnutz.com/product/ex-1515/
wherever you buy it from, it's all standard sizes within a given specification. For instance, 1.5 inch by 1.5 inch extrusion is named 1515, 1.5 inch by 3 in is named 1530 etc. Definitely be sure to also check out...
https://8020.net/1515.html
80/20 are the leaders in the industry and are the originators of this type of extrusion. The resources they have are phenomenal, but they are also the most expensive. 1515 from tnutzs is what I used for the vertical, bottom trusses horizontal supports and the four door frames. I used 1530 for the top frame to eliminate any deflection from a 4 ft, 108 gallon tank. No center supports were needed which is very nice. I also wanted to have access to the front and both sides, with the left side opening upwards. This upward opening door allows it to become a functional tabletop with a simple drop down leg to support it. Total cost of this with all the hardware needed which includes fasteners hinges t-nuts and bolts etc, $848. This cost did not include the 1/4 inch white acrylic panels that fit snugly into the slots of the door frames. They also are not cheap. The greatest place for this with hundreds of other choices than white is...
https://www.canalplastic.com/collec...hite-opaque-acrylic-sheet?variant=32920760654
(4) 18x32 panels at $40.50 each was $162. These were slightly oversized but were very easily cut to size with a table saw. You can cut them to the exact dimension if you need to.
A very nice cost saving alternative would be quarter inch plywood. This could then be laminated with whatever you choose. A sheet of what's known as FRP, which is widely used in commercial kitchens to waterproof walls and make them easily cleanable can be purchased at the big boxes. A 4 ft x 8 ft sheet is right around $25.
For the back side of the cabinet I chose to use 3/4 in birch plywood, laminated with the FRP mentioned above. This is useful to anchor some screws into if and when you need to. About $85. This was cut out and made to fit on the inside of the frame.
Columbia Forest Products 3/4 in. x 4 ft. x 8 ft. PureBond Birch Plywood 165921 - The Home Depot
Veneered construction gives these decorative PureBond Birch Plywood Project Panels the strength, flatness and rigidity to satisfy the most discerning craftsman. Each 7-ply sheet is assembled with a soy-basedwww.homedepot.com
Standard leveling feet designed specifically for the aluminum extrusion are pretty cheap. The total deflection across the 4 ft beam carrying an approximate load of 1400 lb is negligible with 1530 extrusion. With this only the corners need support. I chose to use machine leveling casters instead. This turned out to be an awesome choice, they look pretty sleek and if necessary I could roll the tank around. Don't try to save money here, I tried that and ended up sending the junk back and replacing them with these, $90...
Again, not cheap, but you said you wanted sleek!
The top and bottom floors are 1/2 in thick HDPE. Several drain holes were drilled into the bottom floor. A 2 ft by 4 ft sheet of this is about $130 each. With the exception of the rear panel, everything in this cabinet is corrosion resistant. I purchased these sheets from Amazon but you could find a less expensive supplier or an alternative.
To keep things nice and dry I installed a dual fan panel inside the left door/table and a high output Noctua fan in the right side of the cabinet which is partitioned off from the sump area. This is where all the electronics/power supplies are housed, the "dry side." $120 + $32
In the event that water escapes, and it will escape, a rubber bladder is installed around the perimeter of the frame in the height made available with the space created by the 4-in machine casters. Water would effectively drain through the holes drilled into the floor and hopefully not fill the approximate 32 gallons of containment underneath. The attachment of this rubber bladder is ridiculously easy with the discovery that the quarter inch acrylic scraps left over were able to be used as an extremely effective wedge pinching the rubber inside the slot of the extrusion. As an added bonus the aluminum extrusions slot acts as a very effective gutter which I also drilled a few drain holes into making it virtually impossible for water to extend beyond the footprint of the cabinet frame. 36-in x 5 ft neoprene rubber, about $80.
Lastly to satisfy your desire for sweetness and perhaps little bling as I do fancy led strip lighting was installed on the ceilings of both compartments both controlled by a motion sensor. I used colored strip lights made by GE Cync (3) $120, and (2) motion switches, $60
That's about it. Total cost of build, $1855.00. This was a fun build, fairly simple, very elegant, extremely robust and dead accurate to the millimeter. Working with aluminum extrusion will definitely make you question why you ever had anything ever made out of wood. Enjoy!
Do you have a picture of the stand all closed up and finished?
These do look amazing ! If you search on Google you can just buy cabinet doors. That's what I'm leaning towards doing. Why not this route?Those look great man

- Joined
- Apr 1, 2018
- Messages
- 438
- Reaction score
- 388
I designed my stand after seeing what Tidal Gardens did with all their builds. Made from 20/20 aluminum extrusion. It's probably the strongest, most durable dead accurate to the millimeter cabinet you could possibly make. It's not cheap but considering it would outlive your own life, I think it's money well spent. Here are the plans for my build. All the components would remain the same just the sizes would be different. Everything is cut to size perfectly. By far the least expensive place to get these components are from.
https://www.tnutz.com/product/ex-1515/
wherever you buy it from, it's all standard sizes within a given specification. For instance, 1.5 inch by 1.5 inch extrusion is named 1515, 1.5 inch by 3 in is named 1530 etc. Definitely be sure to also check out...
https://8020.net/1515.html
80/20 are the leaders in the industry and are the originators of this type of extrusion. The resources they have are phenomenal, but they are also the most expensive. 1515 from tnutzs is what I used for the vertical, bottom trusses horizontal supports and the four door frames. I used 1530 for the top frame to eliminate any deflection from a 4 ft, 108 gallon tank. No center supports were needed which is very nice. I also wanted to have access to the front and both sides, with the left side opening upwards. This upward opening door allows it to become a functional tabletop with a simple drop down leg to support it. Total cost of this with all the hardware needed which includes fasteners hinges t-nuts and bolts etc, $848. This cost did not include the 1/4 inch white acrylic panels that fit snugly into the slots of the door frames. They also are not cheap. The greatest place for this with hundreds of other choices than white is...
https://www.canalplastic.com/collec...hite-opaque-acrylic-sheet?variant=32920760654
(4) 18x32 panels at $40.50 each was $162. These were slightly oversized but were very easily cut to size with a table saw. You can cut them to the exact dimension if you need to.
A very nice cost saving alternative would be quarter inch plywood. This could then be laminated with whatever you choose. A sheet of what's known as FRP, which is widely used in commercial kitchens to waterproof walls and make them easily cleanable can be purchased at the big boxes. A 4 ft x 8 ft sheet is right around $25.
For the back side of the cabinet I chose to use 3/4 in birch plywood, laminated with the FRP mentioned above. This is useful to anchor some screws into if and when you need to. About $85. This was cut out and made to fit on the inside of the frame.
Columbia Forest Products 3/4 in. x 4 ft. x 8 ft. PureBond Birch Plywood 165921 - The Home Depot
Veneered construction gives these decorative PureBond Birch Plywood Project Panels the strength, flatness and rigidity to satisfy the most discerning craftsman. Each 7-ply sheet is assembled with a soy-basedwww.homedepot.com
Standard leveling feet designed specifically for the aluminum extrusion are pretty cheap. The total deflection across the 4 ft beam carrying an approximate load of 1400 lb is negligible with 1530 extrusion. With this only the corners need support. I chose to use machine leveling casters instead. This turned out to be an awesome choice, they look pretty sleek and if necessary I could roll the tank around. Don't try to save money here, I tried that and ended up sending the junk back and replacing them with these, $90...
Again, not cheap, but you said you wanted sleek!
The top and bottom floors are 1/2 in thick HDPE. Several drain holes were drilled into the bottom floor. A 2 ft by 4 ft sheet of this is about $130 each. With the exception of the rear panel, everything in this cabinet is corrosion resistant. I purchased these sheets from Amazon but you could find a less expensive supplier or an alternative.
To keep things nice and dry I installed a dual fan panel inside the left door/table and a high output Noctua fan in the right side of the cabinet which is partitioned off from the sump area. This is where all the electronics/power supplies are housed, the "dry side." $120 + $32
In the event that water escapes, and it will escape, a rubber bladder is installed around the perimeter of the frame in the height made available with the space created by the 4-in machine casters. Water would effectively drain through the holes drilled into the floor and hopefully not fill the approximate 32 gallons of containment underneath. The attachment of this rubber bladder is ridiculously easy with the discovery that the quarter inch acrylic scraps left over were able to be used as an extremely effective wedge pinching the rubber inside the slot of the extrusion. As an added bonus the aluminum extrusions slot acts as a very effective gutter which I also drilled a few drain holes into making it virtually impossible for water to extend beyond the footprint of the cabinet frame. 36-in x 5 ft neoprene rubber, about $80.
Lastly to satisfy your desire for sweetness and perhaps little bling as I do fancy led strip lighting was installed on the ceilings of both compartments both controlled by a motion sensor. I used colored strip lights made by GE Cync (3) $120, and (2) motion switches, $60
That's about it. Total cost of build, $1855.00. This was a fun build, fairly simple, very elegant, extremely robust and dead accurate to the millimeter. Working with aluminum extrusion will definitely make you question why you ever had anything ever made out of wood. Enjoy!
Do you happen to have a pic of the final result?
Sure...Do you happen to have a pic of the final result?
Attachments

Sorry for the late reply, I just postedDo you have a picture of the stand all closed up and finished?

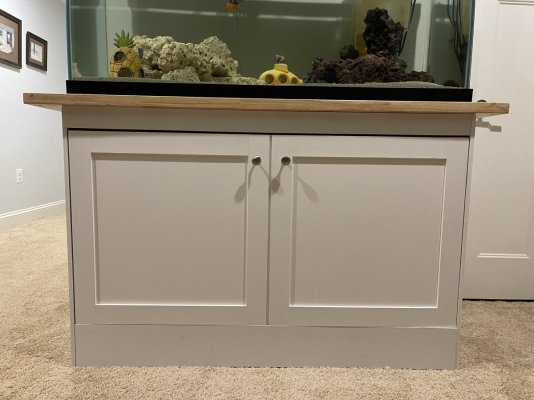
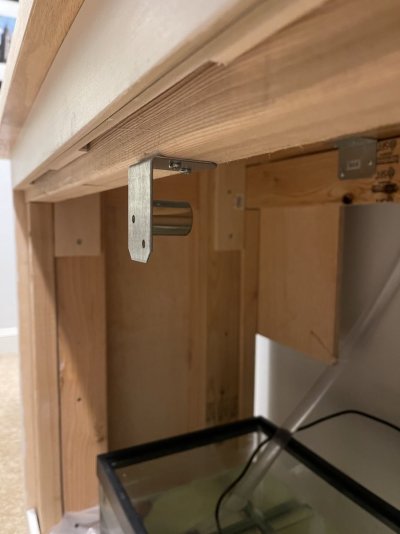
First time stand here, DIY based on a RocketEngineer’s stand. Doors are faked shaker style on a sanded plywood piece and then painted, held in place by a magnet at the top for easy pop-off.
Attachments
Similar threads
- Price: 155
- Shipping Available
- Replies
- 0
- Views
- 155


