Prototype LED light unit

Glitched

New Member
View Badges
Joined
Oct 8, 2018
Messages
16
Reaction score
41
Rating - 0%
0   0   0
Hi all,

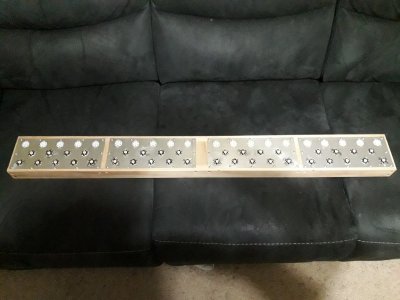
Yesterday, got board and started to make an LED light unit to go with a cabinet I made a few months back for one of my fresh water tanks... but making sure it can be used for reef in the future.

Made the frame last night, and planning to solder the LED's on tonight.
Photo's of what I've done so far, plus a shot of the cabinet before I put the tank into it. Don't mind the mess, the kids tried to take over the cabinet the second I built it.

L1.jpg
L2.jpg
L3.jpg
Stand.jpg
 
OP
OP
G

Glitched

New Member
View Badges
Joined
Oct 8, 2018
Messages
16
Reaction score
41
Rating - 0%
0   0   0
Looks like a great start!
What kind of wood are you using?
I'm using 18mm Pine, and to keep it from absorbing moisture I've treated the Pine with an oil that doesn't stain the wood that much (goes a little yellowish) to keep it looking as natural as possible.

Update with the build, a few nights ago as I'm trying to solder the LED chips to the metal plate, I wasn't happy with how they were only just securing, so after a quick bit of research and finding something I don't know how I missed, the LED chips are on an aluminum base, so will be using a bit of epoxy on the side of the chips to secure them, this way I won't disrupt the thermal paste.
 

Rjramos

Valuable Member
View Badges
Joined
Jan 24, 2013
Messages
1,599
Reaction score
1,386
Location
Miami
Rating - 0%
0   0   0
Yes thermal adhesive is great! I used it on a rapidLED custom job alon with their power supply, controls and dimmers. 2 part adhesive, 1 drop of each per LED.
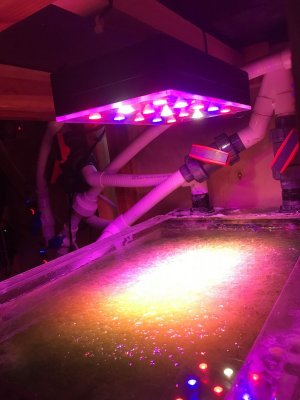
This is a 45w refugium light I made. Dimmed down between 1/4 and 1/2 power.

081AE4D9-4205-4CFB-9A77-B4FAD1782FA2.jpeg
 
OP
OP
G

Glitched

New Member
View Badges
Joined
Oct 8, 2018
Messages
16
Reaction score
41
Rating - 0%
0   0   0
What about a thermal adhesive? Works great and not to horrible to remove if needed later on down the road. Used it on a few of my builds and seems to work well.

I thought about getting some, as I only have thermal grease as I'm use to soldering everything, I'm just scared I guess of it failing on me and something falling into the tank. Random stuff like that seems to happen to me at the best of times.
 
OP
OP
G

Glitched

New Member
View Badges
Joined
Oct 8, 2018
Messages
16
Reaction score
41
Rating - 0%
0   0   0
Yes thermal adhesive is great! I used it on a rapidLED custom job alon with their power supply, controls and dimmers. 2 part adhesive, 1 drop of each per LED.
This is a 45w refugium light I made. Dimmed down between 1/4 and 1/2 power.

081AE4D9-4205-4CFB-9A77-B4FAD1782FA2.jpeg
That looks cool dude.... and idea's taken lol
 

Rjramos

Valuable Member
View Badges
Joined
Jan 24, 2013
Messages
1,599
Reaction score
1,386
Location
Miami
Rating - 0%
0   0   0
I thought about getting some, as I only have thermal grease as I'm use to soldering everything, I'm just scared I guess of it failing on me and something falling into the tank. Random stuff like that seems to happen to me at the best of times.
The thermal adhesive works very good between the back of the LED chip and the aluminum heatsink. You also got the soldered wires running chip to chip, so the chances of one falling off and in are slim. On this fixture I made I used all Cree LED’s with 80 degree lens. The lenses rest on the 1/4”plexiglass front and the vented sides are 1/8” lexan. All put together with plexiglas adhesive. Waterproofing the LED chips is important, you don’t want splash or moisture on them. I got the heat sinks from a company called “heat sinks USA. I cut a circular shape out on the fins on the back and installed a small fan also from rapidLED to keep things cool. I made 2 like the one you see. A bit of labor and money, but I got something better than what they sell for my application.
 
OP
OP
G

Glitched

New Member
View Badges
Joined
Oct 8, 2018
Messages
16
Reaction score
41
Rating - 0%
0   0   0
The thermal adhesive works very good between the back of the LED chip and the aluminum heatsink. You also got the soldered wires running chip to chip, so the chances of one falling off and in are slim. On this fixture I made I used all Cree LED’s with 80 degree lens. The lenses rest on the 1/4”plexiglass front and the vented sides are 1/8” lexan. All put together with plexiglas adhesive. Waterproofing the LED chips is important, you don’t want splash or moisture on them. I got the heat sinks from a company called “heat sinks USA. I cut a circular shape out on the fins on the back and installed a small fan also from rapidLED to keep things cool. I made 2 like the one you see. A bit of labor and money, but I got something better than what they sell for my application.

I'll probably do something similar to this when I build my main one in the future. I'll go to my local electronics shop tomorrow and get some thermal adhesive if they have some in stock, and give it a crack.
As this is just a prototype I'm not to stressed about water proofing it to much, just having a bit of fun while trying something out, before committing to something on a larger scale
 

theatrus

Valuable Member
View Badges
Joined
Mar 26, 2016
Messages
1,966
Reaction score
3,360
Location
Sacramento, CA area
Rating - 0%
0   0   0
I thought about getting some, as I only have thermal grease as I'm use to soldering everything, I'm just scared I guess of it failing on me and something falling into the tank. Random stuff like that seems to happen to me at the best of times.

The best bet is _always_ mechanical mounting. Screws don't fail the way adhesives do, plus the thermal conduction layer of thermal epoxy is way worse than good compounds.

Nothing is wrong with gluing it down for this purpose, but I personally hate it. Especially on a fixture you're likely to experiment with :)
 
OP
OP
G

Glitched

New Member
View Badges
Joined
Oct 8, 2018
Messages
16
Reaction score
41
Rating - 0%
0   0   0
Hey all, a quick update as have been busy with the kids and haven't gotten much done.
Got all the LED's mounted last night, using thermal compound under the chip, and an epoxy on the side of the chip to hold it in place. Most of the chips got just enough to keep them secure, some got a bit to much (was aiming for the right amount that I could chisel off if needed).
I have ordered the resistors I needed, as my local shops don't stock the ones I need, and over the next week I'll be running and soldering up the wires.
Slowly coming along.

LED array1.jpg
 
OP
OP
G

Glitched

New Member
View Badges
Joined
Oct 8, 2018
Messages
16
Reaction score
41
Rating - 0%
0   0   0
Just out curiosity, what are using the resistors for? Dimming the LED’s or another purpose?
Some of the LED's are odd voltages, so just to safe guard the circuit and not burn out the LED. I'm using a 12v supply on this with just LED drivers and on / off switches. Once I have a Raspberry Pi and a few other bits, I'll be building a whole new controller for this, were I can do dimming and other stuff on the tank.
 

Just grow it: Have you ever added CO2 to your reef tank?

  • I currently use a CO2 with my reef tank.

    Votes: 4 5.8%
  • I don’t currently use CO2 with my reef tank, but I have in the past.

    Votes: 2 2.9%
  • I have never used CO2 with my reef tank, but I plan to in the future.

    Votes: 5 7.2%
  • I have never used CO2 with my reef tank and have no plans to in the future.

    Votes: 54 78.3%
  • Other.

    Votes: 4 5.8%
Back
Top