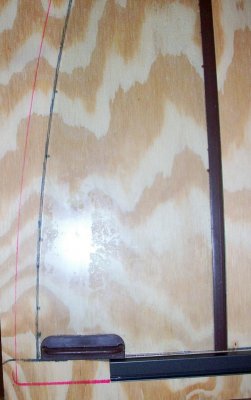
Top Screen: 73 Gallon Bowfront

Bloop

New Member
View Badges
Joined
May 12, 2009
Messages
21
Reaction score
1
Rating - 0%
0   0   0
This is how I finally built a screen top for my 73-gallon bow-front aquarium. The trickiest part being of course the curved front. I did mine in two halves because that is how it would set into the top of my tank that had a support across the center.

The best ideas are of course stolen so thank you to
Jimflies https://www.reef2reef.com/forums/f30/clear-mesh-top-5124.html
And Bergy and Psykokid http://thelittleocean.com/smf118/index.php?topic=54.0

Project-Specific Materials Needed:
2 - 48" aluminum framing material (HD, Lowes, Plesants etc)
8 - screen frame corners (at a $1.25 for 4, I bought an extra pack, anticipating screw-ups)
1 - roll of spline material
1 - spline roller (I strongly advise the cheap plastic one. Half the cost and unlikely to cut your mesh by accident)
1 - roll of garden netting screening material (I used black)
1- wooden dowel, slightly smaller than the spline

Other tools needed

Heatgun (know anyone in the military? They use it to polish shoes.)
Dovetail or hacksaw etc.
Strong adhesive/epoxy. I simply used Crazy Glue
Hammer
Flat head screwdriver
Screws
Scrap ply wood (FREE, thanks Lowes)
Marker
Work gloves

Total cost in my area $24.10
$12.50 for framing, spline, and 4 corners in a combo pack
$2.50 for 8 more framing corners
$3.00 for spline roller
$6.00 for garden netting roll. I could probably make 10 more screens out of this but there wasn’t a smaller package)
$.10 wooden dowel
 
Last edited:
OP
OP
B

Bloop

New Member
View Badges
Joined
May 12, 2009
Messages
21
Reaction score
1
Rating - 0%
0   0   0
1) Make a template of the interior perimeter of the top tank lid. In my case, I had the glass top available to trace directly onto plywood. Alternately, you could place you plywood onto the top of your tank and trace the shape of your tank from underneath.

2) Draw a perimeter to account for the aluminum framing.
- I drew mine exactly 1/16th in front the glass’s outline. If I had drawn form the outside of the whole tank, I would have had to account for the lip of the tank as well the frame needs to set into.
- Note: The INSIDE of a curve should be SMALLER than the outside. My inside line did NOT accommodate this and followed the outside curve exactly. It worked out anyway.

3) Space screws about an inch apart along this inner line.

4) Place a dowel in the spline groove of what is to be your curved side. This will prevent the groove from being crushed/buckled.

5) Place one side of your framing material at the top of the arched side, with the spline and groove side in. Place a screw on the outer edge of the framing to hold in place

6) Use the heat gun to heat and slowly bend the framing material to follow the inner line of screws. (I attempted this without the heat gun and the frame buckled in several places. Not pretty, but it would have done the job) Wear gloves, heat guns make metal hot and there is still a lot of pressure you need to apply.

7) Anchor the outer edge along your original line you transferred from your template as you go along bending it.

8) Once you get to the end, use a dovetail saw cut off the excess. The screws placed at the end can serve as a guide.

9) Cut aluminum framing to the interior size of each STRAIGT side of the top of the tank.

10) Add the next side you to the tightest curved end, which should be the outside corner of the tank. User the heat gun at this “corner†to “finesse†it to the angle you need. You corner will look funky on the outside but you can trim to follow the curve, just ensure the sides are where they need to be and fit snugly into the corner piece.

11) Remove the Dowel and Use epoxy to bond the bowed portion to the straight portion.

12) Click on the next three sides.

13) The final, less sharp corner by the bowed portion is almost a right angle. Use the heat gun to make it perfect but it should be easy. Use epoxy to bond this corner.

14) Remove any outside screws that are bracing down the frame. Pray it doesn’t pop open and test to see if it fits.

15) If you have another half to go, Use the same screw template. The grooved side is still the inside of the curve. BUT if you did it groove UP the first time, do it GOOVE UP the 2nd time. They need to be mirror images, not identical.

16) Lay the screening on the framework and, using the splining tool, press the spline into the groove of the frame, starting at one corner and working around. The splining will keep the screen taunt.

17) Trim the excess screen material off the frame:

18) I cut exactly 1 line of the grid of the mesh top to pass an electrical cord though from the top of my tank. If you are going to do this, I suggest you live a little extra mesh in place to hold onto as you wiggle the power cord though. THEN trim that bit of excess.


http://s573.photobucket.com/albums/ss178/FishyGalPics/?albumview=slideshow&newest=1
 

seafansar

Well-Known Member
View Badges
Joined
Jun 20, 2008
Messages
873
Reaction score
73
Location
DeLand, FL
Rating - 100%
2   0   0
Very cool! Thanks for the step by step! I ordered some mesh. I'll attempt making a top for my 90 bowfront corner tank once it gets here.
 
OP
OP
B

Bloop

New Member
View Badges
Joined
May 12, 2009
Messages
21
Reaction score
1
Rating - 0%
0   0   0
Is a corner bowfront almost a quarter of a circle?

That would be a lot sharper curve than mine.

It would still work with kinks, not cracks, in the frame.

Please post how it works out.

Very cool! Thanks for the step by step! I ordered some mesh. I'll attempt making a top for my 90 bowfront corner tank once it gets here.
 
Last edited:

ficklefins

Super Duper Moderator
View Badges
Joined
May 8, 2006
Messages
3,271
Reaction score
50
Location
MD - Annapolis Area
Rating - 0%
0   0   0
ScreenBuild001.jpg

ScreenBuild008.jpg

ScreenBuild009.jpg

ScreenBuild015.jpg

ScreenBuild018.jpg
ScreenBuild019.jpg
 

Fishcrazy06

Reefing Addict
View Badges
Joined
Jun 21, 2009
Messages
1,147
Reaction score
17
Location
De Pere WI
Rating - 0%
0   0   0
Sweet little write up. I too have the glass lids I can trace out onto the plywood. But I have one question. If I trace them do I need to inset the screws from the pattern some? If I put the framing up against the screws and bend won't the framing be too wide to fit inside the lips of the tank trim? Does this make sense on what I am explaining?

Eric
 
OP
OP
B

Bloop

New Member
View Badges
Joined
May 12, 2009
Messages
21
Reaction score
1
Rating - 0%
0   0   0
If I trace (the glass lid) do I need to inset the screws from the pattern some? If I put the framing up against the screws and bend won't the framing be too wide to fit inside the lips of the tank trim? Does this make sense on what I am explaining?
Eric

Yes. You should.

I traced the glass (in pink) then made an inner line (dk. grey) to mark where the framing would go.

I even traced the glass to mark the curve for the inner line. This is where I placed my screws and bent the frame along. It was a dumb move. The inside curve should be SMALLER. The center of the arc should have been exactly enough to allow for the frame with the ends coming in more tightly since an inner curve would be tighter than the outside. Also it’s not the same curve at both ends, it needed to be pulled in more at the outside end and just a bit at the end at the center of my tank.

If you look closely at my screen cover in place, you can see how the ends meet the lip of the tank, but not at the center. There’s enough of a lip coming into the tank to forgive, but it’s still “off.â€

There is an intelligent mathematical formula that would tell you how to accurately compensate for the width of the frame along the curve. I’m more the trial-and-error sort of gal.
 

Attachments

  • Screen Build 002 2.jpg
    Screen Build 002 2.jpg
    97 KB · Views: 923
Last edited:

VicD81

Well-Known Member
View Badges
Joined
Jul 21, 2013
Messages
677
Reaction score
6
Location
LA
Rating - 0%
0   0   0
HOLY ****!!!:hail:
I am so ridiculously excited to try this for my 72 bow FW to SW conversion!
Very detailed thanks a bunch!
 

Jamesmost

Well-Known Member
View Badges
Joined
Apr 6, 2017
Messages
526
Reaction score
195
Rating - 100%
1   0   0
This is interesting hessting the frame material and getting a bow on it,,,
 

SeaJay

Well-Known Member
View Badges
Joined
Aug 10, 2018
Messages
816
Reaction score
932
Location
Loganville, GA
Rating - 0%
0   0   0
I was looking to make a lid for my bow front when I came across this old thread. Great ideas and information. Combining that with what I know about metal fabrication I would make one recommendation to anyone attempting this. Cut the curve in the plywood, then attach that to another piece of plywood. That way you bend consistently against a solid curve rather than a series of pressure points with the screws. We do this for diy tubing benders when we can’t afford a real one. We also wet the wood and use a torch for heat, though with that thin anodized aluminum, a heat gun is probably safer.
 

RachaelLashno

New Member
View Badges
Joined
Apr 23, 2021
Messages
1
Reaction score
1
Location
bel air
Rating - 0%
0   0   0
This is great! I know this is a older post, but much needed! I have a 36 gallon bow front.. It’s rimless.. Hoping I can still make this work!
 

When to mix up fish meal: When was the last time you tried a different brand of food for your reef?

  • I regularly change the food that I feed to the tank.

    Votes: 27 27.8%
  • I occasionally change the food that I feed to the tank.

    Votes: 34 35.1%
  • I rarely change the food that I feed to the tank.

    Votes: 29 29.9%
  • I never change the food that I feed to the tank.

    Votes: 6 6.2%
  • Other.

    Votes: 1 1.0%
Back
Top