Dierks 75G Office Build

NY_Caveman

likes words, fish and arbitrary statistics
View Badges
Joined
Sep 8, 2017
Messages
17,010
Reaction score
108,410
Location
New York
Rating - 0%
0   0   0
The more I am doing renders of the Dark with the off white the more I am liking it... What do you think?

Don't worry, much more details will go on the small side cabinets (and main cabinet) before we can call this complete, but would love to pick out my base/highlight and "pop" colors and get what I know done.

Stopped to get my hinges and a bit more wood putty so I can get rolling on the build again tomorrow.

BackBuiltIns#.jpg


BackBuiltInsDark.png
Yeah, I love that in and of itself, but depends on the rest of the room too, of course.
 
OP
OP
Dierks

Dierks

Valuable Member
View Badges
Joined
May 3, 2018
Messages
1,718
Reaction score
3,528
Rating - 0%
0   0   0
Wow... This thing is a Monster!!

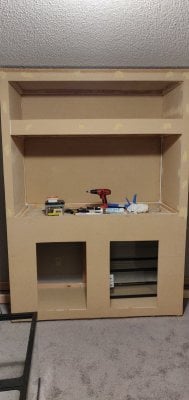
I keep stuffing hours into it with what feel like very little progress. Honestly, we got a lot done today and I am very happy with the progress. It doesn't look like much but behind the scenes a lot has to happen to make a huge piece like this one. Well if you really get into the details like wood filling every hole and sanding everything just so.

I am building this to enjoy for a very long time so I am okay putting in the extra effort but holy cow this thing is a time suck!!

ANYWAYS!!! Here is what we got done today. As always in RED:
BackBuiltins-donetoday.jpg
BackBuiltins-donetoday2.jpg


Here is the Real life Build, looks like it has chicken Pox with all the puddy in all the screw holes!
IMG_20190815_220247.jpg


IMG_20190815_220337.jpg


Coming close to getting the main Cabinet done!! Whoohoo!!

Of course if anyone has any comments/suggestions/ideas you are welcome to share them as I love hearing them even if they are things to think about! Chat with you all soon!!

- Dierks IMG_20190815_220357.jpg
 
OP
OP
Dierks

Dierks

Valuable Member
View Badges
Joined
May 3, 2018
Messages
1,718
Reaction score
3,528
Rating - 0%
0   0   0
Almost forgot...
As @NY_Caveman would say, "I received a box of rocks today." It still strikes me as funny that we are a bunch of crazy people that ship rocks across the world and pay top dollar to do it. I got 35lbs worth of rocks (Paid $55 Shipped) today and all in all not to bad. I got some rock from TX that isnt out of the sea so I really like that idea. ("Calcium Carbonate base rock taken from an above ground coral reef in Texas.") Will get these suckers going right away. The good news is the other 35lbs is coming out of my established Nano tank.

Box of rocks spread out.
IMG_20190816_010201.jpg


I also got my Power Bay for the cabinet, I will need a bit more then just these 8 but wanted to test these and make sure they are as great as everyone says. I will let you all know when its installed and is up and running.

IMG_20190816_010532.jpg


Figured I would post these couple things:)
 
OP
OP
Dierks

Dierks

Valuable Member
View Badges
Joined
May 3, 2018
Messages
1,718
Reaction score
3,528
Rating - 0%
0   0   0
Well just a quick update of what I was able to knock out today. Was a solid work day for the tank build and am hopeful to put the last piece of Skinning. That will feel really good, I am so ready to move onto the next stage of paint.

As always what was done today is in RED:
DoneToday.jpg


Real Build:
IMG_20190816_215341.jpg


Sooooo Close!!
 
OP
OP
Dierks

Dierks

Valuable Member
View Badges
Joined
May 3, 2018
Messages
1,718
Reaction score
3,528
Rating - 0%
0   0   0
I just cant do it today...

I started building for a little bit but just couldn't bring myself to work today. I will finish tomorrow...
I did get one front skin on the left cabinet so we are close to having that side done. Once we get to the trimming I think everything should go quick so here to tomorrow being done.

Here is what we have going into tomorrow:
IMG_20190817_194822.jpg


I think tonight I am going to redesign the sump and maybe make a fully custom one as I have a bunch of Plexi and have a source for more if needed... What is your one regret/moment of genius when you built your Sump?

Chat with all my reefer buddies later!!
- Dierks
 
OP
OP
Dierks

Dierks

Valuable Member
View Badges
Joined
May 3, 2018
Messages
1,718
Reaction score
3,528
Rating - 0%
0   0   0
Yikes, been cutting all the piece for the build since the last post (6.5 Hours ago) and just finished cutting the last piece!!!

I am going to install the last skin pieces and then putty. Sand the dried putty and get ready for paint. Holy cow that was a lot of cuts!

- Dierks
 
Last edited:
OP
OP
Dierks

Dierks

Valuable Member
View Badges
Joined
May 3, 2018
Messages
1,718
Reaction score
3,528
Rating - 0%
0   0   0
I am calling it for the night! Got the entire thing finished in regards to the skin and framing, thank the good lord above because I was running low on steam for the building/cutting and am ready to start with paint and Polyurethane. I will be laying down a thick layer that they pour on bartops for the surface the tank will sit on so if it gets wet I have nothing to worry about.

Im excited to take the next step in the process as all the trim is cut and ready to be painted as well.

Here she is with the doors (Need 4 more hinges) but 2 of the side doors. Got the top hood done as well so we can start with the trim there as well. Of course we are still a little way to the finished project but we are just about done building!

IMG_20190819_022440.jpg


Finished product will look like this:
BackBuiltIns#3-TESTLights.jpg
 
OP
OP
Dierks

Dierks

Valuable Member
View Badges
Joined
May 3, 2018
Messages
1,718
Reaction score
3,528
Rating - 0%
0   0   0
Well we broke out the paint today!!

Got the big chunks painted and we are starting to look a bit more like a nice piece of furniture instead of a big block of wood. I love when the paint goes on, always a good day. This paint job is taking a bit of time like everything else on this monster but overall went well. I think I painted for roughl;y 6 hours today to get it to the point you see it now.

What do you think of the color? I love it!!

IMG_20190819_203321.jpg
 

NY_Caveman

likes words, fish and arbitrary statistics
View Badges
Joined
Sep 8, 2017
Messages
17,010
Reaction score
108,410
Location
New York
Rating - 0%
0   0   0
Well we broke out the paint today!!

Got the big chunks painted and we are starting to look a bit more like a nice piece of furniture instead of a big block of wood. I love when the paint goes on, always a good day. This paint job is taking a bit of time like everything else on this monster but overall went well. I think I painted for roughl;y 6 hours today to get it to the point you see it now.

What do you think of the color? I love it!!

IMG_20190819_203321.jpg
Me too!
 
OP
OP
Dierks

Dierks

Valuable Member
View Badges
Joined
May 3, 2018
Messages
1,718
Reaction score
3,528
Rating - 0%
0   0   0
Nice, I was able to get everything in paint beside the small stuff. will get it all posted tonight when I attach all the doors.


Recessed LED lighting in the built in shelves would also look good ;)

Is the wood MDF?

First thing is first, thank you so much for the kind words!

You are correct and I think I will be adding LED Recessed Lights that I can change the color. The same ones I have in my Theater room I finished up a couple months back.
IMG_20190531_140852.jpg


As far as the wood type, yes it is MDF... But before you let me know what a poor choice I made (Because the second water hits MDF it swells up) I have picked up LOTS of polyurethane and will be giving it a heavy dose of that before any water comes close to this thing.
download.jpg


And as far as the base that the actual tanks sits on there will be a 1/4 layer of poly that bars use to pour on their bar tops to make sure everything is REALLY water tight!
71cJhTzjkEL._SX425_.jpg


But again I am open to hear anything, so if that isn't the issues you were going to bring up I still would love to hear them as I am sure I haven't thought of everything. I am sure I only scratched the surface. :)

I will be posting pictures soon of pre-poly! Stay tuned!!
 
OP
OP
Dierks

Dierks

Valuable Member
View Badges
Joined
May 3, 2018
Messages
1,718
Reaction score
3,528
Rating - 0%
0   0   0
Well, Calling it for the night. Got most everything done. The Hood is not final as those hinges will be removes and replaced. I also have pistons to hold the hood up when I need it to stay open.

Here is the build:
VertCab.jpg


Cabnet-Paint.jpg


Here to another productive day. Next, Poly everything!!
 

count krunk

Valuable Member
View Badges
Joined
Jul 17, 2017
Messages
2,316
Reaction score
4,246
Location
ATL, GA
Rating - 0%
0   0   0
I assumed you used MDF for the smooth paint finish. I wasn't even thinking about the water absorbtion haha.

Looks like it's going to be a nice build!
 
OP
OP
Dierks

Dierks

Valuable Member
View Badges
Joined
May 3, 2018
Messages
1,718
Reaction score
3,528
Rating - 0%
0   0   0
Very impressed with the craftiness. Goodluck with the build!!
Thank you so much for the kind words!!


I assumed you used MDF for the smooth paint finish. I wasn't even thinking about the water absorption haha.

Looks like it's going to be a nice build!
Thank you so much, I thought about and chatted with a lot of people at the hardware store to go about how to do the build. I did pick MDF simply for the fact its the best to work with for a flat surface. I was able to cut all my own parts for the trim as well out of simple 1" and .5 Sheets of MDF.

Like I said before if you choose to use MDF make sure to seal it as I said, MDF is really bad with water... I am hopeful I will have all the Poly on today!! Maybe finish this build up for the most part!
 
OP
OP
Dierks

Dierks

Valuable Member
View Badges
Joined
May 3, 2018
Messages
1,718
Reaction score
3,528
Rating - 0%
0   0   0
Well....
While I wait for the Poly to Dry I figured I would get something done... I cut up the parts for the Algea Scrubber. This will take half of the overflow and run it through a waterfall style scrubber as the other half will go directly into the sump. (You can find a diagram of the sump a few posts back)

I think I will put this together tonight and let the Poly Dry. I plan on pouring teh thick layer of poly tonight as well. I am hopeful to have the tank in the stand by Friday.

IMG_20190821_204919.jpg
AlgeaScrubber.jpg
 
OP
OP
Dierks

Dierks

Valuable Member
View Badges
Joined
May 3, 2018
Messages
1,718
Reaction score
3,528
Rating - 0%
0   0   0
Well we did some more painting and got the main tank platform pored with Poly!

I really like this stuff, if you have ever used it is kind of a pain to work with but i love the fact that I am essentially guaranteeing myself a level service with the polys self leveling properties. I would say the biggest thing if you are going to work with the thick pour poly is that you have to force it over the surface you want covered first to get it wet, then then the next time you spread the poly it will be smooth. A perfect example of this is in the picture I have here showing how smooth the finish is (and completely waterproof) on the far left side I have about 2" long area by 1/4" that didn't get any poly because i didn't spread it all the way to that side. the good news its very small so it shouldn't effect anything but it also is along the front so you cant see it. ;)

FAMOWOOD Glaze Coat
famowood-lacquers-5050110-64_1000.jpg


My Pour Today:
IMG_20190822_172339.jpg
IMG_20190822_172313.jpg


The build is coming along and I'm excited to get the tank in the stand.
 
Last edited:

TOP 10 Trending Threads

WRASSE WAR: TAIL-SPOT VS. LEOPARD! WHICH DO YOU PREFER?

  • Tail-Spot Wrasse!

    Votes: 9 15.3%
  • Leopard Wrasse!

    Votes: 41 69.5%
  • This is too hard!

    Votes: 9 15.3%
Back
Top