My first frag tank

OP
OP
jmatt

jmatt

Just gettin' started. Again.
View Badges
Joined
Apr 27, 2022
Messages
553
Reaction score
803
Location
Lehigh Valley, PA
Rating - 0%
0   0   0
The new BashSea Pro model and ATO reservoir. I gotta admit, I had not had the sump out of the box and am a little miffed to find that one of the walls is solid black... I wasn't expecting that. I have spent the last four months assuming I would be servicing the sump area from the right side of the tank stand since the ReefMat will be the item that will need the most regular servicing (swapping rolls).

You would think that since the great majority of people are right handed, the other side of the sump would be the clear side so that the ReefMat is on the right, making it easier to swap rolls. It's not an issue, just less convenient and unexpected.

1665957071060.jpeg


1665957082301.jpeg
 
OP
OP
jmatt

jmatt

Just gettin' started. Again.
View Badges
Joined
Apr 27, 2022
Messages
553
Reaction score
803
Location
Lehigh Valley, PA
Rating - 0%
0   0   0
And since I'm at a point where I can finally take out the hardware, a few last shots. ReefMat 1200 dry fit, and Pentair 40w UV. Looks like I'll still have room for reactors. Haven't bought a skimmer yet... wondering if the ReefMat will suffice.

ReefMat dry fit 1.jpg

UV dry fit.jpg
 

Digitalfirex

5000 Club Member
View Badges
Joined
Sep 19, 2020
Messages
6,227
Reaction score
8,272
Location
CT
Rating - 100%
1   0   0
And since I'm at a point where I can finally take out the hardware, a few last shots. ReefMat 1200 dry fit, and Pentair 40w UV. Looks like I'll still have room for reactors. Haven't bought a skimmer yet... wondering if the ReefMat will suffice.

ReefMat dry fit 1.jpg

UV dry fit.jpg
That sump looks amazing! I've been looking all over for ideas on what aftermarket sumps fit the reefmat...

Also, how easy will that uv bulb be to change?
 
OP
OP
jmatt

jmatt

Just gettin' started. Again.
View Badges
Joined
Apr 27, 2022
Messages
553
Reaction score
803
Location
Lehigh Valley, PA
Rating - 0%
0   0   0
That sump looks amazing! I've been looking all over for ideas on what aftermarket sumps fit the reefmat...

Also, how easy will that uv bulb be to change?
The BashSea Pro was designed specifically for roller mats so that's a plus. That being said, that compartment looks like it's still gonna be a tight fit once the flexible hose feeding it is installed. I may have to hard plumb an elbow at the fixture. We'll see.

The UV will be installed at an angle so air rises to the top -- I have it placed there just to see how much room I have to play with. All four sides of the stand will be removable so disconnecting it at unions and taking it out for servicing hopefully won't be too difficult.
 
OP
OP
jmatt

jmatt

Just gettin' started. Again.
View Badges
Joined
Apr 27, 2022
Messages
553
Reaction score
803
Location
Lehigh Valley, PA
Rating - 0%
0   0   0
Still moving forward. You wouldn't think getting these rails perfectly perpendicular would be hard... but you'd be wrong. I can't tell you how many machinations I went through trying to translate the markings on the stand up onto the cross members on the ceiling for the wire anchors. Plumb lines, laser levels... I could get them close but not perfect.

Eventually I just hung the light bars to see how close I was. One seems to be off by a hair and I am fighting the urge to move that anchor a few millimeters. lol

RMS ALIGNMENT 1.jpg


RMS ALIGNMENT 2.jpg
 
OP
OP
jmatt

jmatt

Just gettin' started. Again.
View Badges
Joined
Apr 27, 2022
Messages
553
Reaction score
803
Location
Lehigh Valley, PA
Rating - 0%
0   0   0
I wanted to get the lights done before the tank plumbing so I didn't have to install them with a delicate glass tank below. I will dress the power cords with wire loom and may install a small platorm in the rafters above to accomnodate a ceiling power source and the power supply bricks and cables so they're all safely tucked out of the way. As you can see, I have a Romex cable right where I need one in the joists.

I clipped the stranded wire hanging cables and terminated with heat shrink tubing.


Stranded wire wrapped.jpg


Potential location for outlets and psu.

Potential psu platform lication.jpg


Lights!

Hung XR15 2.jpg


Hung XR15 1.jpg
 

Digitalfirex

5000 Club Member
View Badges
Joined
Sep 19, 2020
Messages
6,227
Reaction score
8,272
Location
CT
Rating - 100%
1   0   0
The BashSea Pro was designed specifically for roller mats so that's a plus. That being said, that compartment looks like it's still gonna be a tight fit once the flexible hose feeding it is installed. I may have to hard plumb an elbow at the fixture. We'll see.

The UV will be installed at an angle so air rises to the top -- I have it placed there just to see how much room I have to play with. All four sides of the stand will be removable so disconnecting it at unions and taking it out for servicing hopefully won't be too difficult.
Good idea. That said.... any manifold concept? Like will one pump run the return and the uv or seperate?
 
OP
OP
jmatt

jmatt

Just gettin' started. Again.
View Badges
Joined
Apr 27, 2022
Messages
553
Reaction score
803
Location
Lehigh Valley, PA
Rating - 0%
0   0   0
Good idea. That said.... any manifold concept? Like will one pump run the return and the uv or seperate?
I am planning on having a manifold... still not sure how I'm going to implement it. I picked up another COR-20 pump today. My plan is to have two return pumps, each on a separate breaker for redundancy. One would be a dedicated return pump, the other would service a manifold as well as return water to the tank.

I suppose the UV will be on the manifold circuit. I know the flow through the UV needs to be pretty specific in order for it to be effective, perhaps I can set the manifold pump to supply the return with adequate pressure and tune the flow through the UV with a gate valve.

Ultimately they will be run by the Apex, so I have no idea as of yet how that plays into this.
 
OP
OP
jmatt

jmatt

Just gettin' started. Again.
View Badges
Joined
Apr 27, 2022
Messages
553
Reaction score
803
Location
Lehigh Valley, PA
Rating - 0%
0   0   0
Lights are pretty much done.

First created a mounting board for the PSUs. I glued two thin strips of basswood to the main board so the units are lifted above it, facilitating airflow and hopefully heping to keep them cool. In between, I slipped a few small blocks of pink foamboard to keep them spread apart, as the two oversized rubber bands hold them to the board.

Psu board.jpg


The four cables are bound by zip ties and tucked into wireloom for a cleaner look. .5" for the pairs heading up from the fixture and then all four bundled into a 1" run. The wireloom is then affixed to the rafters.


Wire loom 1.jpg

Wire loom 3.jpg


The nest for the PSUs... I may hide that with black foam board.


Wire loom 2.jpg
 
OP
OP
jmatt

jmatt

Just gettin' started. Again.
View Badges
Joined
Apr 27, 2022
Messages
553
Reaction score
803
Location
Lehigh Valley, PA
Rating - 0%
0   0   0
Today's task was setting up and partially plumbing the UV. I have it inline with one of the COR-20 return pumps and will attempt (at some point) to get the Apex running it at different speeds; 12 hours per day for algae and 12 at a slower speed for parasites.

The plumbing is taking forever so I'm gonna skip the manifold altogether. If I want to run carbon or GFO at some point I'll just get a canister filter.

But I think I'm ready to mount the tank...

UV setup 2.jpg


UV set up.jpg
 
OP
OP
jmatt

jmatt

Just gettin' started. Again.
View Badges
Joined
Apr 27, 2022
Messages
553
Reaction score
803
Location
Lehigh Valley, PA
Rating - 0%
0   0   0
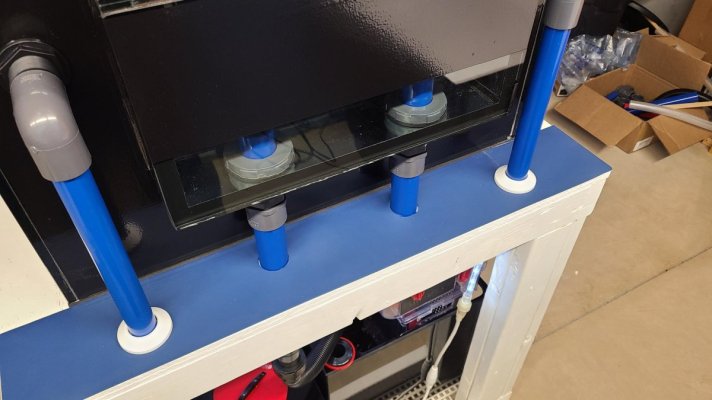
Most of the plumbing is done. I still feel like I'm a million miles away from being ready to add water and critters. I have to deal with the Reefmat roll, the ATK, dial in the UV, the Apex, etc. I'll defer on the ATK and Apex for now.

1671330092253.jpeg


Escutcheons.jpg
1671330109044.jpeg
 
Last edited:
OP
OP
jmatt

jmatt

Just gettin' started. Again.
View Badges
Joined
Apr 27, 2022
Messages
553
Reaction score
803
Location
Lehigh Valley, PA
Rating - 0%
0   0   0
Okay, well, the controller board is mounted and I'm starting to do some wire management. I have three power source cables (across two separate breakers) coming into the sump area. I think I'll put the EB on one, and give the heaters and the main return COR20 their own, each.

Controller board 1.jpg
 

ShepherdReefer

5000 Club Member
View Badges
Joined
Feb 6, 2020
Messages
5,517
Reaction score
27,928
Location
Shepherdsville, KY
Rating - 0%
0   0   0
As mentioned in the Welcome section, I'm getting back into the hobby after a few decades off... and I have a lot of catching up to do. I've done reef tanks before but never a frag tank. I dunno, this thing might wind up being a hybrid between a frag tank and a display tank.

I cleared a space in the basement and painted it. I did it with a coral-ish color (which came out lighter than I expected) and now I think it's just too, uh... pink. So I may repaint it something more mannish. We'll see.

Other than that, I have been haunting my LFS and watching YouTube videos like crazy.

So here's what my new tank looks like at the moment. Now that I see how expensive everything is, I'm starting to wonder if that's enough. :thinking-face:

iu
Love the money...that is right.
 
OP
OP
jmatt

jmatt

Just gettin' started. Again.
View Badges
Joined
Apr 27, 2022
Messages
553
Reaction score
803
Location
Lehigh Valley, PA
Rating - 0%
0   0   0
Made a lot of progress in the last 10 days. Spent almost all of last weekend generating water and adding to the tank. Finally! But it had a cloudiness and a precipitate I wasn't expecting.

Oh, and a couple of small drips in the plumbing which made me really nervous. Two leaks, and just a drop an hour... but still. I spent time tightening the fixtures ever so slightly, checking the result, tightening some more, etc. Just being cautious. But they have abated now for 48 hrs, I think it's good.

Cloudy.

Cloudy water.jpg

Precipitate.jpg


So I added a BRS Carbon/GFO reactor pair to the sump it the water became crystal clear overnight (with the help of the Eco-tech powerheads).

I spent the last two days getting all of the equipment and apps configured with the exception of the Apex and ATK. I just wanna get the gear up and running and I'll take the time to integrate it into the Apex/EB832 in the coming weeks.

So the Reefmat 1200 is running and working well -- but I still need to work out some details. It seems to be advancing on its own a little bit, just not as much as I think it should.

The Helios heaters are in the sump and the water's 78.

The UV unit is running. I wish there was some kind of indicator light on the thing. The bulb is plugged in but I have no way of checking whether it's actually on.

The MP40 QDs are mounted and running, I'll clean up the wiring and mount the controllers later today.


Reactors.jpg


MP40 1.jpg


Liferock table.jpg


Crystal clear 1.jpg


Crystal clear 2.jpg
 
OP
OP
jmatt

jmatt

Just gettin' started. Again.
View Badges
Joined
Apr 27, 2022
Messages
553
Reaction score
803
Location
Lehigh Valley, PA
Rating - 0%
0   0   0
Poured in three bags of Caribsea reef sand, then topped off with the sand I have been cycling with the rocks since June (!). You can see the color difference. The cycled sand is from Tamp Bay Saltwater, so it was ready to go when I received it. For good measure I threw in a bottle of Dr Tims One and Only.

A few days later I gave the tank a big squirt of Dr Tim's Ammonia and the next day the ammonia level is zero. I think this tank is good to go. I'll give it more time and add pods and phyto next week.

Meanwhile I have GFO and activated carbon scrubbing the water and my UV is on 12 hrs / day.

Sand difference 2.jpg
 
Back
Top