
Navigation
Install the app
How to install the app on iOS
Follow along with the video below to see how to install our site as a web app on your home screen.
Note: This feature may not be available in some browsers.
More options
You are using an out of date browser. It may not display this or other websites correctly.
You should upgrade or use an alternative browser.
You should upgrade or use an alternative browser.
3d Printed Aquarium Parts Archive


Hello all, I have joined the 3D world with the purchase of my Bambu Lab P1S. I have been reading this thread and learned a lot and wanted to thank you all for the sharing of knowledge.

I just printed a "Salinity Probe Accurizer by Brofessor2507". I have the one from Vivid Creative Aquatics but am waiting on a new pressure screen I ordered from them so t figured I would try this out.

I don't think it will work as well on my current salinity probe as I'm not using the Neptune one on my Apex. I made an adaptor and got a cheap $33 probe from AliExpress to see if the problems I was having were probe or Apex related.
I don't think it will work as well on my current salinity probe as I'm not using the Neptune one on my Apex. I made an adaptor and got a cheap $33 probe from AliExpress to see if the problems I was having were probe or Apex related.

I designed my own pieces for my D-D Jumpguard to fill in around my Radion mounts and make a nicer cutout for my Avast Plank Feeder.

I decided to try to organize my "stuff" better so I jumped into the Multiboard ecosystem and printed a bunch of stuff.

Still in the process of printing more bins and hangers but I like this system so far.
Still in the process of printing more bins and hangers but I like this system so far.
I've seen a lot of guards but most have been for Ecotec's, If I see any for Jebao's I will let you know.Does anyone have a file for fish/anenome guard for a jebao SLW/MLW-5?
I've used the Nero guards in the past, you might need to resize the guard but they do work.Does anyone have a file for fish/anenome guard for a jebao SLW/MLW-5?
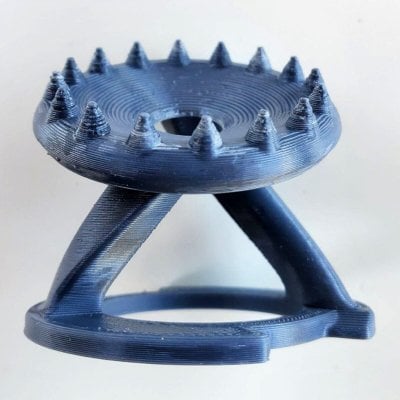
I don't think this has been posted, but I finally got around to printing this adapter to put Noctua fans on AI prime lights. I can barely, if it all, hear the fans anymore. It no longer sounds like an airplane landing in my living room. FWIW, I did also add an extra heat sink to them, just to help keep the heat down even more.
Not my model. It works as is, with one modification needed. One of the 'tabs' blocks the hole you mount it to the arm with. No big deal, after you have it all put together, just cut that one part off. Protip: You can do it first, but then you have to make sure to align it properly. It's easier, in my opinion, to get everything all screwed together, and make sure the wire isn't going to be in the way, then cut the tab.
![url_upload_663d6646a2bdc.webp [webp-to-jpg output image]](/proxy.php?image=https%3A%2F%2Fs1.ezgif.com%2Ftmp%2Fezgif-1-cc41fcd69f.jpg&hash=33c364cb89fc490e7d9d532b01da414f "url_upload_663d6646a2bdc.webp [webp-to-jpg output image]")
Not my model. It works as is, with one modification needed. One of the 'tabs' blocks the hole you mount it to the arm with. No big deal, after you have it all put together, just cut that one part off. Protip: You can do it first, but then you have to make sure to align it properly. It's easier, in my opinion, to get everything all screwed together, and make sure the wire isn't going to be in the way, then cut the tab.

Very nice, I've been reading a lot about the Noctua fans as an upgrade for the cooling fans on my Bambu Lab P1S, darn things sound like a plane taking off. The Noctua are supposed to be some of the quieter fans out there. I bet it made a big difference for you.I don't think this has been posted, but I finally got around to printing this adapter to put Noctua fans on AI prime lights. I can barely, if it all, hear the fans anymore. It no longer sounds like an airplane landing in my living room. FWIW, I did also add an extra heat sink to them, just to help keep the heat down even more.
Not my model. It works as is, with one modification needed. One of the 'tabs' blocks the hole you mount it to the arm with. No big deal, after you have it all put together, just cut that one part off. Protip: You can do it first, but then you have to make sure to align it properly. It's easier, in my opinion, to get everything all screwed together, and make sure the wire isn't going tobe in the way, then cut the tab that blocks the hole.
I have the (enclosed) X1C and the fan noise, while not exactly quiet, doesn't bother me at all. However, I was introduced to Noctua fans when I had an Ender3, which also has very loud fans. On the Ender3, Noctua fans and silent stepper motor drivers made that machine go from "I can ignore it if the TV is on" to "Is it still printing?".Very nice, I've been reading a lot about the Noctua fans as an upgrade for the cooling fans on my Bambu Lab P1S, darn things sound like a plane taking off. The Noctua are supposed to be some of the quieter fans out there. I bet it made a big difference for you.
Very nice.I have the (enclosed) X1C and the fan noise, while not exactly quiet, doesn't bother me at all. However, I was introduced to Noctua fans when I had an Ender3, which also has very loud fans. On the Ender3, Noctua fans and silent stepper motor drivers made that machine go from "I can ignore it if the TV is on" to "Is it still printing?".
This is my first foray into 3d printing and I am very happy with my P1S but am trying to fine tune it to reduce noise as it is located in my office. I would like to change out the fans for Noctura's but want to track chamber temps first so I can monitor any differences with the Nocturas.
Thank you for posting.

Not sure if you have found a solution yet but I came across theseDoes anyone have a file for fish/anenome guard for a jebao SLW/MLW-5?
JEBAO SLW-5 GUARD
Jecod SLW-5 Fish Guard
JEBAO SW4 WAVEMAKER PROTECTION
The is really awesome! I am about to print these. But could I ask what the difference is between theIf anyone has a Clarisea sk5000 g2 filter roller (although I think it will work for all g1-g3 models or even diy projects) and burns up motors every 12-24 months, below are links to prints that might help you. I remixed it off of the original model that @lakai (thingiverse) uploaded. Basically it’s a serviceable motor housing that threads together. @lakai did an amazing job with his OG version, which I really appreciate! This version allows for an upgraded, high torque, low rpm gear motor that has a larger motor and extra gear reduction section. I moved/strengthened the cable boss to be more like the newer upgraded oem g2 units, moved the roller screw holes to the newer upgraded oem g2 location and thread pitch. If you have the early version with self tapping roller screws I will be uploading the screws and rollers soon but I’m pretty sure there’s no original motors that are actually still working. I also made up a shortened motor coupling/crucifix and thumbscrew to allow for the longer than stock motor assy. This gear motor is available on Amazon for $15 and can be swapped out fairly easily if/when it burns up. Although I’m finding that the gear motors longevity is no longer the weak link with this upgrade, it’s the M3 screw for the coupling/crucifix that snaps now (and it’s a major pita to remove what’s broken off in the motor shaft when you have severe vision and dexterity issues!). I now replace that screw with every filter roll just to keep me from throwing things and cussing up a storm! Being as blind as I am, new to fusion360 and 3d printing which don‘t work well with screen readers, and having to use my phone to read my digital caliper display out loud which is buggy at best, and actually reducing myself to ask for sighted help when I just can’t go it alone, these are as good as they’re gong to get from me…..it was a major undertaking with a lot of headaches that I doubt I will attempt again in the near future, but I was on a mission to prove to myself that I could do it.….and someone else had already done the heavy lifting to boot @lakai! All three links are for the same project, just pick your poison thingiverse, printables, or makerworld.
https://www.thingiverse.com/thing:6315015
https://www.printables.com/model/647713-clarisea-sk5000-g2-extended-motor-housing-for-5rpm
https://makerworld.com/en/models/64700#profileId-67917
LH_Thread_Standard and the RH_Thread_Custom_Install files? Many thanks!
- Joined
- Aug 13, 2019
- Messages
- 1,801
- Reaction score
- 2,409
The original file by @lakai was rh right hand thread. I found that the motor will unscrew the housing, which is not good. If you use glue (defeats the purpose of threading) there is no issue. I changed the threads to lh left hand so that the motor won’t unthread the housing. In kept the rh option for those building their own roller, or if one wanted to reverse (mirror) the assembly so the motor would spin the opposite direction. Don’t use pla as the tab on the housing will snap off rather quickly. Petg seems to be holding up well so far.The is really awesome! I am about to print these. But could I ask what the difference is between the
LH_Thread_Standard and the RH_Thread_Custom_Install files? Many thanks!

Excellent, many thanks. This is such a great post. It is not only the Clarisea rollers' motors that get stuck, but also others like the Reef Factory rollers suffer from the same problem. This DIY hack is the cheapest and the best. Again, thanks for the work!The original file by @lakai was rh right hand thread. I found that the motor will unscrew the housing, which is not good. If you use glue (defeats the purpose of threading) there is no issue. I changed the threads to lh left hand so that the motor won’t unthread the housing. In kept the rh option for those building their own roller, or if one wanted to reverse (mirror) the assembly so the motor would spin the opposite direction. Don’t use pla as the tab on the housing will snap off rather quickly. Petg seems to be holding up well so far.
- Joined
- Sep 22, 2018
- Messages
- 787
- Reaction score
- 803
I think its unavoidable being the fleece has to be on so tight to the fixture.Excellent, many thanks. This is such a great post. It is not only the Clarisea rollers' motors that get stuck, but also others like the Reef Factory rollers suffer from the same problem. This DIY hack is the cheapest and the best. Again, thanks for the work!
That’s right. I can’t image that is a hard thing to fix. Thanks @lakai for the initial development of the stl files. It works perfect for me.I think its unavoidable being the fleece has to be on so tight to the fixture.
Similar threads

- Replies
- 31
- Views
- 1,571
- Replies
- 40
- Views
- 1,063
- Replies
- 10
- Views
- 674
- Replies
- 6
- Views
- 377
New Posts
-

-
 Halichoeres Biocellatus (red-lined wrasse) abnormalities in sleep
- Latest: steveschuerger
-


