OP
OP
backdraft_reefer

backdraft_reefer

Active Member
View Badges
Joined
Jan 29, 2019
Messages
120
Reaction score
162
Location
Charleston
Rating - 0%
0   0   0
Nice build! Maybe I missed it but can you let me know who built the tank and stand?
Thank you!!
Exotic Aquarium (same company that built the tanks for the new WWC store) out of Florida built the tank and stand. I ordered it from Joe Knows Reefs in Charleston. It is very well built and exactly what I asked for. I would highly recommend them!
 
OP
OP
backdraft_reefer

backdraft_reefer

Active Member
View Badges
Joined
Jan 29, 2019
Messages
120
Reaction score
162
Location
Charleston
Rating - 0%
0   0   0
Hello everyone,

This is the large update that I have been writing for the past few days. A lot has happened the past few weeks, both good and bad, and now I finally have the time to update the thread. First and foremost, the bad…

As I posted a few weeks ago, I believe I have AEFW. I lost a large acro colony and had to dip all my other acros and keep a close eye on them for any white areas where it looks like they are eating and laying their eggs. For treatment, I pulled ALL my acro colonies and frags and dipped them in Coral RX for 10 minutes each. I then scrubbed the bottom of them and any white spots while I had them in the dip outside of the tank. I then placed a small dot of super glue on top of any places I thought there were eggs or bite marks. So far, I have not seen any evidence of AEFW on my acros, but I am still keeping a very close eye for anything that remotely resembles them.


After dealing with the AEFW, I started noticing a brown algae starting to form on the back glass of my tank. At first it was very thin and I didn’t think much of it, however that quickly changed. In less than a week the algae, which I have now identified as Dinoflagelles, began taking over the entire tank. It quickly started growing over all the rocks, some corals, and the pumps and glass. It was stringy and looked like snot. After searching some R2R threads, I identified it and began looking at how I was going to begin battling it. I first started with turning off all my white T5 lights and only running blues. I also ordered Dino X and began a dosing regiment base on the instructions for it. Lastly, I did a four day complete blackout with blankets and towels on the entire tank. I finished this process three days ago. So far, the tank is looking much better. I believe the four day blackout made the most impact against the dinos overall. Unfortunately, I did lose one small acro frag and my pincushion urchin. Some of the other acros did lose some color also. I believe the urchin was still recovering from the tank transfer and then almost getting eaten by the carpet anemone a few months ago, so it was still weak and possibly poisoned by the dinos while eating coraline on the glass. Once again, I am going to monitor closely for any dinos that may pop up. I am also going to continue to dose the Dino X for the next week to ensure they are gone. If they do return in the next few weeks, I will be seriously considering adding a UV sterilizer to the system.

C0C5D420-6B9E-4223-8DFC-59785B0B8A23_1_201_a.jpeg


215234DE-4D86-4FEB-A962-28083FDAB7B9.jpeg


BD804250-6703-4FB7-94BA-DA7B56CDC3DA.jpeg


Now finally some good news!!!

I ordered the custom lids from Clearview Lids about three weeks ago and will hopefully get them sometime in the beginning of March. I decided to get three separate lids to cover the entire tank and a solid piece to cover the overflow. Each lid will have a large feed door on it so I can feed in a different place every time. It will also help access across the tank for the magnet cleaners and veggie clips.

I finally sent off the bad MP40 wetside to Ecotech this week and will hopefully receive a replacement this coming week. I will say that the customer service with Ecotech is amazing! They were quick to email me when they received my defective wetside and confirmed that the new one will fall under warranty. I also ended up moving both of my MP40s slightly up and closer to the back glass. My thought process for this was that the aquascape and majority of my SPS is in the back of the tank, thus my flow needs to be more focused on that area. I immediately noticed an increase in detritus being moved from the back of the tank to the sides and front, which will make it much easier when doing a water change to siphon up. I also think the sides of the tank are far more aesthetically pleasing.

EB50FBFC-41EA-48F2-B678-80019C8AD3AB_1_201_a.jpeg


89D7C733-5636-4163-9348-1AC3441F5861.jpeg


Overall, I am hoping that everything settles out in the next few weeks and that I can get back to having fun and watching my corals grow! If you have read this post all the way though, I really appreciate your support and hope you enjoy it! Please let me know if there is anything if there are any questions I can answer or things I shared that I need to elaborate on. Thanks again, I will keep the updates coming!!
 
OP
OP
backdraft_reefer

backdraft_reefer

Active Member
View Badges
Joined
Jan 29, 2019
Messages
120
Reaction score
162
Location
Charleston
Rating - 0%
0   0   0
Update on the Dino battle:

the past few weeks I have been dosing Dino X and increasing feedings and keeping all unnecessary lights off. The dinos have definitely been pushed back, however definitely not defeated. I decided to go ahead and pull the trigger on a 57 watt Aqua UV sterilizer that I got from BRS. The sterilizer came in last week, but it had a broken quartz sleeve. I immediately contacted BRS customer service and was told that they did not carry any replacement parts for that particular model. They reached out to Aqua UV and CC‘d me to the email. As of this post, I have yet to hear back from them. In the meantime, I was able to order a replacement sleeve off Amazon which came in on Tuesday. I got off work early today and went to my LFS to pick up an additional pump and some tubing. My plan is to run it closed loop in my DT for 3-4 weeks. If it works out and I feel I am clear of dinos, then I will take out the pump and completely plumb it into the tank. Will keep everyone posted on the outcome! Here are the pics:

5454202A-E163-4C2B-8547-377C203A7249.jpeg
A2D2ABB1-E2AA-47A8-BD61-EF0FCF3E7C8C.jpeg
FB415E41-2A22-4DFE-B7AE-544492AF1496.jpeg
D0DC86B2-9874-46FF-9ED0-15F994361A13.jpeg
 
OP
OP
backdraft_reefer

backdraft_reefer

Active Member
View Badges
Joined
Jan 29, 2019
Messages
120
Reaction score
162
Location
Charleston
Rating - 0%
0   0   0
Hey everyone,

Hope everyone is staying strong with all the recent current events. Here is a quick update since placing the new Aqua UV 57watt
sterilizer on the tank a little over a week ago. So far, the UV has been great! The tank is crystal clear and the Dino’s are almost completely eradicated (knock on wood). I still plan on running the same set up for another few weeks before I plumb it into the hard plumbing underneath the stand. Aqua UV did end up shipping out a new quartz sleeve, but it only arrived a few days ago. The main issue I had after starting the UV is my Alkalinity spiked waaaay up. I cannot confirm this, however I believe that the Dino’s were using some of the alk that I was dosing. Thinking my corals were using the alk, I gradually increased my dosing. A few days after starting the UV, I noticed that a lot of my acros and LPS had bleached out and/or RTN. After testing all parameters, I noticed that my all had skyrocketed to 13.6. I triple checked this number three times with my Hanna checker to be sure. I immediately stopped all 2-part dosing and mixed a large amount of fresh salt water. My plan is to test daily until the alk has decreased to around 9.5-10. I also am doing a 20% water change every 3 days for the next 2 weeks to ensure all my parameters get back to normal.

I feel like the past 2 months has been a non stop uphill battle with this tank, but I’m hoping this is the light at the end of the tunnel. Best wishes to everyone during these crazy times. I’ll keep the updates coming.
D81F33BB-D923-4016-8F04-E386391DF72D.jpeg
 
OP
OP
backdraft_reefer

backdraft_reefer

Active Member
View Badges
Joined
Jan 29, 2019
Messages
120
Reaction score
162
Location
Charleston
Rating - 0%
0   0   0
Hey everyone!

Sorry for the long hiatus on updates. I have been busy working on the tank, as well as doing a bunch of projects around the house. I have a ton to update on this build thread. Just want to let everyone know that I am still in it and the tank is looking much better than it was back in March. I am writing the entire new update that I will be posting tomorrow. Updates include: dinos, new coral additions, fish losses (due to carpet anemone eating), re-locating said carpet anemone to a new species only tank, Apex Cor-20 power supply issues, and hair algae and cyano battle after the dinos.

Once again, sorry for the long break in updates. Hope to fill everyone in in all of it tomorrow!

CD0C0297-3D60-4919-AEB2-A5EFCF01B8EA.jpeg DFA6CD1A-59E9-4D5E-8285-45FE6FA6773A.jpeg
 
OP
OP
backdraft_reefer

backdraft_reefer

Active Member
View Badges
Joined
Jan 29, 2019
Messages
120
Reaction score
162
Location
Charleston
Rating - 0%
0   0   0
Hey everyone!

Finally sat down and got to edit this post I was supposed to have done the other night. Like I said in the last post, there is a lot I need to cover.

First off all, an update on the dinos. I think I have finally gotten rid of them (fingers crossed). I think the combination of the new UV sterilizer, multiple blackout periods, increasing my nutrients, and bubble scrubbing (which I will cover more in depth below) has all combined to take them out. After the initial few weeks of using the sterilizer on my tank in a closed look, I replumbed it into my return lines. Since my returns are split, not all the water was passing through the UV. To counter this, I slowed my return pump to 45% and partially closed the valve on the right return to push the majority of water through my left return. I definitely think this helped and finally killed off the rest of the dinos. The week or so following doing this I began to see a massive increase in nutrients. My phosphate levels spiked to 1.03. This increase led to a massive outbreak of hair algae and cyano bacteria all over the tank. I began to increase my water changes, doing 10-15 gallons every other day for about two weeks. I also did a lot of manual removal which helped knock it back.

I began reading on other methods to help naturally remove hair algae and keep the dinos from coming back. I came across the long R2R thread on bubble scrubbing and how some have had success removing algae and floating debris from the water column and getting into the sump to be filtered out. I had an extra-large air pump that I used a while back on a small freshwater tank still in storage. I went to my local LFS and picked up some air tubing and small fittings to rig a small air system. I placed two air lines in the tank just above my MP10’s and programmed one of my Apex outlets to run it from 6:30am to 8:30am just before the lights come on. I have been running this for the past three weeks and I am glad to say I have seen great results!! The algae was lifted and pulled off the rocks. It came off a little bit at a time over the course of the past three weeks, but I have essentially done nothing different other than my regular maintenance. I have since gone back to my bi-weekly water changes of 15 gallons and regular feeding. I know the bubble scrubbing is completely antidotal, and that not everyone has had success from using it. For me, however, I can say that I have seen nothing but positive results. I plan to keep running it for the next month or so to help keep the tank stable, then slowly phase it out so I can get the airline out of the tank (my eye is drawn to them and I hate the sight of air tubing going over my glass).

During all of the water changes, I came across another issue. I had just completed a water change and was in the process of turning all the pumps back on when my Neptune Cor 20 return pump came up with a voltage error. I double checked the outlet and confirmed that it was an issue with the power supply. I contacted Neptune support and was able to get a new power supply order for 50% off since the pump was out of warranty. I was really surprised to find out that I am not the only one this has happened to. For the amount of money, the pump had cost, I wish that Neptune had designed a better power supply for it (or made it easier to order a replacement). Luckily, I found another R2R thread that said I could hook up a power supply from one of the Dos onto it for temporary use. The Dos power supply is a lower wattage; thus the pump was only running at 10% max. Luckily, it was just enough to keep the water moving through the sump until the new power supply arrived a week later.

In addition to the dinos, hair algae, and Cor issues, I also had issues with my long time Haddoni carpet anemone eating multiple fish and a new urchin in less than two weeks. I had placed a new mimic tang and it had disappeared in just four days after putting it in. I also lost my male lyretail anthia and my court jester goby……all to my carpet. I know he had eaten some of my fish in the past, but never this many and never this fast. I believe that he was finally settling into his new anemone bowl I had made for him specifically and was beginning to grow. After he one of my new pincushion urchins, I had finally had enough. I cleaned up an old Innovative Marine 10-gallon tank and built a quick set up for him right next to my frag tank. I place a Kessil A80 on it and added some rock and sand. I plan to make this strictly a tank for him with no other inhabitants. I run it for a little over a week and added some bacteria and some a few Marine Pure balls from the 180 to help make sure the tank was good. I placed him in about a week and half ago and am happy to say that the little carpet anemone tank is looking great! I am actually very much in love with how the little tank turned out and the idea of having a small species only tank that is very low maintenance.

In its place, I ordered a large frogspawn coral from WWC. I am still playing around with its placement and moving other corals around in the tank to fit the open space better. I am planning to make the previous anemone bowl more of a euphyllia garden to keep some movement in the tank. Along with the new frogspawn, I also finally traded my old tank to a local reefer for some nice frags. Some include Walt Disney acro, Pinky the Bear, Strawberry Shortcake, Palleta Pink Tip, and a few others that I had forgot the names. All the new frags have settled in and began encrusting onto the frag plugs. I’ll be taking some pics later and posting them for reference and to document growth.

Lastly, I received my order from Clearview Acrylics. The lids are perfect! They are well built and I love the feed door features on each lid. The only issue (which was totally my fault) was the lid for the rear overflow was too large. Clearview worked with me and I had to re-order. I hoping it will be in by June.

If you have read though all of that, I really appreciate your patience and support. I want to be better at updating on a regular basis. Please feel free to ask any questions or let me know if I need to elaborate on anything I have posted about. I will be posting all the associated pics below today and tomorrow. Cheers!
 

RobB'z Reef

2500 Club Member
View Badges
Joined
Apr 23, 2020
Messages
2,783
Reaction score
5,773
Location
Eau Claire
Rating - 0%
0   0   0
Hello everyone!!

This is my first post as my new profile (side note: I lost the password to my old one and never updated it anyways…plus I lined up my profile name to match my Instagram profile also J). I am finally starting my build profile for my new custom 180 gallon mixed reef. The tank was ordered at the end of January of this year and arrived a month ago. I plan to update everyone on all the info in this first post, so I hope all of you like reading!

First of all, I’ll go over my background. I currently have two tanks. My main reef is an Innovative Marine SR-80 packed full of SPS, LPS, zoanthids, clams, and a large neon green Haddoni carpet anemone. The tank was set up in August of 2016 and has been fantastic. It runs on a 2016 Apex and is dosed with BRS 2-part. My other tank is an Innovative Marine Nuvo 20 that I use as a frag/holding tank. I just took down my 10-gallon frag tank and combined it with this one for another project that I will post about down the road. So, long story short, I am outgrowing my current tank, so time to upgrade!!!

Next, the specs to the new build:

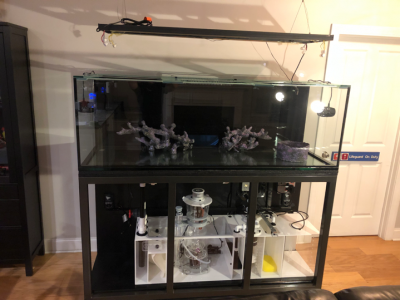
Tank:Custom 180 gallon, standard dimensions, Euro-braced on top and bottom
Stand:Custom 2 inch steel, 40” tall and built with the tank, has plywood already mounted on bottom for sump and top for tank. Stand also came with 1” of Styrofoam to cushion bottom of the tank.
Sump:GeosReef 46” sump, 3 filter socks, built in reactor and refugium section
Skimmer:Nyos 220 (sump has custom built lid for the skimmer), also have the Avast Marine Skimmer Swabbie
ATO Container:Synergy Reef 10-gallon container (Tunze Osmolator)
Dosing Container:Advanced Acrylic
Controller:2016 Apex, 2 Dos dosers, Lunar Sim module, WXM module, Avast Marine switchboard module
Return Pump:Apex Core 20
Lighting:4 Kessil A360’s (on current tank) coupled with the Aquatic Life T5 Hybrid (60” model)
Flow:two Ecotech MP40s and two Ecotech MP10s (on current tank, will move over when livestock is moved)

Like I said earlier, the tank arrived about a month ago, so I am back tracking and showing all the pictures with commentary as I have made progress up to now.

1566697124661.png


1566697155444.png


1566697186069.png


First and foremost, I had to move the old tank to the guest room to make room for the new tank. You can see I marked out the approximate area of the new tank when deciding where to put it. The move took about an hour and all the muscle of my roommate and myself. We drained about 80% of the tank and slid it into the temporary location. I had a few frag not make it, however, most corals pulled through the stress.

Next came the padding under the stand. I decided to use two ½” thick gym mats under the stand to help protect the floor and distribute the weight. Both came a few days before the tank arrived. Due to the dimensions, I had to order both mats bigger than the tank and cut them back.

1566697234004.png


On July 26th, the new tank was delivered! I had some awesome friends from Joe Knows Reefs (also who I ordered it through) come and help move it in. Exotic Aquariums built the tank in Florida along with the stand. The tank itself has amazing craftsmanship with no discrepancies whatsoever. It has an external glass overflow box with three 1” holes for a Bean Animal setup. It is reinforced with Euro-bracing on top and bottom of the tank and the three viewing panels are made of low iron glass.

1566697276971.png


1566697301476.png


1566697328786.png


Immediately after delivery, I began working on getting the system together. Many large components began coming in almost daily. I painted the bottom of the plywood under the sump black and placed some extra molding for esthetics. The new sump from GeosReef arrived about a week later and I was blown away by the build quality and attention to detail! The sump is the 46” Pro version with three 4” filter socks, a Nyos 220 Skimmer with custom built covers, a built in media reactor and 5 gallon refugium.

1566697390075.png


1566697411692.png


1566697438814.png


Over the next two weeks I began assembling other parts of the build. I hung the new Aquatic Life Hybrid fixture, but still have not placed the bulbs in. The ATO container was moved from the current tank to the new one and fits right in with the new sump. I used black chalkboard panels from the local big box hardware store with magnets on the back to mount. I began the plumbing soon after. All drainpipes are black 1” PVC with white fittings to match the sump and stand. I placed a gate valve on the main siphon and left the partial drain and emergency drain open. The return is plumbed off a manifold. There are two ½” lines to feed the reactor and fuge. After that, there is a T with two ¾” return lines into the top corners of the tank.

1566697483598.png


1566697512141.png


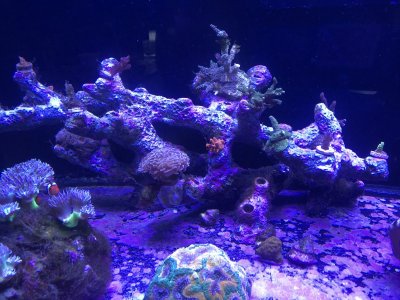
After finishing the plumbing, I began mounting some of the equipment. I ordered a second 832 Energy Bar to help power and control half of the tank. I am going to split the heaters and T5 lights onto separate circuits to not overload anything. The Kessil lights and power heads will be powered by a regular power strip that is on a different circuit from the Apex energy bars. The flow on the tank will be provided by two Ecotech MP40s and two Ecotech MP10s (the current tank is using the MP10s and will be moved over once the livestock is transferred). Lastly, I leak tested the tank the past two days with only one small leak found on the emergency drain bulkhead. After tightening it down a little more, the leak was stopped and everything was working well. At this point, I am just waiting for the ABS sheets to come in from BRS. Once installed, I will begin cycling the tank. The main rock structures are made by Aqua Rocks. Lee is was great to work with and creates amazing works of art! I got two main reef structures, which will be placed against the back glass. I specifically asked the structures to be lower to allow more vertical growth of my SPS colonies. The third structure is a custom designed “Anemone Bowl.” This will be the only place in the tank with sand and was specifically designed for the Haddoni Carpet anemone.

1566697555434.png


So this is how far I have come in the past month. I hope all of you enjoy this build! Please feel free to ask questions and give advice!

If you would like to keep up with the build, follow me on Instagram @backdraft_reefer I post multiple times a week on what I am working on

1566696991864.png
this looks super, will be checking out the rest of your build to catch up! Being relatively new here I'm just having fun meeting new people and learning about their experiences as well, one at a time :)
 
OP
OP
backdraft_reefer

backdraft_reefer

Active Member
View Badges
Joined
Jan 29, 2019
Messages
120
Reaction score
162
Location
Charleston
Rating - 0%
0   0   0
Hey everyone,

sorry for the long pause in updates. I’ve been working tons of overtime and have only had small bits of time here and there to work on the tank. Overall, the tank is doing very well. Despite working 3, 4, or 5 days straight, I have been able to keep up with regular water changes and basic maintenance. Additionally, I have added some new coral to the tank also!

I got my first order from Battlecorals back in June. Without a doubt, this is the nicest, best packaged SPS I have seen. I ordered one of the Battleboxes and Adam was great to work with. He worked with me on types of coral I was interested in and communicated the shipping dates to ensure the fastest delivery. I will definitely be ordering from him again! Here are some pics of the order:
185FF813-9EC6-4B02-BDD8-888436918261.jpeg
FBA50005-428B-4C5D-825A-78DE654F21C0.jpeg
AA20D0A3-342C-4C93-A31B-0DF94EA4D9F1.jpeg
74354B74-A7D6-40FF-A417-E52CBF6BF55B.jpeg
4C2D0330-FA2F-4BAA-959C-64C09B676DDC.jpeg

a few weeks later, I made a small order with Unique Corals. This is my second order from them and they do not disappoint! I decided to add to clam collection with a 5“ maxima clam. Once again, shipping was great and the clam came in good condition. I placed the clam in my frag tank for 2 weeks for QT and observation. I also took it out and scrubbed the sides every few days to ensure no snails were present. After the 2 weeks were over, I felt comfortable placing it into my 180 with my other clams. I also ordered a small neon green trumpet coral which I am still deciding on placement for.

7B12BEC6-6EB6-411A-BA69-0C4A9AEFC86E.jpeg
1F63607E-A8B2-4E40-8A74-DA3AFCAD092E.jpeg
650C8D38-2751-4C91-8708-5A9D6F5CA024.jpeg
95F85C5D-E455-4966-A38C-648D768A0830.jpeg

One project I have been meaning to do it turn my refugium area into a small built in frag tank within the sump. I decided to do this in order to make room for magnetic rocks in the DT and to make acclimating new frags coming in or out of the tank easier. I used an older Kessil A80 for its size and flexibilit and placed the ZenReef frag rack in the sump. So far, it’s working great! I do need to add a few snails to eat some algae, but that’s about it.

Lastly, one of my EB832 burned out on a recently thunderstorm we had a few days ago. Luckily, all the major equipment can be run off a general power strip until the new EB arrives. The generator at the house did it’s job, however, the power came on and off about 4 different time in less than 2 minutes, which wreaked havoc on the tank. I’m glad that it was the only item to get damaged.

To finish up, here are some updated pics of the tank! Enjoy!
B742F247-5353-443A-AAC4-6F68D9965ED8.jpeg
7FF64994-506C-4E00-9E26-4612527F7758.jpeg
F1684CCE-000F-4FA5-939D-3742D74460FB.jpeg
8B94B86C-DEEF-4E9C-861B-F979FC27018B.jpeg
B0827796-0AE1-45D1-BC58-FE6986985010.jpeg
 
OP
OP
backdraft_reefer

backdraft_reefer

Active Member
View Badges
Joined
Jan 29, 2019
Messages
120
Reaction score
162
Location
Charleston
Rating - 0%
0   0   0
You have a great set of tanks. Did you anemone double in size after eating all that fish?

It definitely got bigger When I moved it from the 80 gallon into the new 180. I think that is why it began eating fish regularly. Right now though, it did shrink a little bit when I placed it into the 10 gallon. I am coming up with plans to make a larger carpet new only tank in the next few months though
 
OP
OP
backdraft_reefer

backdraft_reefer

Active Member
View Badges
Joined
Jan 29, 2019
Messages
120
Reaction score
162
Location
Charleston
Rating - 0%
0   0   0
Quick update on the 180:

Everything is really starting to take off in terms of growth. I have my PH dialed in to 8.1-8.2 and the acros definitely show it. The biggest difference in the past few weeks is utilizing the fuge section of my sump to the fullest extent. As I showed a few weeks ago, I decided to add a frag rack to the fuge section to hold frags coming into or going out of the tank after cutting. I decided to move the frag rack back to the frag tank and try to get some lettuce algae to grow in it The algae was from Algae Barn and came quickly and packaged well, however the algae bleached and died within a few days. Despite the failure, I did notice a big bump in PH by just running the fuge light for a few hours everyday. That’s when I came up with the idea to create a DIY algae scrubber off the manifold. This scrubber would be very small and mostly submerged, but I still think it would grow enough algae to keep the PH up naturally in the tank and assist in removing any excess nutrients. Below are the picture of the entire process. It took about an hour and less than $10 worth of material. I simply put a T with two 1/2” pvc pipes sticking out with caps. The pipes were cut down the center with a Dremel and placed some plastic mesh from Wal-Mart zip ties to it. The water flows perfectly down it and I think natural hair algae from the tank will start growing over the next few weeks. I did not glue the entire assembly to the manifold, this way I can easily take it out and clean it when needed. So far so good!
 

chizerbunoi

Well-Known Member
View Badges
Joined
Dec 29, 2017
Messages
979
Reaction score
1,025
Rating - 0%
0   0   0
My concern for you is that often it’s hair algae growing on those screens and if that would give it a betyet chance to spread to your display from inside the fuge? Often it’s macro algae that’s submerged.
 

Ingenuity against algae: Do you use DIY methods for controlling nuisance algae?

  • I have used DIY methods for controlling algae.

    Votes: 30 52.6%
  • I use commercial methods for controlling algae, but never DIY methods.

    Votes: 12 21.1%
  • I have not used commercial or DIY methods for controlling algae.

    Votes: 12 21.1%
  • Other.

    Votes: 3 5.3%
Back
Top