First build, some questions, and documenting my build

OP
OP
Glasswalker

Glasswalker

Active Member
View Badges
Joined
Mar 24, 2016
Messages
232
Reaction score
244
Rating - 0%
0   0   0
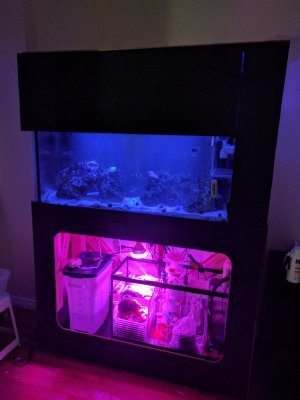
Love the full tank shot with the cover down....can you get some pics of the sump? Right front is the overflow right?
Yup, right front is overflow. Plumbing is just behind right side pillar.

Can grab some sump shots, still don't have sump door done, and will take some pics of new sump tank/parts I have (not built yet) new sump can hopefully be built and go in early next month. Have new sump tank sitting in living room, and new skimmer. Waiting to get custom glass baffles. Will maybe post my designs for it too, get some feedback.

Old(current) sump is 20L, going to a 29, same footprint but 30% deeper. New layout I think will be much more efficient, I keep same return pump, but gain a dedicated filter sock chamber with easy drop in replacement, gain like 10% refugium footprint, and a dedicated media chamber for matrix or other similar media., Plus plumbing is far cleaner, and whole thing MUCH more serviceable.

Anyway will post more pics as requested shortly.

Once the whole thing is entirely done, I will do a final round of "full system tour" shots as well, but that will be several months still likely lol.

Thanks for following along!
 
OP
OP
Glasswalker

Glasswalker

Active Member
View Badges
Joined
Mar 24, 2016
Messages
232
Reaction score
244
Rating - 0%
0   0   0
Hey sorry guys, right after that last post, work went all to hell :) been crazy busy with work, and had little time for my aquatic friends :)

That said new developments:
New sump going slow, ordered glass for baffles, but have not finished the build, been too busy.

Travelling for work now, I'm actually in Washington DC for business for the whole week. My Wife is tending to the tank.

I think I have the sketchup designs of the new sump on here, so I can post that up at least.

Also new developments:
  • The anemone split again, and the largest one moved away from the two smaller ones. So I have 3 healthy looking BTAs on my large arch island.
  • The Porcelain crab is hosting in the smaller pair (seems to alternate between them) and is happy there.
  • Since the larger one moved a little ways away from the crab, the Clowns have found the anemone! And they've begun actively hosting in it, which I was very happy about.
  • Firefish is getting more brave, and even occasionally hanging out with the foxface (Which terrified him before)
  • Foxface being a bit depressed. The clowns schooled with him before, now that they've found their anemone though they don't play with him anymore :( so I think we need to get him another friend...
  • The goby has been trashing the place lol, sand mounds everywhere, the little guy is an excavation master. Every day we wake up to a completely re-imagined aquascape it seems lol... We like it though, he's active and seems happy, and we're happy we put those feet on the rocks to keep them stable even with shifting sands...
  • Algae outbreak on the decline. I think it's under control. We started dosing NoPox, and it's made a HUGE difference. Keeping Nitrates near 0, and phosphates at 0 ppm. (nitrates somewhere between 0 and 5 ppm). Algae seems to be dying off, we've been manually removing it and it's not growing back very quickly. So that's good. I say another month or two and algae bloom should be 100% gone.
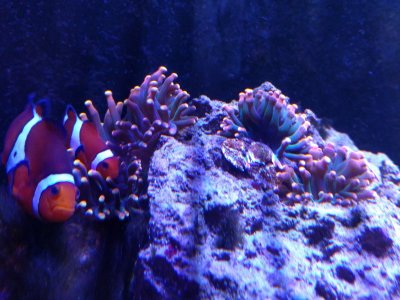
Sorry not many pics lately, as I said been rediculously busy. But in the meantime here are some really bad cellphone pics of the anemone/clowns

Oh and the anemones have taken on a rainbow appearance. They really seem to love the lighting in the display. They bubble up nice most of the time, and they now have a blue/purple coloring at the oral disk, with colors shifting through green, then orange/pink at the tips of the tentacles. It's very colorful. These pics aren't the greatest but here they are:

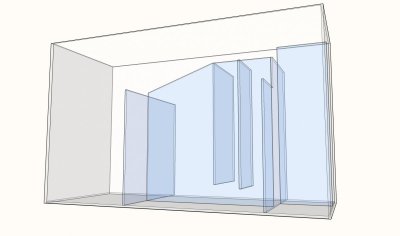
New Sump Design Angle 1
New Sump V2-1.jpg
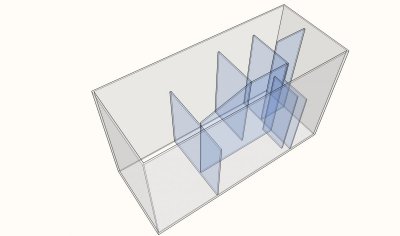
New Sump Angle 2
New Sump V2-2.jpg
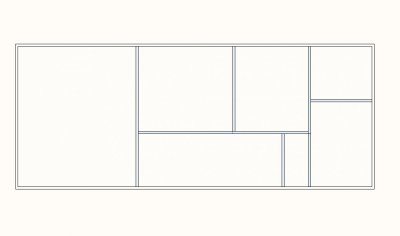
New Sump Top Down
New Sump V2 -top.jpg
The sump design is meant to keep siphons in, and return pump chamber on the same end of the sump. Giving me room for skimmer, and a decent size fuge still, with seperate mechanical filteration through dedicated sock chamber (will have enclosed sock "hole" to force water to flow through sock, right now empty chamber). There is a "spare" chamber on the front, for either media (like bio balls, or carbon) or reactors. Undecided on that for now. Sock chamber is designed to overflow into it from the inlet chamber (to keep constant depth in inlet) and down through the sock, out the bottom into the skimmer chamber. If sock plugs, water will rise in sock chamber and flow over the overflow into the skimmer chamber (also allowing me to monitor depth in that chamber to notify of plugged sock with my controller, still in the works).

Starting top right corner, going around counter clockwise (direction of flow) is inlet chamber, sock chamber, skimmer chamber, fuge, media chamber, bubble trap, return pump.

And here is the pic of the clowns (and porcelain crab) in their respective anemones (taken with whites on, doesn't do the anemone coloring justice on cell phone, under actinics they really glow rainbow):
IMG_20161202_125811.jpg

Again sorry for lack of updates, will try to get more posted when I've finished some more real work. (probably over christmas/newyears break at this point though.)
 
OP
OP
Glasswalker

Glasswalker

Active Member
View Badges
Joined
Mar 24, 2016
Messages
232
Reaction score
244
Rating - 0%
0   0   0
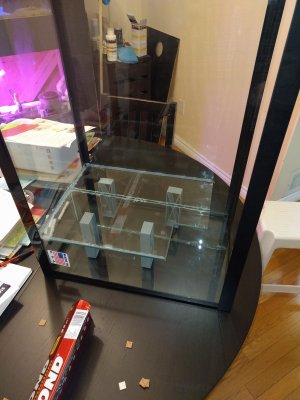
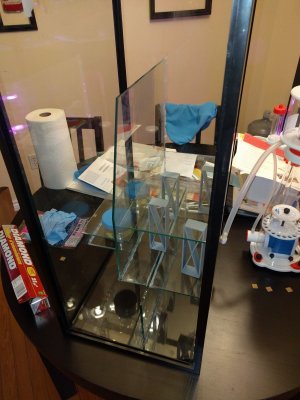
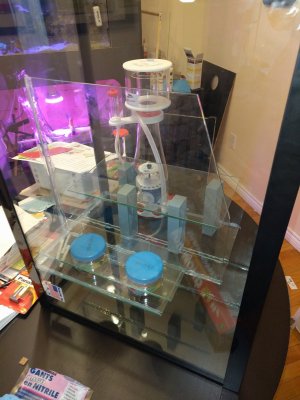
Couple updates, almost done building the new Sump... Here are a couple crappy cellphone shots of the assembly underway. All custom glass baffles (yeah the silicone job is messy, it's a tight space, and it's only a sump so I wasn't worrying about 100% pretty lol)

First couple panels going in, these are the inlet and return pump chambers. Building it on it's side, easier to align the panels for silicone this way, using jigs/braces can line up using gravity to help me, and silicone in place)
IMG_20161229_220129.jpg

Next round of panels going in:
IMG_20161231_105126.jpg

Another angle (oh and you can see the new skimmer in the background too):
IMG_20161231_105133.jpg

Also another update, we just got a new friend for the tank. Another Kole Tang, we wanted one and unfortunately didn't have a great experience with the last purchase (he was sick and didn't make it) but so far this little guy is looking active and healthy. He's in the QT tank now, and we'll be leaving him there for a full 6 weeks, possibly a little longer (to give time for the display to stabilize after the new sump installation which we plan on doing next weekend).

Here's a video on youtube of the new little guy in the QT. So far he's eaten (not a lot, but he's eaten a bit of marine spirulina flakes, and picked at some nori) he's also picking at the glass and live rock a lot, not that there is a lot of algae in the tank, but there is some.

He does appear to be breathing a bit heavy, but that might just be he's pretty active, so maybe that's normal for him, not really sure. Otherwise he seems fine, I know the tank has tons of oxygen, the oversized HOB filter creates a ton of bubbles/aeration as you can see in the video. (and sorry the tank is a bit dirty some saltwater drips on the outside from when I acclimated him, and some algae, figured I'd leave it on there for him to get if he wants).

Anyway, here is the video:


As always comments/suggestions/feedback welcome!

I'll post more pics when new sump is done, (or I might just wait until it's installed and do a bunch of photos of it installed). Anyway, until next time!
 

DeniseAndy

7500 Club Member
View Badges
Joined
Sep 12, 2011
Messages
7,802
Reaction score
10,681
Location
Milford, Ohio
Rating - 0%
0   0   0
Those guys graze all day long. Make sure to give them some algae to graze on. Can add a few sheets inside some pvc or hide between rocks, etc.
 
OP
OP
Glasswalker

Glasswalker

Active Member
View Badges
Joined
Mar 24, 2016
Messages
232
Reaction score
244
Rating - 0%
0   0   0
Those guys graze all day long. Make sure to give them some algae to graze on. Can add a few sheets inside some pvc or hide between rocks, etc.
Thanks! Yeah I added some nori on a veggie clip in the tank, and he didn't touch it at first, but I did catch him nibbling on it a bit. Then came down the next day and the whole sheet was gone lol... Not stuck in the filter, just gone... so he was apparently hungry.

So I've added another sheet on the clip now (I take a sheet, and cut it into strips most of the way through to make it like a "brush" then fold the sheet 2-3 times and clip it, this makes it wave and wiggle in the flow like seaweed (saw the suggestion elsewhere from another member).

Also prob tomorrow I'll wrap a piece of rubble in some nori to have it "on a rock" for him.

He's eating flaked veggie food, but not a lot of it, seems to mostly ignore it, but does occasionally grab a piece, so we're trying to feed a tiny amount but frequently. Hoping this, on top of the nori, on top of whatever algae/whatever he eats in the tank off the glass/rocks should be good.

He's still a bit skittish, but not extremely so, swimming about very active, if we're still and keep our distance we can watch him swim around, investigate, and nibble on things. So he seems to be doing well so far. Hard though because unlike our other fish he's not a "schedule eater" lol (the others in the display, our clowns, foxface, firefish, and goby, all attack the food visibly when we feed, and eat a lot, this guy just eats little nibbles whenever he feels like it so hard to be sure he's getting enough food.

But judging from how that nori "mysteriously" disappeared, I suspect he's eating good.
 
OP
OP
Glasswalker

Glasswalker

Active Member
View Badges
Joined
Mar 24, 2016
Messages
232
Reaction score
244
Rating - 0%
0   0   0
Hey so here is an update. Unfortunately we lost the Kole, pretty sure it was Velvet, came in at the 2 week mark, and hit fast. By the time I got back from LFS with gear to do a hospital setup, and meds to treat the Velvet, he was gone... Was working with reefsquad to id/treat it, but just couldn't act fast enough once we noticed symptoms.

Anyway, that was a week ago, and we're moving on. More lessons learned, and we now have a fairly full marine medicine cabinet going, and a full hospital tank setup (and some major planned revisions to our onboarding/QT protocol which I'll probably document as I work on that as well).

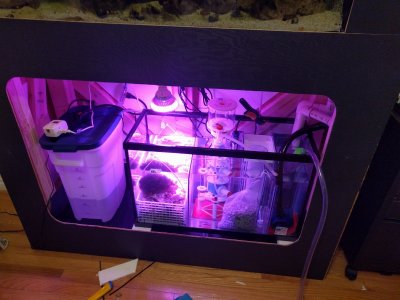
On the brighter side, this past weekend we FINALLY found time to install the new sump! Was a full weekend long project, but we got it done.

So we shut the system down, put bubblers in the DT to keep it aerated, I had to cut one run of plumbing and re-cement it (adjusting length) so wanted to give 24h for that to cure and de-gas before re-circulating water through it. We took the opportunity to kill the lights for the whole weekend too, to help with the minor algae outbreak we're having right now.

Then we got to work on plumbing, assembling everything, 3D Printing some custom parts, cleaning the old sump parts, preparing new parts, etc...

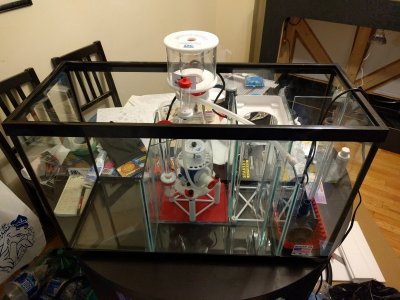
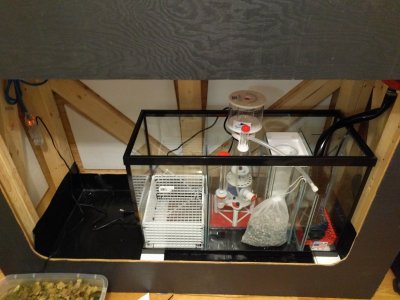
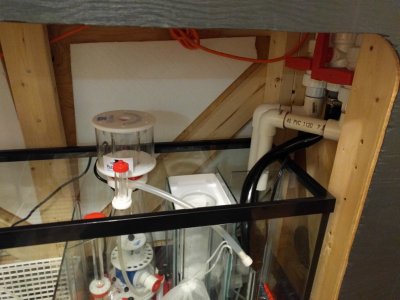
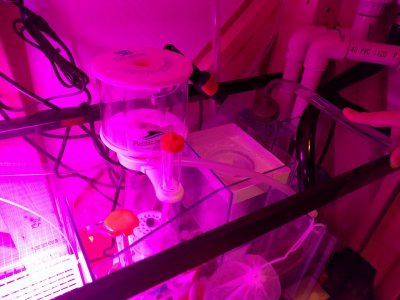
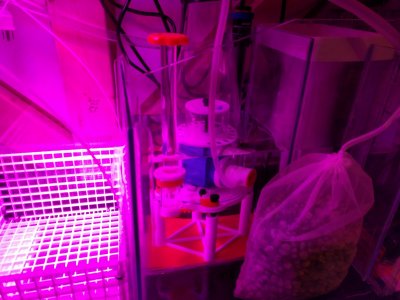
The baffles are all custom cut glass, the sock holder is made on my 3D Printer, as is the support for the skimmer. Skimmer is brand new Bubble Magus DC skimmer (basically silent), Return pump is 1050gph lifegard aquatics, which has was brought from old sump, and has served us very well and is also very silent (FAR quieter than our old Mag).

Water flows in back right corner, flows over baffle into sock chamber which has a whirlpool effect and flows into the sock via custom sock holder box.

Water then flows under baffle into the equipment chamber (skimmer and heaters). And over the next baffle into the fuge which is a low flow zone.

If the sock plugs, the design allows it to flow over the box lip, and baffle, into the equipment chamber without negatively impacting anything else (flow continues as expected, just bypasses plugged sock).

Fuge overflows into media/reactor chamber (currently a small bag of Seachem Matrix media in there I'm going to try out). And that flows through a pair of baffles to trap bubbles before the return pump chamber which is also on the righthand side.

This allows the plumbing to all be on the right side where the vertical run in my custom stand is, reducing amount of plumbing, and keeping it all out of the way to make it easy to work in the sump.

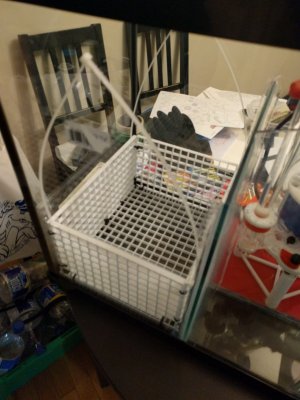
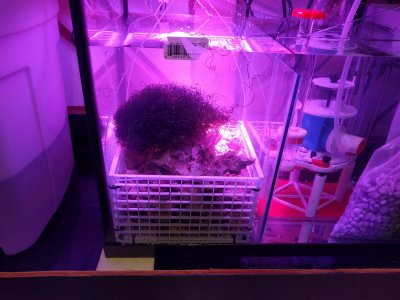
I also built a "basket" for the rubble in the fuge. Which is made of egg crate and zip ties. This allows me to easily lift the rubble during cleaning/water changes.

Basically shut system off, it backflows up to higher level in the sump, then siphon off enough water into a small bin (big enough to hold the basket), which allows me to lift the basket, give it a good shake to dislodge any settled detritus, move it to the bin to store, siphon out all the remaining water in the sump (vacuuming up detritus in the process), and then replace with clean salt water, and return the basket to it's place.

This allows me to do about 25g water change in an 80g total system, fairly easily.

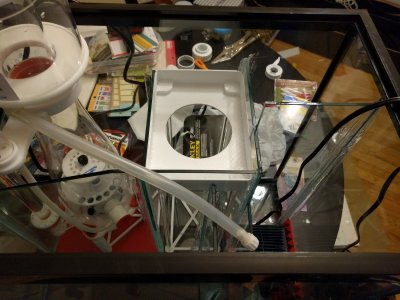
Sock holder keeps a good seal forcing water through the sock, but also allows easy pop out and change of socks with system running, and will minimize detritus making it to the rubble and media side.

Will see how it goes! But I expect this new sump will significantly ease regular tank maintenance, and significantly improve water quality for our little friends!

Here are some pics of the process:

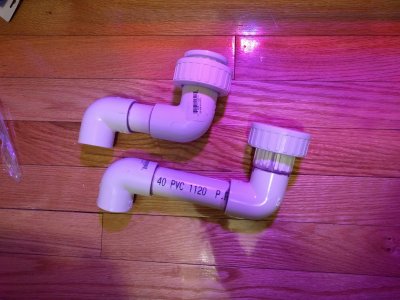
New inlet plumbing segments (attaching to existing unions, though the emergency is now getting a valve, it didn't have one before)
IMG_20170121_224842.jpg

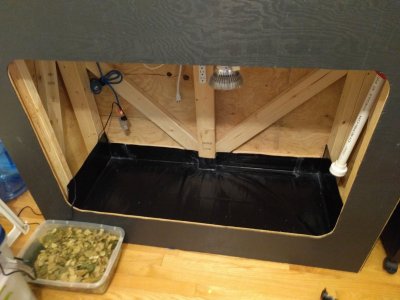
Cleared out the old sump, and ATO, got the chamber all clean...

Interesting story on this step, I was made very glad I put that sealed membrane in there! I was pulling rubble out of the old sump into the bin of tank water you see in the bottom left. When suddenly I heard trickling water... And was like "Umm, where is that coming from!?!?!" look down and to my horror there was like half an inch of water in the sump chamber! (that's like a couple gallon lol). I immediately went into emergency mode, and grabbed the siphon and finished siphoning off the sump, assuming that my moving the rubble cracked the tank somehow or something, and it was leaking.

Anyway, turns out I'm a bit of a dummy, accidentally knocked my ATO hose out of the sump when working in there, and it started to passively siphon water from the ATO into the chamber! lol

So yeah, no broken tank, but still put like 2g of water into that chamber with no ill-effects because it's nicely sealed for exactly that reason. Soaked it up with towels, and cleaned it all up for this pic, and all is good!
IMG_20170122_132719.jpg

New Skimmer on it's 3D Printed Riser (to keep it at recommended operating depth). Also shows the 3D Printed sock holding system, which seals that chamber forcing water flow through the sock (but is easily removable for cleaning/maintenance)
IMG_20170122_191458.jpg

Closer shot of the sock holder (note all 3D Printed parts printed in food-safe PET plastic, which from everything I can figure is totally reef-safe):
IMG_20170122_191513.jpg

Closer shot of the skimmer:
IMG_20170122_191507.jpg


The rubble basket I made from egg-crate and zip ties, to ease tank maintenance:
IMG_20170122_200711.jpg

Now the new sump is installed in the chamber, freshly washed/rinsed Matrix media bag added to media chamber, and pump is connected to return flex line (switched to black hose, from clear hose, to keep growth in the hose down, last time was clear and it got gunked up fast due to growth in the tube):
IMG_20170122_204935.jpg

New Plumbing installed (yes I know these valves are very close together, will make things awkward, but it works, unfortunately only limited space available)
IMG_20170122_210029.jpg

Beginning to fill the sump with fresh salt water (fuge lights are on here):
IMG_20170122_214834.jpg

More Filling, no leaks in baffles, all sealed up well. And flow behaving exactly as expected:
IMG_20170122_214839.jpg

Nearly full, fuge has live rubble and freshly pruned chaeto ball in it now
IMG_20170122_221159.jpg

Sump fully operational:
IMG_20170122_221221.jpg

And everyone is happy, tank back to normal, no more "intrusive" bubbles (the bubblers really wierd out the fish) and the lights are on for a couple hours before bed. Resuming normal (reduced slightly and adjusted spectrum due to combatting algae) lighting next day (today)
IMG_20170122_223955.jpg

Last but not least, here is a short youtube video of the sump in action:
 

Bronc

Valuable Member
View Badges
Joined
Mar 1, 2016
Messages
1,348
Reaction score
2,234
Location
Tulsa, OK
Rating - 0%
0   0   0
Really nice job!!! I love it all, and wish I would have thought of the membrane in my stand!
 
OP
OP
Glasswalker

Glasswalker

Active Member
View Badges
Joined
Mar 24, 2016
Messages
232
Reaction score
244
Rating - 0%
0   0   0
In the process of building my stand im probably stealing that idea lol

If you look back earlier on, there is membrane under the DT as well, but not as deep. My intent was to put a bulkhead in the membrane with a small hose running down into the sump membrane, so that any leak in the DT would be captured safely in the membrane, until it over-ran the lip on the bulkhead and then ran down into the much higher capacity sump membrane...

Never got that done though, so just the low capacity membrane up top, and high capacity below (no way to connect them currently). I may still drill it and add a small bulkhead down the road.

If you're going to use the idea, thought I'd throw that out there to give you the whole picture.

That membrane is certainly handy, and was an inexpensive solution. Little spills, dribbles when working in the tank or sump are caught and don't leech into the stand (causing potential structural issues) or even worse to the floor and cause damage (since I rent).

Remember not to nail/staple down the membrane, defeats the purpose. I attached it with construction adhesive to the frame, and used silicone on all seams/edges to seal it up. Have to think through how to cut all the corners to properly fold it over to get a good seam to seal up easily too.
 

Tokash23

Active Member
View Badges
Joined
Oct 3, 2014
Messages
498
Reaction score
297
Rating - 0%
0   0   0
Thanks for the advice. Thats a great idea about adding a bulkhead to the top layer if you can make it work which i think i can because of the way that i built my stand...ideas ideas. Where did you find these pond membranes? Box store or what?
 
OP
OP
Glasswalker

Glasswalker

Active Member
View Badges
Joined
Mar 24, 2016
Messages
232
Reaction score
244
Rating - 0%
0   0   0
Thanks for the advice. Thats a great idea about adding a bulkhead to the top layer if you can make it work which i think i can because of the way that i built my stand...ideas ideas. Where did you find these pond membranes? Box store or what?

Home depot, had an assortment of sizes etc. The one I got was like 12' square, and I just cut it up to make the 2 membranes. I think it was like $25 or something like that (but honestly don't actually remember exact price, might have been more than that, definitely wasn't too much more though)
 

When to mix up fish meal: When was the last time you tried a different brand of food for your reef?

  • I regularly change the food that I feed to the tank.

    Votes: 32 27.1%
  • I occasionally change the food that I feed to the tank.

    Votes: 38 32.2%
  • I rarely change the food that I feed to the tank.

    Votes: 36 30.5%
  • I never change the food that I feed to the tank.

    Votes: 8 6.8%
  • Other.

    Votes: 4 3.4%
Back
Top