Or instead of the cinder block (rocket engineer for current stand OR cinder with slightly larger tank)

Fish Fan

Valuable Member
View Badges
Joined
Dec 8, 2017
Messages
1,273
Reaction score
1,704
Rating - 0%
0   0   0
Daphne, I say just go for it! Building a 2x4 stand can be very easy and very strong. If you have a drill to drive screws and can have the store cut some lumber for you, you’re in. You may also be able to borrow a saw from a friend or neighbor (almost any saw could be used, from a hand saw to a jigsaw, circular saw, or a miter saw is ideal). 2x4’s are still pretty inexpensive, so if you goofed one up it’s not that big of a deal. And there are some easy tips and tricks to get nice, straight cuts using, for example, a jig saw or circular saw.

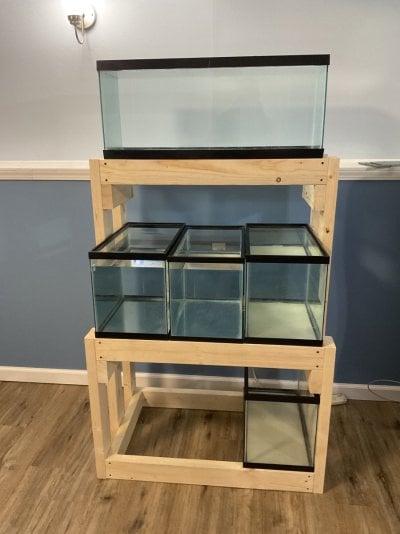
Take a look at the following video from The King Of DIY Joey. Basically, you build two square frames, one for the top and bottom. You use 4 vertical pieces to establish the height and the overall shape, if you will. Then, you come back with more vertical pieces that directly support the top and bottom frame. This is all there is to it, and I think this video will make sense of what I’m trying to describe.


If you decide you want to try this, I would even help you make a “cut list” so you know exactly what length to cut each piece in the stand. but I promise you, a stand like this is very easy to build and rock solid. What have you got to lose besides ~$20 in 2x4’s?

Just a few other thoughts: keep in mind a 2x4 does not measure 2”x4”, it’s really 1.5”x3.5”. In addition to screws I would suggest using wood glue as you build your stand, but you could likely get away with just screws.

And if you ever decide you do want to skin it, instead of using plain plywood and finishing it, consider using an inexpensive piece of wall paneling. These can be pretty inexpensive, and are already finished for you.

If I can help you with this build, please don’t hesitate to ask. Good luck!
 

Fish Fan

Valuable Member
View Badges
Joined
Dec 8, 2017
Messages
1,273
Reaction score
1,704
Rating - 0%
0   0   0
I need something good for the tank is all! To be honest, if anyone had an idea for a way to make water changes not a nightmare, I'd be quite content just setting the thing on the floor instead and calling it good.
All you’d need is a small water pump to pump the water out of your tank :) However, having the tank on the floor makes it a lot harder to enjoy, in my opinion. Take a look at the above video, if you have any questions just post.
 

Fish Fan

Valuable Member
View Badges
Joined
Dec 8, 2017
Messages
1,273
Reaction score
1,704
Rating - 0%
0   0   0
What screws should I use? I'd be grabbing them from Lowe's, but there are a million and a half packages there. Self-tapping would be great so I don't need to pre-drill. Other than that, I'm open to suggestions.
I would very much recommend Spax brand screws as these are a very good screw that tends to not need predrilling. However, it is generally a good idea to pre drill if you can. But these screws will go right into 2x4 material like it’s butter.

Size #8, and about 2” or 2.5” long.

https://www.lowes.com/pd/SPAX-8-x-2...sistant-Coated-Screw-1LB-Box-124CT/5001701747

You got this!
 

RocketEngineer

Well-Known Member
View Badges
Joined
Sep 3, 2019
Messages
976
Reaction score
1,069
Rating - 0%
0   0   0
@OP, look for 5/4X4 clear pine. Yup, five quarter. It’s very nice stuff as it’s intended for furniture type framing. No knots. For a 40G, glued and screwed, you wouldn’t need a skin. And with nice clear lumber you can just stain it and coat it for a decent look.
 

Fish Fan

Valuable Member
View Badges
Joined
Dec 8, 2017
Messages
1,273
Reaction score
1,704
Rating - 0%
0   0   0
@OP, look for 5/4X4 clear pine. Yup, five quarter. It’s very nice stuff as it’s intended for furniture type framing. No knots. For a 40G, glued and screwed, you wouldn’t need a skin. And with nice clear lumber you can just stain it and coat it for a decent look.
Great idea, thanks for your input, RE! I know you kind of wrote the book on DIY aquarium stands :)

You’re not wrong, this would look great, and be very strong, but I think that may be a bit more costly option for the OP. And, the 5/4 material would have to be surfaced. In my area, the only clear pine I can get in 5/4 is rough sawn. Not a problem for my jointer and planner, but I think that would be outside of the OP’s tool set. But certainly this is a path to a great looking and functional stand.

To Daphne, if you like RE’s idea, try to find a hardwood lumber dealer in your area (not Home Depot/Lowes). They likely stock clear pine, they can surface it (ie make it smooth, straight, and nice looking) and could even cut it to size for you. They will call this service “mill work”, you can even search for that in your area.

If you decide to proceed using common 2x4’s from the home store, these do not take stain well like nicer pine would. Consider just painting the 2x4’s with exterior paint; simple, easy, cheap, durable.

Clearly, there are lots of options, but at the end of the day it’s not that hard to build a solid stand, and I think many of us here would be happy to try to help. Pick a methodology that appeals to you, your skill set and your budget, and go for it!
 
Last edited:

RocketEngineer

Well-Known Member
View Badges
Joined
Sep 3, 2019
Messages
976
Reaction score
1,069
Rating - 0%
0   0   0
It’s been a while but we found our 5/4X4 pine in the same aisle as the 1X poplar and oak in our local box store. Just look around, you may find what works.

Also, pocket screws are amazing. I used KREG jigs for a bunch of stuff on my last build and it should work for a stand no problem. Just be sure to use the correct screws as it matters.
 

Fish Fan

Valuable Member
View Badges
Joined
Dec 8, 2017
Messages
1,273
Reaction score
1,704
Rating - 0%
0   0   0
It’s been a while but we found our 5/4X4 pine in the same aisle as the 1X poplar and oak in our local box store. Just look around, you may find what works.

Also, pocket screws are amazing. I used KREG jigs for a bunch of stuff on my last build and it should work for a stand no problem. Just be sure to use the correct screws as it matters.
I have a 75 gallon and a 15 gallon both on home built stands made using 3/4" plywood and pocket hole screws (AKA Kreg Jig screws), and they are very solid. The 75 has been running for about ten years now (both are freshwater tanks).

Kreg Jigs start at about $40, but a kit like this (that includes the clamp you really need) is on sale for $90 and well worth it, especially if you think you'll build anything else in the future.

Kreg Jig Kit

You can have Lowes or Home Depot cut the plywood to size for you, so all you'd have to do is glue and screw the pieces together.

If you have a Home Depot near you, in my area they stock a 3/4" Radiata pine plywood that's only $50/sheet and is pretty good stuff.

3/4" Radiata pine plywood

Again, really just depends on your budget and what appeals to you.
 
OP
OP
D

Daphne's_Reef

Community Member
View Badges
Joined
Dec 1, 2022
Messages
51
Reaction score
22
Location
Florida
Rating - 0%
0   0   0
Going for plywood, I'd be spending at least as much as going for a commercially built stand, and I was hoping to DIY in part to cut the cost.

If THE engineer says it's okay, it must be! Thank you!!! I don't think I can do pocket screws, because wouldn't I need a tool to screw them in? (another post happened while I was doing this, so yes, and one that I'd likely only use once)

It's good to know exterior paint is okay for it. I didn't know if it'd last forever, or if it'd need to be re-touched regularly.

So 4 36" lengths for the top rails(after I measure the tank to double check that exact frame size.) top and bottom, 4 17" side pieces (accounting for the 2xs not being exactly 2" wide) plus another for the mid-rib, 8 17" pieces for the weight bearing sides, assuming I want it to be around 24" high and that the wood top/bottom will take off 7" from that, and then 4 24" pieces for the uprights that hold the top/bottom to the legs?

Then wood glue to double-secure the joined pieces, a box of those screws, and a quart of exterior paint? No need for a plywood sheet on top for the tank to sit on, right? Then go back for shims if it isn't 100% level where it'll be sitting.

Then to figure out pump upgrades, how to get rid of the mounds of algae/aiptasia in there, and how to do the sump. At least I've got an hob skimmer already. :face-with-tears-of-joy:
 

Fish Fan

Valuable Member
View Badges
Joined
Dec 8, 2017
Messages
1,273
Reaction score
1,704
Rating - 0%
0   0   0
Sounds like a great plan! Double check your tank because while a 40 breeder is indeed 36" long with the trim it's usually a little longer, like 36.25". If it works out to be some odd fraction, just go to the next largest quarter inch to make it easier on yourself. The 2x4's are 1.5" wide and as long as the plastic frame of the tank sits on the 2x4 frame, you should be fine.

The paint will last a long time, but will scratch and ding if the stand gets bumped or whatever, but I don't think it would be a big deal to touch it up from time to time. Save the leftover paint for future touch ups. Exterior house paint should be reasonably waterproof and easy to work with (cleans up with water).

Wood glue would be a good idea for sure, try like Titebond II or III, or wood glue from Gorilla Glue or similar.

I personally don't think you need the plywood top, I have made stands like this in the past and they have held up fine without the top. However, it's not a bad idea to add the plywood top. It would give the stand a little more resilience to twisting. You would not need a thick piece of plywood for this, 1/4" would be just fine, and they sell material like this in small 2'x4' pieces. Strictly speaking I think you can skip the plywood, but it wouldn't be much extra to add it if you feel better about it.

EDIT: You may want to consider adding a piece of plywood at the bottom to act like a shelf ;-) But, you can add either a top or bottom piece later if you decide you want to.

Double check your tank's exact dimensions and if you'd like me to I'll help with the cut list or the lengths you'll need to cut everything to. You may be able to get Lowes to cut them to size for you too.
 
Last edited:
OP
OP
D

Daphne's_Reef

Community Member
View Badges
Joined
Dec 1, 2022
Messages
51
Reaction score
22
Location
Florida
Rating - 0%
0   0   0
Since Petco has tanks on sale at the moment, I was planning to grab a new one. (I've had this tank for a WHILE, and it was outside for a couple years in the elements with plants in it, and since I plan to need to move it anyway. . .) Those cuts seem to be okay if I just measured the new tank when I got it to make sure it'd sit right?* Should I plan for a tiny bit of overlap so instead of being directly on the edge of the 2x4 it sat 1/4" or so inside it instead? Depending on how many cuts I could get without needing to buy more boards anyway.

*(4x ~36" -top/bottom rails
5x ~17" top/bottom rails+1 for the centre brace
4X ~24" pieces for the frame connection
8x ~17" for the weight-bearing sides)
 

Fish Fan

Valuable Member
View Badges
Joined
Dec 8, 2017
Messages
1,273
Reaction score
1,704
Rating - 0%
0   0   0
It would be ideal if you bought a new tank and had it while you're building the stand. This way, you can double check everything by simply holding your cut part up to your tank.

Yes, you can build the stand a bit larger in each direction and be just fine. You have that 1.5" width of the 2x4 frame to work with. You just want to make certain that the plastic part of the tank's frame is what's sitting right on the 2x4 frame. You have to support standard tanks by their plastic frame or you risk damaging the tank.

If I remember correctly, a standard 40 breeder's footprint is 36"L x 18"W, but double check because with the frame I believe they will be slightly longer, like 36.25" or so. But for now just using the 36"x18" footprint you would need:

Four 36" pieces for the top and bottom long rails
Five 15" pieces for the top and bottom short rails (18" width - 3" (the thickness of two 2x4's))
Four 24" pieces for your first set of vertical supports
Eight 17" pieces for the second round of supports. These are doing the real work of holding up the stand, so try to get these all the same length exactly. With the vertical supports, it's not crucial that you cut them exatly 24". What's more important is that they are all exactly the same length. You can be slightly longer or slightly shorter, but try to make them all the same.

I'd suggest if you have the extra material, cut a 6th pieces at 15" and place this in the center of the bottom frame. This piece would then support a shelf if you decide to have one (and who doesn't need a place for buckets and turkey basters, right??).

I'd also suggest picking up an inexpensive speed square at the hardware store if you don't have one. You'll want to do your best to make sure everything goes together squarely.

If you have a Harbor Freight near you this can be a great place to get any of the tools you might need. Lowes tends to be pretty expensive on most things, and since you're not exactly trying to start a furniture making business, Harbor Freight's inexpensive tools would serve you well on this project.

Are you cutting the 2x4's yourself, or asking Lowes to do it?
 
Last edited:

Fish Fan

Valuable Member
View Badges
Joined
Dec 8, 2017
Messages
1,273
Reaction score
1,704
Rating - 0%
0   0   0
By the way, you can cut the pieces for the top and bottom frame, and screw them together WITHOUT glue. Take your assembled frame to your tank and just see if it fits. If it fits your tank's frame just how you want it, unscrew the frame pieces and reassemble everything permanently with glue. If it doesn't fit, correct the problem before going any further. This is called "dry fitting" in woodworking.

Once your top and bottom frame are good, same thing with the vertical supports. Start with the first four and work on getting them as perfect as you can without glue. Once you have them, take them off one-by-one and reinstall with glue.

At this point, even without the extra vertical supports your stand *should* hold the EMPTY tank. Place the empty tank on your stand and marvel at your accomplishment. If it looks like everything is going together well, then cut and fit the remaining eight vertical pieces. These are really what's supporting the weight of the tank, so you want them to fit perfectly. The good news is you don't even have to measure them, simply hold your 2x4 in place where it goes on bottom rail, and mark with a pencil at the top rail right where you'd have to cut it so it fits right in between the top and bottom frames. Feel free to intentionally cut your piece a tiny bit long, then take additional tiny cuts, test fitting after each cut, until the piece just fits. Woodworkers call this "sneaking up" on a cut. I hope that all made sense!

EDIT: The whole "sneaking up" thing may only help you if you have access to a power saw like a miter saw or table saw. Ask a friend or neighbor to borrow a miter saw, most homeowners and amateur woodworkers have one. They may even help you cut the pieces too!
 
Last edited:
OP
OP
D

Daphne's_Reef

Community Member
View Badges
Joined
Dec 1, 2022
Messages
51
Reaction score
22
Location
Florida
Rating - 0%
0   0   0
"Five 15" pieces for the top and bottom short rails (18" width - 3" (the thickness of two 2x4's))" Oops. I did know that, I just took off the half inch that it is thinner than the width of the actual board, haha. At least I was not cutting it at the moment!

A shelf would mean no room for a future sump, unless I made bracing across the whole thing, so I think I'll skip that piece. I DO have a speed square somewhere, though. Trick is to find it.

"Once you have them, take them off one-by-one and reinstall with glue." Wouldn't it be easier to just partially unscrew them once they've been fit the way I want and dribble or brush the glue or into the joined spot?

Sneaking up on the cut would be okay, but still planning to have Lowe's cut it for me, so I doubt I could just ask them to cut the same spot a half dozen times. I don't have any friends with tools, sadly. It's just me!

Thank you again for all the help!
 

Fish Fan

Valuable Member
View Badges
Joined
Dec 8, 2017
Messages
1,273
Reaction score
1,704
Rating - 0%
0   0   0
"Five 15" pieces for the top and bottom short rails (18" width - 3" (the thickness of two 2x4's))" Oops. I did know that, I just took off the half inch that it is thinner than the width of the actual board, haha. At least I was not cutting it at the moment!
Yes, at least you were not cutting yet ;-)
A shelf would mean no room for a future sump, unless I made bracing across the whole thing, so I think I'll skip that piece. I DO have a speed square somewhere, though. Trick is to find it.
The shelf was totally just a suggestion. If you don't need it, don't worry about it. This is your stand, make it however you want it ;-)
"Once you have them, take them off one-by-one and reinstall with glue." Wouldn't it be easier to just partially unscrew them once they've been fit the way I want and dribble or brush the glue or into the joined spot?
Sure! As long as you can get the glue in between the wood and then get it back to a nice, tight joint, it'll be fine.
Sneaking up on the cut would be okay, but still planning to have Lowe's cut it for me, so I doubt I could just ask them to cut the same spot a half dozen times. I don't have any friends with tools, sadly. It's just me!
Ah! OK, I was not sure how you were going to make the cuts. If Lowes cuts your wood, try to find a capable employee who will cut them correctly. Remember that consistency is really better than being exactly at, for example, 24". Just try to make sure your parts are all the same length. And obviously choose some nice, straight 2x4's to begin with. You may have to sort through the pile to find some nice ones.
Thank you again for all the help!
No problem at all! I like woodworking, and I like trying to help people build their own stands. If you have any questions, please post back and I'll do my best to try to help you.

Good luck!!
 

riche

Valuable Member
View Badges
Joined
Feb 7, 2014
Messages
1,061
Reaction score
408
Location
Metro Detroit
Rating - 0%
0   0   0
It would be ideal if you bought a new tank and had it while you're building the stand. This way, you can double check everything by simply holding your cut part up to your tank.

Yes, you can build the stand a bit larger in each direction and be just fine. You have that 1.5" width of the 2x4 frame to work with. You just want to make certain that the plastic part of the tank's frame is what's sitting right on the 2x4 frame. You have to support standard tanks by their plastic frame or you risk damaging the tank.

If I remember correctly, a standard 40 breeder's footprint is 36"L x 18"W, but double check because with the frame I believe they will be slightly longer, like 36.25" or so. But for now just using the 36"x18" footprint you would need:

Four 36" pieces for the top and bottom long rails
Five 15" pieces for the top and bottom short rails (18" width - 3" (the thickness of two 2x4's))
Four 24" pieces for your first set of vertical supports
Eight 17" pieces for the second round of supports. These are doing the real work of holding up the stand, so try to get these all the same length exactly. With the vertical supports, it's not crucial that you cut them exatly 24". What's more important is that they are all exactly the same length. You can be slightly longer or slightly shorter, but try to make them all the same.

I'd suggest if you have the extra material, cut a 6th pieces at 15" and place this in the center of the bottom frame. This piece would then support a shelf if you decide to have one (and who doesn't need a place for buckets and turkey basters, right??).

I'd also suggest picking up an inexpensive speed square at the hardware store if you don't have one. You'll want to do your best to make sure everything goes together squarely.

If you have a Harbor Freight near you this can be a great place to get any of the tools you might need. Lowes tends to be pretty expensive on most things, and since you're not exactly trying to start a furniture making business, Harbor Freight's inexpensive tools would serve you well on this project.

Are you cutting the 2x4's yourself, or asking Lowes to do it?
When you listed the 4 pieces at 24" and 8 at 17", is this based on having the stand only 24" tall?
 

Fish Fan

Valuable Member
View Badges
Joined
Dec 8, 2017
Messages
1,273
Reaction score
1,704
Rating - 0%
0   0   0
When you listed the 4 pieces at 24" and 8 at 17", is this based on having the stand only 24" tall?
Yes, that seems to be what the OP wanted. You could certainly make it taller or shorter if you wanted to.
 
OP
OP
D

Daphne's_Reef

Community Member
View Badges
Joined
Dec 1, 2022
Messages
51
Reaction score
22
Location
Florida
Rating - 0%
0   0   0
Yes. I think the current one (NOT safe-it was for a 30 gallon and has propped cinder blocks behind it for the extra width) is about that high, and it seems to be a nice height for me.
 

Fish Fan

Valuable Member
View Badges
Joined
Dec 8, 2017
Messages
1,273
Reaction score
1,704
Rating - 0%
0   0   0
@Daphne's_Reef I hope your build is going well! I don’t know if you’ve gotten started yet, but if you haven’t, I have another design idea that may be even easier than what I was describing before. This is not my original idea, I have even seen fish stores use this construction method. It’s easier to build because with the other stand I was describing you have to cut the vertical support legs just right so they sit in between the top and bottom frame. The other way to do it is to use horizontal supports rather than vertical supports, and it doesn’t matter if the horizontal pieces are slightly too long or short. I have some pics that I think will show you what I mean. I’m not sure why I didn’t think to mention this before….

I have been wanting to setup a quarantine system for future reef inhabitants, and I have a freshwater tank that I want to breakdown and reboot, so today I made this stand. I designed this one to hold three 10 gallon tanks side-by-side, and the top shelf is sized for a 29/20L if I need more real estate. As you can see, I have the three 10 gallon tanks filled, and the stand is rock solid. Although my 29 gallon is in storage and not on hand, I have every confidence that the stand will support the 29 no problem.

Obviously, you wouldn’t need the top shelf, so just build the base. I started by making the top and bottom frame as described before. Then I attached the vertical legs, and then the horizontal supports pieces under the top frame. Again, if these horizontal pieces are not exactly the perfect length, I won’t matter much, they just need to support the top frame fully.

Mine is a temporary structure, I plan to disassemble it and reuse the wood and screws in other projects when I’m done with all this. Because of that, I didn’t use any wood glue here. If you glued up each of those joints, the stand would be rock solid for sure. I have no worries about mine even without using glue. I did use fairly beefy 3” Deckmate brand deck screws that I had on hand.

So just another option to throw at you, not to confuse you more :) I hope the pictures help!

EDIT: If you’re interested to know, the ten gallon tanks are right at 24” tall, and I can easily get a 5 gallon bucket etc. under the stand. The top shelf is at 48” tall.

IMG_0184.jpeg IMG_0185.jpeg IMG_0186.jpeg
 
Last edited:
OP
OP
D

Daphne's_Reef

Community Member
View Badges
Joined
Dec 1, 2022
Messages
51
Reaction score
22
Location
Florida
Rating - 0%
0   0   0
I have not started yet. Only because the petco near me is out of 40s.

So I'd need a top/bottom frame, then three (?) uprights for the sides, and a piece to go under the frame and attach to each of those? Do I need another bar inside the top frame piece? Looks like you have plywood over yours. Is that for stability, or to have contact on the long sides of the smaller tanks?
 

Fish Fan

Valuable Member
View Badges
Joined
Dec 8, 2017
Messages
1,273
Reaction score
1,704
Rating - 0%
0   0   0
Turns out I had a 20L 9n the garage, so here it is filled and doing just fine on the stand.

It also occurred to me that if I wanted to, I could get three 10 gallon tanks on the bottom frame. You may want to consider having your old 40 live under your new 40 and act like a sump. That would be a pretty good setup, I think.
 

Attachments

  • IMG_0187.jpeg
    IMG_0187.jpeg
    134.7 KB · Views: 11

When to mix up fish meal: When was the last time you tried a different brand of food for your reef?

  • I regularly change the food that I feed to the tank.

    Votes: 45 21.4%
  • I occasionally change the food that I feed to the tank.

    Votes: 72 34.3%
  • I rarely change the food that I feed to the tank.

    Votes: 70 33.3%
  • I never change the food that I feed to the tank.

    Votes: 19 9.0%
  • Other.

    Votes: 4 1.9%
Back
Top