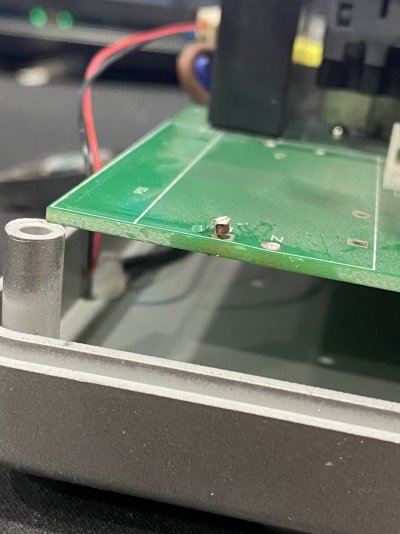
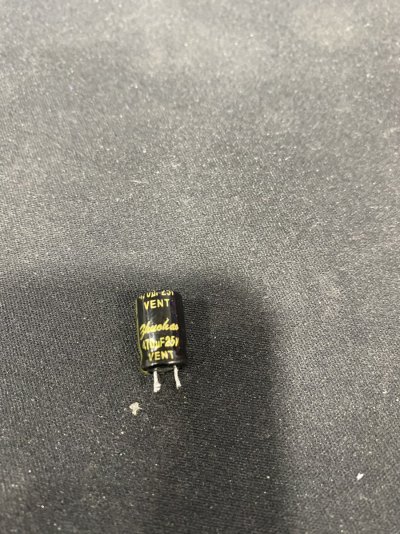
Another attempt at fixing Apex EB832

OP
OP
_AV

_AV

Well-Known Member
View Badges
Joined
Oct 3, 2019
Messages
720
Reaction score
730
Rating - 0%
0   0   0
Thank you very much I will check that out. Desoldering and resoldering relay will be no big deal but I have no clue how to restore a burnt pad. Any info on doing this ?

Once you remove the relay and clean the solder, you'll be able to see what the other side looks like. From what you've posted above I'm guessing that the pad in the picture is completely gone. If that's the case, perhaps running a thick copper wire from the other side, through the hole and soldering it to the trace and then to the relay pin will provide a reasonable repair. The key is to pick a wire that has the conductivity equal or greater to that of the trace.
Oh, and the wire on the other side where it connects to the trace will have to be insulated with some conformal coating to avoid any shorts when it gets in contact with the bottom of the relay.
 
Last edited:

Kershaw

Valuable Member
View Badges
Joined
Nov 11, 2015
Messages
2,494
Reaction score
1,500
Location
sacramento, ca
Rating - 0%
0   0   0


looking inside mine, one of the capacitors on the 12v power supply is swollen.
could that cause this flickering. is this what you meant by Click of death?
 
OP
OP
_AV

_AV

Well-Known Member
View Badges
Joined
Oct 3, 2019
Messages
720
Reaction score
730
Rating - 0%
0   0   0


looking inside mine, one of the capacitors on the 12v power supply is swollen.
could that cause this flickering. is this what you meant by Click of death?

I can hear a very rapid clicking in your video. Assuming that the noise is coming from the EB832 and you see a bulged capacitor, chances are very excellent that the problem is indeed with the 12v PSU.
 

Kershaw

Valuable Member
View Badges
Joined
Nov 11, 2015
Messages
2,494
Reaction score
1,500
Location
sacramento, ca
Rating - 0%
0   0   0
I can hear a very rapid clicking in your video. Assuming that the noise is coming from the EB832 and you see a bulged capacitor, chances are very excellent that the problem is indeed with the 12v PSU.
Yes the rapid clicking is the EB832.
thanks for your input. I will post my results once I locate the proper caps and replace them
 

Kershaw

Valuable Member
View Badges
Joined
Nov 11, 2015
Messages
2,494
Reaction score
1,500
Location
sacramento, ca
Rating - 0%
0   0   0
@_AV i am having a hard time finding a site that has all capacitors in stock. shipping is pretty high on these items. the few sites that have them all have a min Order of 75 or more.
i am looking at attempting to replace the PSU with the meanwell version. it appears as though the old PSU is 5v and the new is 12V. if that's the case then i would need a IRM-5-5? i am aware it may not fit but looking at the old one VS IRM pin placement i may be willing to take the chance. could you please provide your Opinion on this mater?
thank you
 
OP
OP
_AV

_AV

Well-Known Member
View Badges
Joined
Oct 3, 2019
Messages
720
Reaction score
730
Rating - 0%
0   0   0
@_AV i am having a hard time finding a site that has all capacitors in stock. shipping is pretty high on these items. the few sites that have them all have a min Order of 75 or more.
i am looking at attempting to replace the PSU with the meanwell version. it appears as though the old PSU is 5v and the new is 12V. if that's the case then i would need a IRM-5-5? i am aware it may not fit but looking at the old one VS IRM pin placement i may be willing to take the chance. could you please provide your Opinion on this mater?
thank you
It's actually a 12V PSU, not 5V. I corrected myself in a later post, but I can't edit the original unfortunately. So you can't use IRM-5-5 and need an IRM-5-12 instead. But those are out of stock everywhere. You can try the MPM-05-12 version of it instead, but (1) I don't know if it fits in original holes and (2) if it fits in the available space. You'd have to do your own measurements to confirm. Also, I do believe that replacing the entire PSU is not necessary as the new caps will make the original PSU strong enough to last for a very long time. But only the time will tell if. Meanwell PSUs are not without faults either.
 

Kershaw

Valuable Member
View Badges
Joined
Nov 11, 2015
Messages
2,494
Reaction score
1,500
Location
sacramento, ca
Rating - 0%
0   0   0
It's actually a 12V PSU, not 5V. I corrected myself in a later post, but I can't edit the original unfortunately. So you can't use IRM-5-5 and need an IRM-5-12 instead. But those are out of stock everywhere. You can try the MPM-05-12 version of it instead, but (1) I don't know if it fits in original holes and (2) if it fits in the available space. You'd have to do your own measurements to confirm. Also, I do believe that replacing the entire PSU is not necessary as the new caps will make the original PSU strong enough to last for a very long time. But only the time will tell if. Meanwell PSUs are not without faults either.
thank you for Reply i want to replace caps but i cant find any with out paying 30+ for shipping between two sites. ill keep looking and intend to buy a few extra to help local reefers out they may need it
 

Kershaw

Valuable Member
View Badges
Joined
Nov 11, 2015
Messages
2,494
Reaction score
1,500
Location
sacramento, ca
Rating - 0%
0   0   0
May not have been gentle enough.... hope it’s savable.
 

Attachments

  • 6861DD91-0359-42DB-8E73-2B7CB67B743B.jpeg
    6861DD91-0359-42DB-8E73-2B7CB67B743B.jpeg
    162.7 KB · Views: 131

Kershaw

Valuable Member
View Badges
Joined
Nov 11, 2015
Messages
2,494
Reaction score
1,500
Location
sacramento, ca
Rating - 0%
0   0   0
Confirmed the 470uf25v is well below it’s rated uF. I removed all 3 and 2 of 3 check out as good. And the swollen cap is the one in picture.
 

Attachments

  • 3FA88BE4-B8DA-4D8F-BC66-1FE3E0CD913D.jpeg
    3FA88BE4-B8DA-4D8F-BC66-1FE3E0CD913D.jpeg
    330.3 KB · Views: 114
  • AFF6309A-EC68-4C12-82F4-48289181D653.jpeg
    AFF6309A-EC68-4C12-82F4-48289181D653.jpeg
    196.2 KB · Views: 107
OP
OP
_AV

_AV

Well-Known Member
View Badges
Joined
Oct 3, 2019
Messages
720
Reaction score
730
Rating - 0%
0   0   0
Looks like you are on the right track. The lifted trace is on the AC side, make sure you repair it safely.
 
OP
OP
_AV

_AV

Well-Known Member
View Badges
Joined
Oct 3, 2019
Messages
720
Reaction score
730
Rating - 0%
0   0   0
The FixReef Youtube channel is now officially live!

Here's the video of the EB832 12v PSU repair, enjoy.
Please like and subscribe to help motivate me to work on other videos :)

 
OP
OP
_AV

_AV

Well-Known Member
View Badges
Joined
Oct 3, 2019
Messages
720
Reaction score
730
Rating - 0%
0   0   0
Thanks, very handy reference video!:D
Thank you. It would be great if the mods could add the video link to the first post in this thread.

Great how to. What do you use to clean the PCB?
Thanks, guys!
I always use 99% isopropyl alcohol for manual cleaning and rinsing. Thankfully, the prices started to come down this year as it's becoming more available.
 

Reefer Reboot

F.V.P.!
View Badges
Joined
Jan 31, 2018
Messages
2,649
Reaction score
3,836
Location
Irvine, Ca.
Rating - 0%
0   0   0
Unfortunately, OP is not a Partner/Supporter with unlimited editing. I vote that for something as useful as his fixit inputs he should get an honorary membership. ;) If that can't happen then hey #MODS, can we get this added to the first post please?
 

((FORDTECH))

2500 Club Member
View Badges
Joined
Jan 23, 2020
Messages
4,838
Reaction score
4,280
Location
Chicago
Rating - 0%
0   0   0
Unfortunately, OP is not a Partner/Supporter with unlimited editing. I vote that for something as useful as his fixit inputs he should get an honorary membership. ;) If that can't happen then hey #MODS, can we get this added to the first post please?
Didn’t realize that was one of the perks
 

((FORDTECH))

2500 Club Member
View Badges
Joined
Jan 23, 2020
Messages
4,838
Reaction score
4,280
Location
Chicago
Rating - 0%
0   0   0
Once you remove the relay and clean the solder, you'll be able to see what the other side looks like. From what you've posted above I'm guessing that the pad in the picture is completely gone. If that's the case, perhaps running a thick copper wire from the other side, through the hole and soldering it to the trace and then to the relay pin will provide a reasonable repair. The key is to pick a wire that has the conductivity equal or greater to that of the trace.
Oh, and the wire on the other side where it connects to the trace will have to be insulated with some conformal coating to avoid any shorts when it gets in contact with the bottom of the relay.
Finally got around to doing the repair. Was little confused at first about what you meant but I think I got it. pads were totally burnt. Had to run a jumper At least I hope I got what you meant :) either way thank you very much for your help. well wish me luck hope it’s fixed lol
911547FC-A312-4A29-979A-4D52C3B66725.jpeg
 
Last edited:

Kershaw

Valuable Member
View Badges
Joined
Nov 11, 2015
Messages
2,494
Reaction score
1,500
Location
sacramento, ca
Rating - 0%
0   0   0
Looks like you are on the right track. The lifted trace is on the AC side, make sure you repair it safely.
Thank you, will be subscribing to your channel as well. The caps are in route, any advice on repairing the lifted trace?
 

TOP 10 Trending Threads

WHEN CONSIDERING BUYING A NEW FISH, WHAT FACTOR IS THE MOST IMPORTANT TO YOU?

  • Compatibility with other members of the tank.

    Votes: 12 24.5%
  • Compatibility with the environment & size of the tank.

    Votes: 18 36.7%
  • Feasibility of care & nutritional needs.

    Votes: 5 10.2%
  • Temperament & common personality traits.

    Votes: 1 2.0%
  • Common health issues & survival rates.

    Votes: 1 2.0%
  • Roles & benefits offered to the reef.

    Votes: 8 16.3%
  • Appearance & coloration.

    Votes: 3 6.1%
  • Other (please explain).

    Votes: 1 2.0%
Back
Top