USING HANNA CHECKER HI-707 TO TEST FOR IODINE
In my quest to improve my testing accuracy and precision I found the standard colorimetric tests for Iodine difficult to get any kind of accurate reading and the repeatability (precision) was not very good. Being that I dosed Iodine this made me uneasy about the actual levels. So I decided to take the same approach I did with Nitrates. I found a Hanna Checker that I could use with the Red Sea Iodine Test Chemistry and proceed to set up a DIY test protocol. What follows is a bit of background on the test development, the data on accuracy and precision…The test procedure in detail (video) and comparisons of results to outside testing services.
My quest started well over a year ago and has taken several twists and turns…Different test chemistries…different measuring instruments…different procedural steps, and combinations thereof. I will not bore you with all of the details (and there are lots) but will hit the highlights that support the results.
Here is what I will cover:
- Summary ---The Procedure (With Video)
- The principle of the test
- The Chemistry
- The Instrument
- The generation of the regression
- The Standards
- The Measurements
- Goodness of Regression Fit
- The test Accuracy Results
- The test Precision Results
- The test results measured against outside testing
- Additional Work
This summary provides the general details of the procedure step by step. It is intended to go along with the posted video and will allow to perform the test without going into the technical details of the procedure development. For those of you who might be interest in the details of the test development and all the “Technical Stuff” that starts with section
II THE PRINCIPLE.
I THE PROCEDURE
EQUIPMENT NECESSARY
1) Hanna HI-707 Nitrite LR Checker
2) Red Sea Iodine Pro Reagents A & B
3) Two Hanna Checker Vials
4) Timer
5) Accurate Pipette(s) or Syringe cable of measuring .5 mL and .8 mL
6) RODI Water for rinsing vials & pipettes
7) Accurate Thermometer
8) Sample Water Container (I use a beaker or plastic bottle)
PROCEDURE…STEP BY STEP (See Included Video)
1) Fill vial with water to be tested. This will be the Blank. Place it into the Checker
2) Set Timer to 1 Minute 45 seconds
3) Rinse second vial with water to be tested
4) Fill second vial with water to be tested.
5) Add .5 mL of reagent “A” to second vial containing the test water.
6) Add .8 mL of reagent “B’ to the second test vial — IMMEDIATELY START TIMER!!
7) Put the cap on the second vial and invert the vial several times
8) Press the button on the Hanna Checker…When “C1” appears press again….”C2” will now be on the display.
9) Remove the blank vial from the checker and put the second vial into the checker.
10) The Timer should be still counting down from 1:45…When the timer reaches “0” IMMEDIATELY PRESS THE BUTTON ON THE CHECKER TO GET THE READING
11) Record the value appearing on the meter…This is the value you put onto the formula below.
12) MEASURE AND RECORD THE TEMPERATURE OF THE SAMPLE BEING TESTED
NOTE ON TEMPERATURE: Temperature below 73⁰F at lower iodine (<.02ppm) concentration levels will cause the HI-707 to exceed its measurement limits of 600. It is recommended to keep the sample temperature above 73⁰F. See the section on the “Regression Equations” for details in calculating the PPM iodine.
Multiply the meter reading by -.0003292492 then add 0.1973653 This will = PPM Iodine
Example: (No Temperature Correction)
Meter Reading 422
1) 422 x -0.0003292492 = -0.138943162
2) -0.138943162 + 0.1973653 = 0.058 PPM Iodine
NOTE ON TEMPERATURE: Temperature below 73⁰F at lower iodine (<.02ppm) concentration levels will cause the HI-707 to exceed its measurement limits of 600. It is recommended to keep the sample temperature above 73⁰F. See the section on the “Regression Equations” for details in calculating the PPM iodine.
NOTES ON THE PROCEDURE: The time is very critical to achieving accurate and precise results so paying attention to start and stop times is important. In addition the accurate measurement of the reagents is important to getting good results. I generally run two tests back to back and take an average of the values. If the two results are greater than 5% from each other I run a third test and take the average of the 3 as my value…This does not happen very often. (See Table 3) Total testing time is approximately 6-8 minutes….One note on the video. The video shows Step 7 and 8 in different order than the procedure calls for…The procedure is the correct way.
VIDEO of PROCEDURE
II THE PRINCIPLE
The principle is much the same as other colorimetric tests. A sample is mixed with a series of reagents that react with the ion being tested for in such a way as to produce a distinct color. The saturation of the color is proportional to the concentration of the ion in the test water. Is some tests the higher the concentration the more saturated the color (directly proportional to concentration). In other tests (like the Red Sea Iodine Test) the higher the concentration the lower the saturation (Inversely proportional). Once the reaction is complete the color can be compared to a standard color card or measured spectrophotometrically by using an instrument like a Hanna Checker to determine the value.
THE CHEMISTRY
The chemistry I chose for my work is the Red Sea Iodine Pro Test. I tried others but this one ended up the best for my application. I am not going to go into the chemistry itself but am going to note two important factors that impact the outcome of the test results.
First the reaction is time sensitive….This is best illustrated by Figure 1.
Fig 1
As you can see as the level of Iodine concentration increases the steeper the time dependency becomes. I ran two tests at each level to confirm the results. The red line represents the time interval I chose as my standard time, 1 min 45 seconds. I chose this because this was the time interval that the Red Sea Standard matched the .06 level on the standard color card but given the results in Fig 1 other time intervals could work. The implications of this time dependency on the test procedure is the test must be accurately timed.
The second factor is the reaction is temperature dependent. See Fig 2
Fig 2
Again I ran two sample sets to confirm the results. The outcome is for every 1⁰ F it changes the meter value by ±5 units. The implications for this temperature dependency are that the sample temperature needs to be folded into the regression formula.
Note: Temperatures below 73⁰F at the lower levels of Iodine (<.02) will exceed the range of the HI-707 Meter (600). So it is recommended if the sample temperature is below 73⁰F that the sample be warmed up.
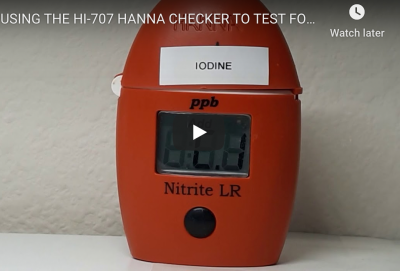
THE INSTRUMENT
The Hanna Checker I finally chose after testing several others is the HI-707 Low Range Nitrite Colorimeter. Its light source is a 470nm LED. It measures in parts per billion from 0- to 600 ppb. Stated accuracy is ± 20 ppb ± 5% of meter reading. The detector is a Silicon Photocell. After running multiple Iodine samples at 5 different levels (.01, .03, .06, .07, and .1 ppm) the relative precision was very good < ± 5 % of the mean at every level except the .01ppm level which was higher because it is near the limits of detection.
III. THE REGRESSION
THE STANDARDS
All of the standards were prepared using reagent grade potassium iodide (KI). The standard levels prepared were .01, .03, .06, .1 ppm using a volumetric flask and an analytical scale. The water used to prepare the standards was salt water made from reagent grade Sodium Chloride at 35 ppt. There is a slight salinity effect (See Fig 3) so standards should be prepared in water close to your tanks standard salinity. It does not work with RODI water! Two sets of standards were prepared and compared against each other to cheek for errors. In addition some time later a 3 set was prepared as a final validation. I also prepared two sets of standards using the Red Sea Potassium Standard (KI) and measured them as well. There is a great deal of data associated with this project. I will not bore you with all of it just the final confirmation data will be included in this write up. If you are interested PM me and I would be happy to share it with you.
THE MEASUREMENT
Each standard was measured a minimum of 5 times and in some cases 8 times according to the above procedure. The data was recorded and used to generate the regression curve for the PPM Iodine calculation (See Table 1). I used the Excel Data Analysis as well as a program called MyCurveFit ( https://www.mycurvefit.com/ ) to generate the regression curve. (See Fig 4 & 5)
TABLE 1
Fig 3
Fig 4
Fig 5
GOODNESS OF FIT
The goodness of fit of a statistical model describes how well it fits a set of observations. Measures of goodness of fit typically summarize the discrepancy between observed values and the values expected under the model in question. In the above figure the columns labeled “Measure” and “Value provide the data for the Goodness of fit for the selected regression. The low P value and high F value are indicators that the regression is good. Also the Standard Error of the Estimate (SE) is low which indicates the regression is relatively accurate.
THE REGRESSION EQUATIONS
Y= The Calculated PPM of Iodine X= The Meter Reading on the Hanna Checker
T= The Temperature of the sample being tested
NO TEMP CORRECTION Y= -0.0003292492 x X+ .1973653
To get the PPM Iodine—
1) Multiply the Meter reading Value By -0.0003292492
2) Then add to the value in step 1 + .01973653
TEMP CORRECTION Y= -.0003417494 x (((T-79)x 5) + X)) +0.2008589
To get the PPM Iodine---
1) Subtract 79 from the measured sample temperature. Note if T is less than 79 the number will be negative.
2) Multiply the value from step 1 by 5.
3) Take the value from step 2 and add it to the meter reading…Note the number may be negative so you will need to subtract it
4) Multiply the value from step 3 by
5) Then add to the value in step 4 ----THIS IS THE PPM Iodine in Your sample
EXAMPLES
Meter Reading 422
Temperature of Sample 77⁰ F
NO TEMPERATURE CORRECTION
1) 422 x -0.0003292492= -0.138943162
2) -0.138943162 + 0.1973653 = 0.058 PPM Iodine
TEMPERATURE CORRECTION
1) 77-79 = -2
2) 5 X -2= -10
3) 422-10= 412 This is the meter reading corrected for temperature
4) 412 X -0.0003417494 = -0.140800753
5) -0.140800753 + 0.2008589 = .06 PPM Iodine
As you can see the difference between the temperature corrected value and the uncorrected value are not significant so the simpler method would be the better choice. However when the sample temperature is 75 or less or above 83 it starts to become significant…Remember this is not the tank temperature it is the sample temperature. The sample may have set around for a period of time and gotten cooler or warmer depending on the environment.
IV. TEST ACCURACY & PRECISION
KNOWN STANDARDS RESULTS:
TABLE 2
For Accuracy I use Relative Accuracy (RA).
This value is expressed as a %. Any value less than or greater than 100% indicates a level of error. The relative Error can then be found by subtracting the Relative Accuracy from 100. The math looks like this:
(Actual value) - (Actual value – Measured Value) divide this by the Actual value
For Precision we will use Relative Standard Deviation (RSD).
This value expressed in % tells us if the calculated standard deviation is small or large compared to the average value for our data set. A small number means there is small variability in our data clustered around the average. This would indicate good repeatability. A large number would indicate a lot of variability in our measurement. The math looks like this
(Standard Deviation of the Data Set x 100) Divide by (The Average Value of the Data Set)
The accuracy and Precision are quite good for this regression (See Table 2). The .01PPM has a lower level of Accuracy and Precision due to the fact the test is approaching the limits of detection for the test but none the less it is still within an acceptable range for my use. I am currently working to refine the test to get better results at the lower levels.
RELATIVE PRECISION OF METER READING & CALCULATED PPM
As I mentioned above I have been measuring the sample 2-3 times to get an idea of the precision of the test. Table 3 shows the meter readings and calculated PPM over several test dates testing my tank water. As you can see the relative precision is very good. The lower the percentage the more repeatable the test is. Because the relative precision is this good I would feel confident in taking a single measurement.
TABLE 3
OUTSIDE TESTING LABS RESULTS:
Over the last year I have been sending my water samples to 3 outside testing labs and the comparing my results to theirs. (See Table 4)
TABLE 4
As the data in Table 4 shows my results using this test for the most part agree with the outside testing service results. The 9/16/19 results were an error on my part. A retest of the sample gave a result of .057ppm. I am not sure why the outside testing results from vendor # 3 are so much lower, but as you can see they are consistently lower.
V. CONCLUSIONS
Well that about sums it up. The test is relatively simple to do, but does take some practice. By paying close attention to time and temperature good accurate and repeatable results can be obtained. I am continuing the work to improve the lower level accuracy and precision and continue to use the test to monitor the Iodine level in my tanks.
If you have any feedback or question don’t hesitate to PM me…Hope you find this useful.
ACKNOWLEDGMENTS
I would like to personally thank @Dan_P and @taricha for their help and support. Their input and direction provided insights to working on developing this test. It is great to be in community like Reef 2 Reef where quality people like these two are willing to come along side to encourage and support….Thanks for your help!
An alternative test method was developed by @taricha. It uses a different Hanna Checker and a different test kit. It is a good repeatable test. The details can be found in the link below.
https://www.reef2reef.com/threads/iodide-test-seachem-kit-and-hanna-silica-meter.391003/