
Navigation
Install the app
How to install the app on iOS
Follow along with the video below to see how to install our site as a web app on your home screen.
Note: This feature may not be available in some browsers.
More options
You are using an out of date browser. It may not display this or other websites correctly.
You should upgrade or use an alternative browser.
You should upgrade or use an alternative browser.
Lasers 1000+ Inwall Starfire
- Large Build
- Thread starter Laser
- Start date
- Tagged users None


OP
OP
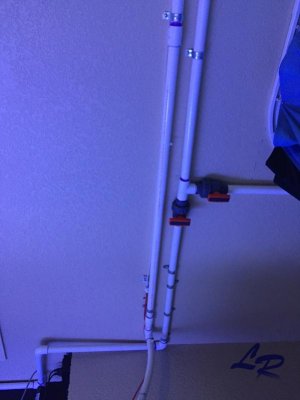
With the addition of the new frag tank I wanted to have the ability to automate large water changes without lifting buckets so I took out the 90 and replaced with a tee and valves to allow me to push new salt water to the main display sump or the frag tank/qt sump. The valves are located on the ceiling and will require a ladder to turn but no big deal as everything in the room requires a ladder for me.
Attachments
OP
OP
working late into the night last night (we have a ice storm here in DFW) I was able to get the ATI 60" fixture hung and the lights hooked up. Here are couple full tank shots with different color schemes I have on the 2 different channels.


OP
OP
hopefully I can get the reefbrite leds up today and finish up plumbing on the topoff reservoir emergency overflow drain that I will have run into the main drain in case the floats ever fail or the pump sticks on. At least when that happens (yes it has in the past hence this hookup method) floor will be dry and just loose a little water to the drain.
have you considered just using a pressure switch wired to your apex? so you get notified if/when that happens and the apex simply shuts off your RO/DI instead of having it run into your drain. less wasteful (saves money) and you get the notification via apex.... finish up plumbing on the topoff reservoir emergency overflow drain that I will have run into the main drain in case the floats ever fail or the pump sticks on. At least when that happens (yes it has in the past hence this hookup method) floor will be dry and just loose a little water to the drain.

OP
OP
have you considered just using a pressure switch wired to your apex? so you get notified if/when that happens and the apex simply shuts off your RO/DI instead of having it run into your drain. less wasteful (saves money) and you get the notification via apex.
That is how I have it set up already just using float switches instead of pressure switches. Just saying that during power outage in the past my RO reservoir fill pump was set to Fallback OFF and it still came on and made quite a mess. This is just a safety precaution. It is actually not directly from the RO unit. It is pumped from the 300 gallon RO reservoir when the floats tell it to. There is a high float and a backup high float but I have had both fail in the past so this takes care of an accidental spill.
OP
OP
Dude you are redonkulous.. What a freaking build.. Must be swimming in that $$
Thank u sk8!! No swimming here this weekend we have an ice rink...

sounds like you would benefit from using pressure switches as they are more reliable than floats for sure and easy to hook up to the controller and less obtrusive and parts to fail.That is how I have it set up already just using float switches instead of pressure switches. Just saying that during power outage in the past my RO reservoir fill pump was set to Fallback OFF and it still came on and made quite a mess. This is just a safety precaution. It is actually not directly from the RO unit. It is pumped from the 300 gallon RO reservoir when the floats tell it to. There is a high float and a backup high float but I have had both fail in the past so this takes care of an accidental spill.
thanks for the photo updates, fun to see different builds come together!
OP
OP
sounds like you would benefit from using pressure switches as they are more reliable than floats for sure and easy to hook up to the controller and less obtrusive and parts to fail.
thanks for the photo updates, fun to see different builds come together!
I utilize pressure switches in the main sump and skimmer overfill bucket but they would be difficult to install reliably in the manner I am using the floats here. I will try and get a pic of the inside of the 55 gallon RO topoff. When I say I had a failure realize I have been using Neptune a long time and had a previous controller at that point(believe it was ACII back then). I dont fear a failure with the floats its just a ease of mind knowing if all goes chaotic it will go down the drain(remember it is coming out of a 300 gallon container, being pumped up to the ceiling and across the room and a uh oh there would be devastating. I expect the inside of the pipe to never see water... I also replace the floats every year to help prevent mechanical failure.
roger. look forward to the photo!I utilize pressure switches in the main sump and skimmer overfill bucket but they would be difficult to install reliably in the manner I am using the floats here. I will try and get a pic of the inside of the 55 gallon RO topoff. When I say I had a failure realize I have been using Neptune a long time and had a previous controller at that point(believe it was ACII back then). I dont fear a failure with the floats its just a ease of mind knowing if all goes chaotic it will go down the drain(remember it is coming out of a 300 gallon container, being pumped up to the ceiling and across the room and a uh oh there would be devastating. I expect the inside of the pipe to never see water... I also replace the floats every year to help prevent mechanical failure.
OP
OP
Now that I went and took pics I believe you are correct. It would be better to use pressure switches for this as well as I could still mount them on the pvc the same and run the air tubing up inside the pvc and out the bulkhead. Thanks for the advice.roger. look forward to the photo!
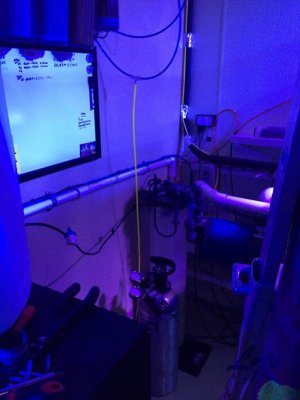
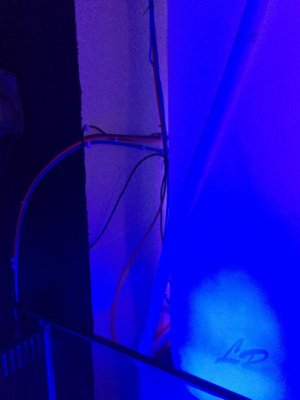
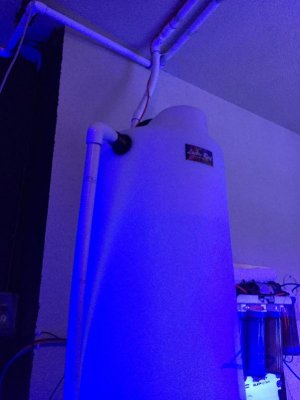
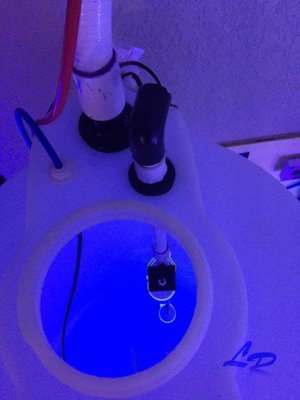
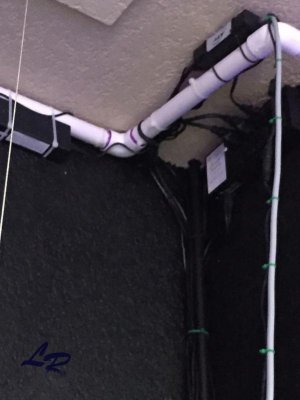
First pic shows water coming in from other side of room on ceiling into the 55 gal ro topoff reservoir. You can also see the emergency drain on the side. Pic 2 shows emergency drain going behind the storage tank onto the wall and pic 3 shows the water drain going down the wall and dropping down into the main drain. (It will be hooked up final when plumbing is redone)
Attachments
Last edited:
OP
OP
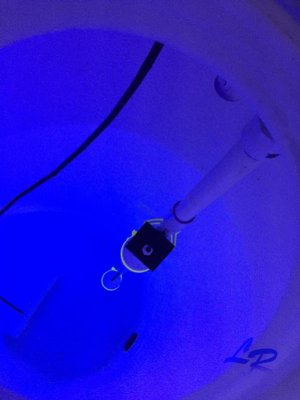
here is couple shots looking down into the 55 reservoir...Obviously the pressure switches could be mounted in the same manner with the air lines running up the pvc and out the bulkhead. GREAT POINT..:bigsmile:
The other black RO tubing in the 55 is for RO feed for the Kalk Reactor.
The other black RO tubing in the 55 is for RO feed for the Kalk Reactor.
Attachments
Last edited:
OP
OP
Ordered the new Neptune DOS for the frag/QT/sump to be able to perform constant water changes as well. I am running about 20 gal/day on the main display through a Cole Parmer dual head and it works flawlessly. I will observe the Neptune product and compare. I plan to change about 1-2% daily from the second system. Having a bad ice storm here in the DFW metroplex so stuck in the house. I may have been able to put this whole system together in a couple of weeks if I lived up the northeast with the winter they have had. Sooo cold here not a car to be seen on the roads.. Crazy but great for tank work.
Last edited:

thanks for the photos. glad to help. the magnet mounts would work well on the surface of the container and a simple john guest fitting on the top on the container for the 1/4" coming out will keep things super clean. I guess with the hole already drilled for the bulkhead/uniseal might as well use it but just a larger hole than might be necessary if changing the design now. I really enjoy the equipment photos and build out - thanks for sharing.
OP
OP
thanks for the photos. glad to help. the magnet mounts would work well on the surface of the container and a simple john guest fitting on the top on the container for the 1/4" coming out will keep things super clean. I guess with the hole already drilled for the bulkhead/uniseal might as well use it but just a larger hole than might be necessary if changing the design now. I really enjoy the equipment photos and build out - thanks for sharing.
Thanks again Monkeyboy!
I was able to get the first reebrite 60" led strip mounted to the ATI 60" fixture and must say it fits like a glove. It is almost if they are from the same manufacturer!!! All that was required was to remove the 2 screws on each end that were already in the ATI and replace them with a slightly longer philips head screw and mount the swivel that was provided. Then mount the led to the swivel and adjust to desired angle. Very rare when something turns out this easy..:thumb:
Just finished up this amazing build thread! Really meticulous and well thought out... I run bubble king skimmers as well, just a thought, order some back up parts just to have on hand, I had an issue with my pump and it took 2 months to get my order worked out, seals bearings impellers etc... Nice to have on hand. Coral selection is great.... Look forward to this growing out!

OP
OP
Just finished up this amazing build thread! Really meticulous and well thought out... I run bubble king skimmers as well, just a thought, order some back up parts just to have on hand, I had an issue with my pump and it took 2 months to get my order worked out, seals bearings impellers etc... Nice to have on hand. Coral selection is great.... Look forward to this growing out!
Great idea on the backup for the bubble king. I will be shot if a pump goes out. May just get another pump to have.. I did go ahead already and get a third dart return pump as a backup. It was easy decision when the seals went out of one and leaked. Just figured may as well have it on hand. Same for the bubble king will get a third pump just in case..
OP
OP
was able to complete all installs for the frag tank today except for the installation of the last reefbrite led.
Here are pics of the apex DC8 in the upper right by the ceiling. It will control all the lights. On the lower right there is a DC4 for the return pump, heater, and skimmer that will controll the qt/refugium/sump. The two modules are about 25' away so I had to make a new aquabus connector. I just cut a small one in half while splicing the wires and saving the wrap cord for ground. Then take a cat5 and use all the colors to connect hot and all the white to connect to the mesh for ground and you have a cord as long as you need...:whistle::whistle:

Tomorrow we will strip old plumbing and redo and then tie in frag tank. Water finally!!!
Here are pics of the apex DC8 in the upper right by the ceiling. It will control all the lights. On the lower right there is a DC4 for the return pump, heater, and skimmer that will controll the qt/refugium/sump. The two modules are about 25' away so I had to make a new aquabus connector. I just cut a small one in half while splicing the wires and saving the wrap cord for ground. Then take a cat5 and use all the colors to connect hot and all the white to connect to the mesh for ground and you have a cord as long as you need...:whistle::whistle:
Tomorrow we will strip old plumbing and redo and then tie in frag tank. Water finally!!!
Attachments
Last edited:
Similar threads
- Replies
- 5
- Views
- 107
- Replies
- 8
- Views
- 224


