DIY Alkalinity Monitor

OP
OP
Borat

Borat

Valuable Member
View Badges
Joined
Apr 4, 2021
Messages
1,606
Reaction score
1,913
Location
United Kingdom
Rating - 0%
0   0   0
indeed a small
Or just use a normal DC motor with higher torque and put an acryl disc with magnets on its axis. Fans really aren't meant to push any load more than air.
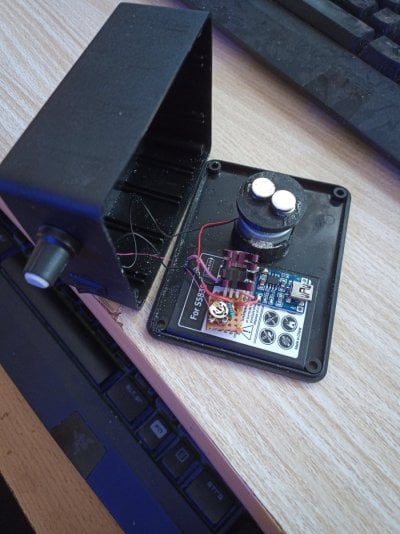
That's a battery powered magnetic stirrer i made that i use for mixing alkalinity and calcium solutions.

IMG_20220918_155520 (1).jpg
indeed a small motor would be better - does not need a lot of torque, its just that fans have almost no torque at all..

the fan is still preferred as its easier to mount and saves a lot of space. there would be not enough space in my enclosure for other motor unfortunately
 
OP
OP
Borat

Borat

Valuable Member
View Badges
Joined
Apr 4, 2021
Messages
1,606
Reaction score
1,913
Location
United Kingdom
Rating - 0%
0   0   0
The one thing I would have changed about the project is this:

I would have used 5v 40mm x 40mm DC fan instead of 12v. I would then connect this fan to Adafruit DAC board.

DAC stands to Digital to Analog Converter. You connect DAC board to one of I2C 4-pin connectors (GND/VCC/SDA/SCL) and the boards gives you voltage range 0v-5v depending on I2C (SCL/SDA) channel signal. Unfortunately DAC converters don't work with external voltage (such as 12v), they derive voltage from the controller board - therefore you would need to use a 5v fan for it to work with a DAC converter.

DAC boards are produced by a number of manufactures, Sparkfun is another popular version of DACs. Adafruit DAC is explained here: https://www.adafruit.com/product/935..

Once you can control voltage via code - you can have better control of the stirrer spin speed. In my case I was lucky that the stirrer works fine without any voltage adjustmentns - but generally you would most likely need to have some way of controlling voltage supplied to the fan..
One other advantage of such setup is that you dont need a relay - when you want to switch off stirrer, you just set voltage to 0 (or any voltage below fan start level - this can be found in the datasheet for the fan in question).
 

Gogo007

Active Member
View Badges
Joined
Dec 18, 2020
Messages
150
Reaction score
67
Location
Egypt
Rating - 0%
0   0   0
The one thing I would have changed about the project is this:

I would have used 5v 40mm x 40mm DC fan instead of 12v. I would then connect this fan to Adafruit DAC board.

DAC stands to Digital to Analog Converter. You connect DAC board to one of I2C 4-pin connectors (GND/VCC/SDA/SCL) and the boards gives you voltage range 0v-5v depending on I2C (SCL/SDA) channel signal. Unfortunately DAC converters don't work with external voltage (such as 12v), they derive voltage from the controller board - therefore you would need to use a 5v fan for it to work with a DAC converter.

DAC boards are produced by a number of manufactures, Sparkfun is another popular version of DACs. Adafruit DAC is explained here: https://www.adafruit.com/product/935..

Once you can control voltage via code - you can have better control of the stirrer spin speed. In my case I was lucky that the stirrer works fine without any voltage adjustmentns - but generally you would most likely need to have some way of controlling voltage supplied to the fan..
Can not be done with transistor as power driver and pwm signal to control its base so you can control the speed via analogWrite ? I think also there this H bridge drivers L298N accept speed control and direction control for any dc motor ... Does this works ? Or what do you think ?
 
OP
OP
Borat

Borat

Valuable Member
View Badges
Joined
Apr 4, 2021
Messages
1,606
Reaction score
1,913
Location
United Kingdom
Rating - 0%
0   0   0
Can not be done with transistor as power driver and pwm signal to control its base so you can control the speed via analogWrite ? I think also there this H bridge drivers L298N accept speed control and direction control for any dc motor ... Does this works ? Or what do you think ?
You can - but for 5 US&A bucks cost of DAC converter board I wouldnt bother soldering anything. I am not against soldering own components but i hate it very much (i soldered everything without any use of PCB in the previous version!):
- any soldered components need to be fitted somewhere, you then need to drill holes, use small screws etc, ensure soldered board is not in contact with any metallic parts..
- you typically end up using wires here and there as part of DIY soldered part, this is the most annoying thing in complex projects as you already have lots of wires to handle all components, so minimizing the complexity/number of connected components in this device is a great advantage
 
OP
OP
Borat

Borat

Valuable Member
View Badges
Joined
Apr 4, 2021
Messages
1,606
Reaction score
1,913
Location
United Kingdom
Rating - 0%
0   0   0
One other piece of advice - if you are planning to try to build one of your own...

The challenge for me wasn't in the handling/use of electric components or the programming part: that's mostly of secondary importance where you will eventually find something that will work satisfactorily (and if certain things don't work you will find other components that will do the job).

For me the greatest challenge was mostly in building it as a mechanical device:
- enclosure cover removable on 3 sides: you do need to have top access (to take PH probe out of reaction chamber for calibration) and rear access (to mount components initially and also to have easy access to Arduino Mega chip should you need to adjust the code). Bottom cover being removable is not a must-have although it helps,,
- components accessible, replaceable and minimizing the amount of wires
,- PH probe accessible for calibration, don't forget about this one! You don't want to have a device whereby you need to take the whole thing apart just to calibrate the PH probe!

If you are building it as your first device, I recommend that you make it 20% wider and 20% deeper (does not need to be taller though), it was challenging enough for me to fit everything inside this enclosure given that I have already built my first device a year ago and knew all the tricky bits from prior design faults (e.g. it was very difficult to take the PH probe out of my previous device - something I addressed in this project as a matter of priority).
 

Bluedore

Active Member
View Badges
Joined
Jul 23, 2016
Messages
396
Reaction score
166
Rating - 0%
0   0   0
One other piece of advice - if you are planning to try to build one of your own...

The challenge for me wasn't in the handling/use of electric components or the programming part: that's mostly of secondary importance where you will eventually find something that will work satisfactorily (and if certain things don't work you will find other components that will do the job).

For me the greatest challenge was mostly in building it as a mechanical device:
- enclosure cover removable on 3 sides: you do need to have top access (to take PH probe out of reaction chamber for calibration) and rear access (to mount components initially and also to have easy access to Arduino Mega chip should you need to adjust the code). Bottom cover being removable is not a must-have although it helps,,
- components accessible, replaceable and minimizing the amount of wires
,- PH probe accessible for calibration, don't forget about this one! You don't want to have a device whereby you need to take the whole thing apart just to calibrate the PH probe!

If you are building it as your first device, I recommend that you make it 20% wider and 20% deeper (does not need to be taller though), it was challenging enough for me to fit everything inside this enclosure given that I have already built my first device a year ago and knew all the tricky bits from prior design faults (e.g. it was very difficult to take the PH probe out of my previous device - something I addressed in this project as a matter of priority).
Thanks so much for documenting this great project! Not including time, what would be your estimated cost to build this DIY? Thanks.
 
OP
OP
Borat

Borat

Valuable Member
View Badges
Joined
Apr 4, 2021
Messages
1,606
Reaction score
1,913
Location
United Kingdom
Rating - 0%
0   0   0
Thanks so much for documenting this great project! Not including time, what would be your estimated cost to build this DIY? Thanks.
Approximate cost breakdown is as follows:
- Dosing heads, £7 each = £21
- Stepper Motors, £7 each = £21
- TMC 2209 drivers, £7 each = £21
- 12v FAN, £6 each = £12
- DF Robot PH board, £32
- PCB Fabrication, £5
-PH probe, £32
- Mega 2560 Mini (from China) - £7
- ESP32 £7
- Acrylic £15
- RTC £5
- Other small bits and blobs £22

Total: £200
 
Last edited:

Bluedore

Active Member
View Badges
Joined
Jul 23, 2016
Messages
396
Reaction score
166
Rating - 0%
0   0   0
Approximate cost breakdown is as follows:
- Dosing heads, £7 each = £21
- Stepper Motors, £7 each = £21
- TMC 2209 drivers, £7 each = £21
- 12v FAN, £6 each = £12
- DF Robot PH board, £32
- PCB Fabrication, £5
-PH probe, £32
- Mega 2560 Mini (from China) - £7
- ESP32 £7
- Acrylic £15
- RTC £5
- Other small bits and blobs £22

Total: £200
Thanks for the detail breakdown!
 
OP
OP
Borat

Borat

Valuable Member
View Badges
Joined
Apr 4, 2021
Messages
1,606
Reaction score
1,913
Location
United Kingdom
Rating - 0%
0   0   0
The Alk monitor started to give unreliable DKH readings... it took me a while to understand the cause, which was - the PH probe reached its end of life and needed replacement... So this one lasted for just over 14 months..

New PH probe arrived yesterday (same ExTech brand) and replaced the old probe today.
 

SHARK_2

New Member
View Badges
Joined
Dec 13, 2020
Messages
17
Reaction score
10
Location
Warsaw
Rating - 0%
0   0   0
The Alk monitor started to give unreliable DKH readings... it took me a while to understand the cause, which was - the PH probe reached its end of life and needed replacement... So this one lasted for just over 14 months..

New PH probe arrived yesterday (same ExTech brand) and replaced the old probe today.
Hey @Borat ,

how is the new version of Alkalinity Monitor performing? Do you have a video of working like from previous one?
 

yusufhadiwinata

Community Member
View Badges
Joined
May 21, 2022
Messages
34
Reaction score
71
Location
indonesia, jakarta
Rating - 0%
0   0   0
The Alk monitor started to give unreliable DKH readings... it took me a while to understand the cause, which was - the PH probe reached its end of life and needed replacement... So this one lasted for just over 14 months..

New PH probe arrived yesterday (same ExTech brand) and replaced the old probe today.
hi, usually ph probe change every 6 month from my understanding when we use on continuous monitoring :)

thanks for sharing the code and the PCB
 

Gogo007

Active Member
View Badges
Joined
Dec 18, 2020
Messages
150
Reaction score
67
Location
Egypt
Rating - 0%
0   0   0
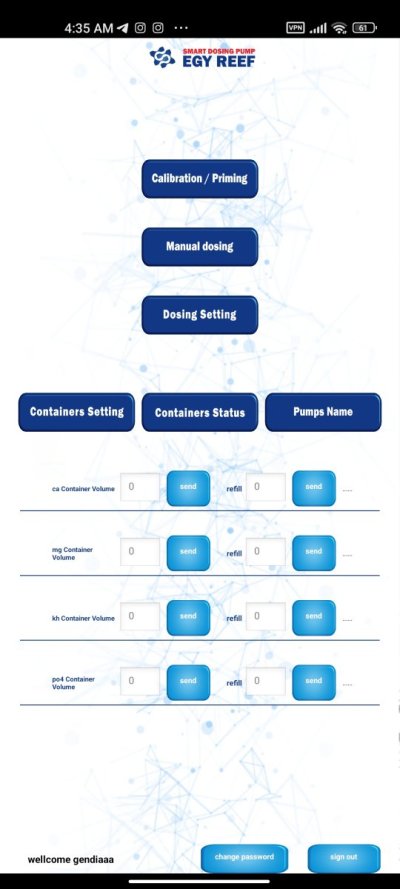
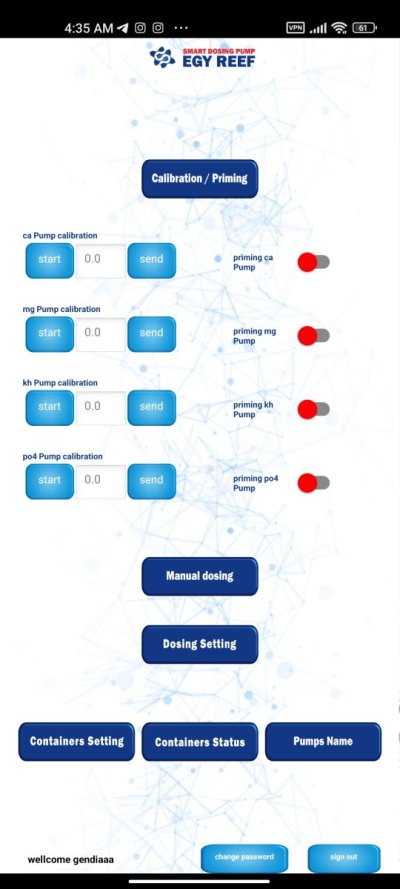
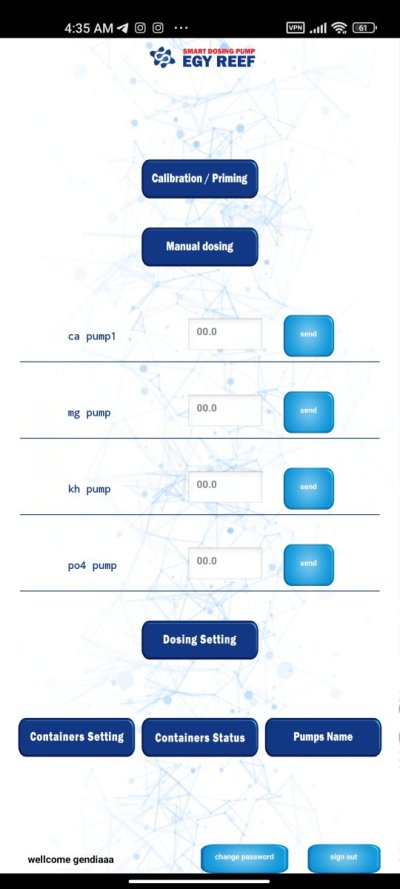
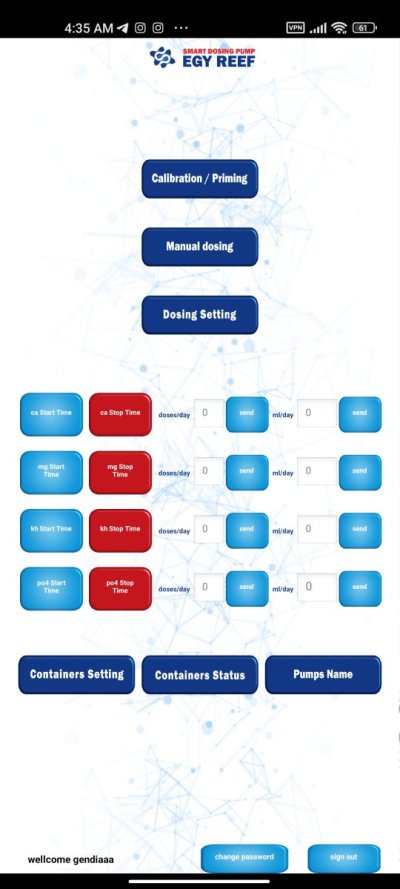
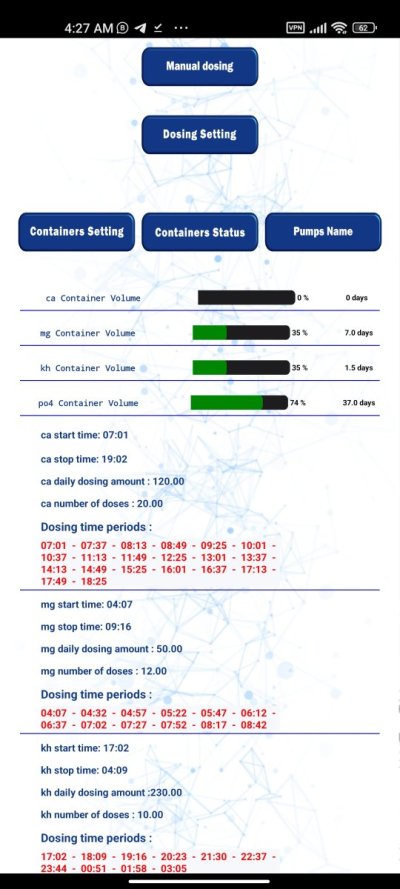
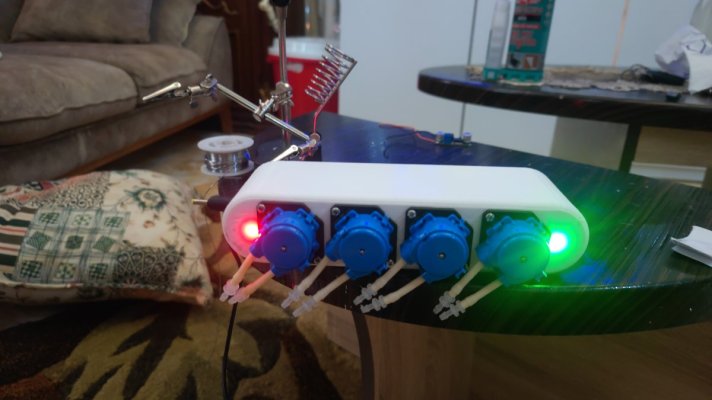
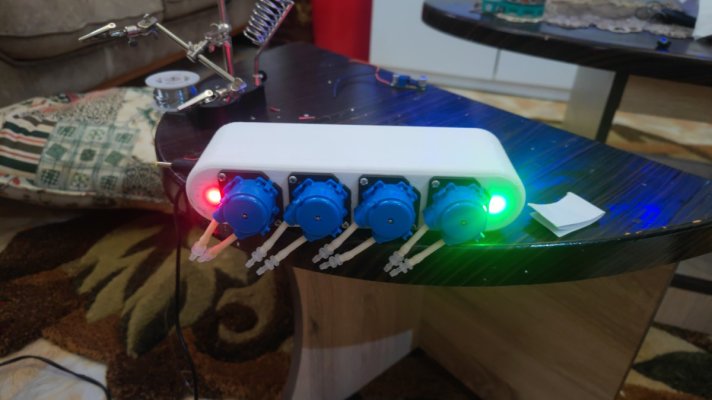
I have finished the dosing pump now i am working in the kh it will be also with mqtt mobile app and linked to the doser
 

Attachments

  • Screenshot_2022-11-16-04-35-42-071_appinventor.ai_mohamed_gendia71.doser.jpg
    Screenshot_2022-11-16-04-35-42-071_appinventor.ai_mohamed_gendia71.doser.jpg
    77.7 KB · Views: 185
  • Screenshot_2022-11-16-04-35-35-783_appinventor.ai_mohamed_gendia71.doser.jpg
    Screenshot_2022-11-16-04-35-35-783_appinventor.ai_mohamed_gendia71.doser.jpg
    79.7 KB · Views: 174
  • Screenshot_2022-11-16-04-35-33-603_appinventor.ai_mohamed_gendia71.doser.jpg
    Screenshot_2022-11-16-04-35-33-603_appinventor.ai_mohamed_gendia71.doser.jpg
    74.5 KB · Views: 156
  • Screenshot_2022-11-16-04-35-30-876_appinventor.ai_mohamed_gendia71.doser.jpg
    Screenshot_2022-11-16-04-35-30-876_appinventor.ai_mohamed_gendia71.doser.jpg
    82.4 KB · Views: 160
  • Screenshot_2022-11-16-04-27-43-773_appinventor.ai_mohamed_gendia71.doser.jpg
    Screenshot_2022-11-16-04-27-43-773_appinventor.ai_mohamed_gendia71.doser.jpg
    107.2 KB · Views: 168
  • IMG-20221116-WA0039.jpeg
    IMG-20221116-WA0039.jpeg
    95 KB · Views: 156
  • IMG-20221116-WA0041.jpeg
    IMG-20221116-WA0041.jpeg
    93.9 KB · Views: 130

BassamKassem

Active Member
View Badges
Joined
Mar 8, 2023
Messages
158
Reaction score
60
Location
Egypt
Rating - 0%
0   0   0
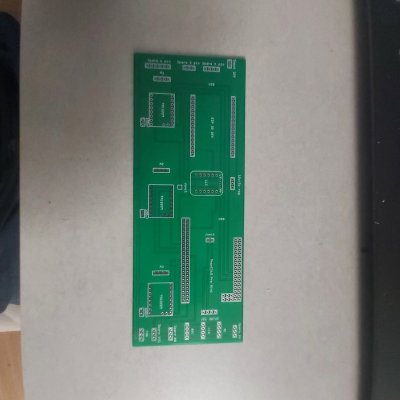
Now most mechanical parts have been completed - I can start soldering together electronic components:

- I am going to use the 3-head doser PCB I have utilised previously in this project (as minimum order for PCBs as 5 - I have 4 PCBs left over as spares)
- whenever I design PCBs I always try to accomodate additonal/spare connectors such that the PCB can be utilised in other projects.
- for example the 3-head doser did not reequire a 12v + PIN 9 (PWM) connector (which is typically used to control PWN FAN) - but I added that connector anyway...


20220911_135307.jpg
Amazing work @Borat , I can't thank you enough for this

I have some questions if I may ask , so please walk me through them .

1- Where to connect the PH board. it was mentioned in your code that it will be linked to Pin A1, so can it be linked to any unused Pins like "Spare A1" for instance ?

2- Same goes for the Relay Module, where to connect it ?

3- Stirrer fan , where to connect it ?

4 - Why 2 LCDs while in your model you are using only one ?

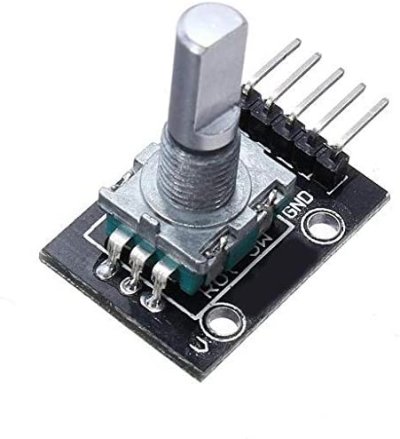
5- Regarding the Rotary Encoder board can I use the one in the attached image

6- Final question : Can I use Capacitor 100uf 16V 5 7mm, instead of 15V

Thanks again , wish you the best

RE.jpg
 
Last edited:
OP
OP
Borat

Borat

Valuable Member
View Badges
Joined
Apr 4, 2021
Messages
1,606
Reaction score
1,913
Location
United Kingdom
Rating - 0%
0   0   0
Amazing work @Borat , I can't thank you enough for this

I have some questions if I may ask , so please walk me through them .

1- Where to connect the PH board. it was mentioned in your code that it will be linked to Pin A1, so can it be linked to any unused Pins like "Spare A1" for instance ?

2- Same goes for the Relay Module, where to connect it ?

3- Stirrer fan , where to connect it ?

4 - Why 2 LCDs while in your model you are using only one ?

5- Regarding the Rotary Encoder board can I use the one in the attached image

6- Final question : Can I use Capacitor 100uf 16V 5 7mm, instead of 15V

Thanks again , wish you the best

RE.jpg
Hello!

in Arduino world (and other microcontroller) pins are broadly separated into analogue and digital. Analogue pin gives voltage range - which is then interpreted as signal (e.g. PH level) whereas digital ping gives on/off signal only (e.g. switching something).

In a lot of cases analogue pin can be used as digital - but I am not sure if the reverse is true.

PH board can be connected to any ANALOGUE pin (A0, A1..A5 etc).

There are no 2 LCDs, there are 2 fans however mentioned above, perhaps this is what you have spotted.One fan is used for spinning the stirrer and another serves its true purpose - ventilate the enclosure. The second fan strictly speaking is not needed. All you need for the fan is to have voltage applied to it. These are 12v fans - however most fans will accept lower voltage, I believe I connected the stirrer fan to the 12v supply (not 100% sure now - but almost sure) and in between I placed a relay - in order to be able to switch it on/off.

Relay module is connected to one of the digital pins. It's an on/off type of device.

Any capacitor rated at or above the operating voltage (which in my case is 12v) works well. It's a good practice to have the capacitor to be have somewhat higher rated voltage, e.g. 15v.
 

BassamKassem

Active Member
View Badges
Joined
Mar 8, 2023
Messages
158
Reaction score
60
Location
Egypt
Rating - 0%
0   0   0
Hello!

in Arduino world (and other microcontroller) pins are broadly separated into analogue and digital. Analogue pin gives voltage range - which is then interpreted as signal (e.g. PH level) whereas digital ping gives on/off signal only (e.g. switching something).

In a lot of cases analogue pin can be used as digital - but I am not sure if the reverse is true.

PH board can be connected to any ANALOGUE pin (A0, A1..A5 etc).

There are no 2 LCDs, there are 2 fans however mentioned above, perhaps this is what you have spotted.One fan is used for spinning the stirrer and another serves its true purpose - ventilate the enclosure. The second fan strictly speaking is not needed. All you need for the fan is to have voltage applied to it. These are 12v fans - however most fans will accept lower voltage, I believe I connected the stirrer fan to the 12v supply (not 100% sure now - but almost sure) and in between I placed a relay - in order to be able to switch it on/off.

Relay module is connected to one of the digital pins. It's an on/off type of device.

Any capacitor rated at or above the operating voltage (which in my case is 12v) works well. It's a good practice to have the capacitor to be have somewhat higher rated voltage, e.g. 15v.
Thanks again my friend . This is my first Arduino/ESP project .

I will give it a try and feedback you .

So in your exact board for PH can i use the PINs labelled SpareA1 right?

Regarding the ventilation fans it is straight forward to be pluged to Fan pins at edge of the board called Fan. But the stirrer Fan sadly still can't find where . And not sure where to connect the Relay

I ordered all the parts and PCB fabrication is in progress maybe in 15 days all will be at my doorsteps to start messing
 

BassamKassem

Active Member
View Badges
Joined
Mar 8, 2023
Messages
158
Reaction score
60
Location
Egypt
Rating - 0%
0   0   0
Thanks again my friend . This is my first Arduino/ESP project .

I will give it a try and feedback you .

So in your exact board for PH can i use the PINs labelled SpareA1 right?

Regarding the ventilation fans it is straight forward to be pluged to Fan pins at edge of the board called Fan. But the stirrer Fan sadly still can't find where . And not sure where to connect the Relay

I ordered all the parts and PCB fabrication is in progress maybe in 15 days all will be at my doorsteps to start messing
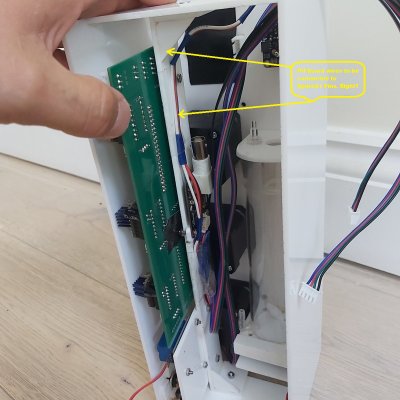
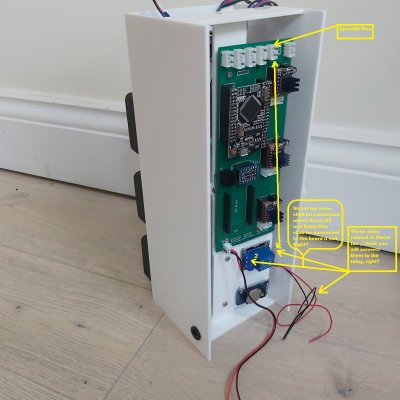
Attached images might elaborate my questions please have a look at them and advise
 

Attachments

  • PH.jpg
    PH.jpg
    257.1 KB · Views: 162
  • Relay & Stirrer Fan.jpg
    Relay & Stirrer Fan.jpg
    228.6 KB · Views: 185

BassamKassem

Active Member
View Badges
Joined
Mar 8, 2023
Messages
158
Reaction score
60
Location
Egypt
Rating - 0%
0   0   0
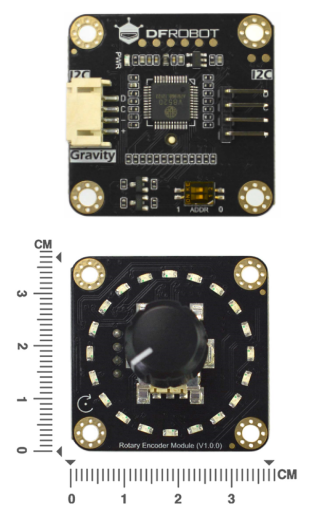
MR. @Borat I need your help please . am stuck and can't get adafruit encoder due to customs and international shipping difficulties.

I ordered the PCBs and all electronic parts as well.

so can I use DF Robot encoders instead of adafruit. if yes will it be plug & play
 

Attachments

  • daab9d0e6c8e907c8e399a9fbd5ab4b9.png
    daab9d0e6c8e907c8e399a9fbd5ab4b9.png
    161.5 KB · Views: 144
OP
OP
Borat

Borat

Valuable Member
View Badges
Joined
Apr 4, 2021
Messages
1,606
Reaction score
1,913
Location
United Kingdom
Rating - 0%
0   0   0
MR. @Borat I need your help please . am stuck and can't get adafruit encoder due to customs and international shipping difficulties.

I ordered the PCBs and all electronic parts as well.

so can I use DF Robot encoders instead of adafruit. if yes will it be plug & play
Nothing is truly plug-and-play in electronics world in my experience, but from the pictures I can see that the DF robot expansion board is also I2C (i.e. uses SCL/SDA serial communication) - so it will work as a replacement, although you may need to adapt the code as DF robot board would use its own library.
 

TOP 10 Trending Threads

HAVE YOU EVER BROUGHT A CORAL OR FISH BACK FROM THE BRINK OF DEATH? SHARE YOUR BOUNCE-BACK STORIES!

  • Yes! I thought it would not recover, but it bounced back!

    Votes: 69 69.0%
  • No. I tried to help the coral/fish recover, but it could not bounce back...

    Votes: 28 28.0%
  • Other (please explain).

    Votes: 3 3.0%
Back
Top