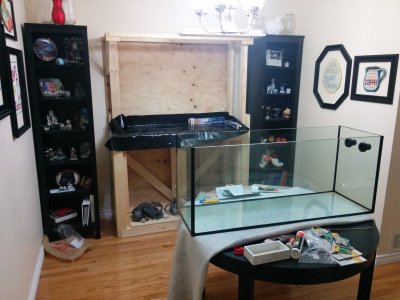
First build, some questions, and documenting my build

OP
OP
Glasswalker

Glasswalker

Active Member
View Badges
Joined
Mar 24, 2016
Messages
232
Reaction score
244
Rating - 0%
0   0   0
Don't see a means to edit posts, but typo in that last post "Ordering someore fear" should be "Ordering some more gear" lol...
 

Bronc

Valuable Member
View Badges
Joined
Mar 1, 2016
Messages
1,348
Reaction score
2,234
Location
Tulsa, OK
Rating - 0%
0   0   0
Very exciting! Thanks for bringing us along for the ride!
 
OP
OP
Glasswalker

Glasswalker

Active Member
View Badges
Joined
Mar 24, 2016
Messages
232
Reaction score
244
Rating - 0%
0   0   0
Just got some great deals at Big Als, they had their midnight madness sale at the local store, and so I went and hit up the door crashers. Picked up a 48" Coralife Light (may not be sufficient in the long-run but it is a good starter, and I can easily augment it). As well as a pair of 150watt Jager heaters, a siphon/cleaning kit, a black background for the tank (to hide the unfinished inside of the stand), and a 200gal box of Reef Crystals to get started mixing my saltwater in the near future. Saved a ton on all of it thanks to that sale!

Also as for general updates, tank held water like a champ for 72 hours. No leaks at all. So I've now drained it, and have picked up the sanded 1/4" ply to use for facing it out and making it look pretty... I'll be doing the back panels and assembling the hood frame very shortly. And then the stand comes into the house to it's new home!

Following that I'll slowly putter at:
  • Finishing all the facing panels for the base and hood and attaching them in place in the house
  • Figuring out the plumbing for the sump
  • Installing the sump and some of the electrics
  • Mixing Salt-Water
  • Ordering some dry-rock to augment the live-rock my friend can supply
  • Rinsing the live-sand my friend provided.
This while I wait on the diamond drill for the glass to arrive (expected mid-april). At which point I'll drill the tank, and provided nothing catastrophic happens then, I'll order the glass for the overflow box, and finish plumbing... Then it's time for aquascaping!
 
OP
OP
Glasswalker

Glasswalker

Active Member
View Badges
Joined
Mar 24, 2016
Messages
232
Reaction score
244
Rating - 0%
0   0   0
And it's time for another update!

I got the pre-sanded ply, as I mentioned in the last post. So I've cut now the 2 backing panels for the stand (the panels that will be against the wall). and a couple of the other panels as well, but not complete (it's been bloody cold outside all weekend). My reasoning being that's the last real thing keeping me from bringing the stand into the house (once it's in-place I won't easily be able to access the side against the wall). The remaining panels can all be added later while it's in-place. And I don't intend to paint the back panels.

So I finished that, and assembling the frame for the hood support. So the stand is now ready to be moved into the house. It's a bit tight in my garage right now, so I'll get pics up of it once it's in it's new home probably early this week.

So in the meantime I've decided it would be wise to do a full mock-up of the whole setup. DT, Sump, Baffles, Overflow, Plumbing, Light, and so on. To see how it all looks, and to plan it out ahead of time to make sure I do it right. As a result since I don't have any new photos to share. I'd like to share some of the plans!

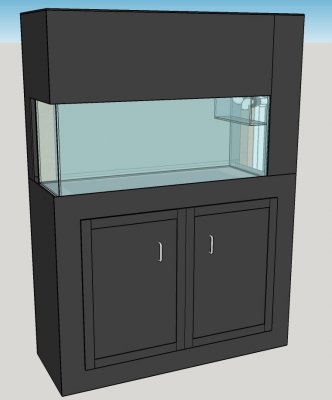
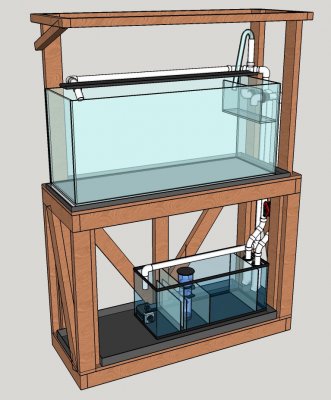
First of all, the stand as I intend it to look when finished:
Fish Stand Mock-Up 1.jpg

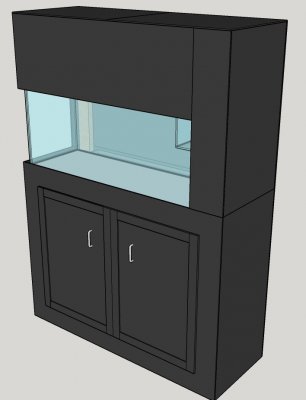
Another Angle:
Fish Stand Mock-Up 2.jpg

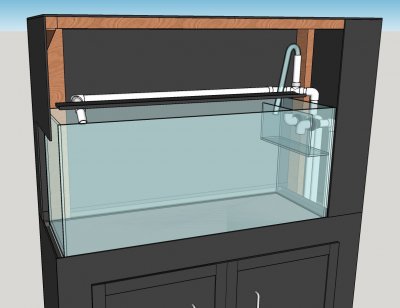
Showing the hood access panel opened. I intend to hinge this with a Piano Hinge, and eventually put gas assist on it to make it open nice and smooth. Another interesting Idea I had but which isn't reflected in the plans yet, is to have steel cables hanging the lighting bar over the tank which pulley off the center of the top of the hood. and connect to the front panel. So when it's closed, the lights weight holds the panel closed nicely, and when you open the panel it lifts the lighting up and out of the way for servicing the tank.
Fish Stand Mock-Up 3.jpg

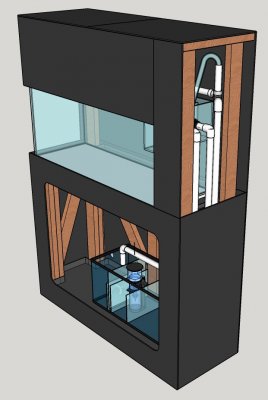
Here I show the front sump access panel removed, it will be hung on with an internal lip, and magnets for easy removal and wide open access to the sump area. Also I intend to have the righthand (plumbed side) panel hinged for access to service the plumbing if needed. Again closed with magnets
Fish Stand Mock-Up 4.jpg

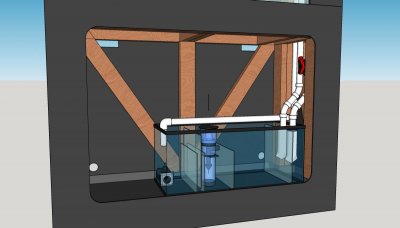
Next up, a close-up of the sump internals. I've got some stand-in gear from 3d-warehouse in there, a pump, skimmer, and socks. These don't reflect the final gear, The actual gear I have right now for the actual pump/skimmer are a Mag7 pump, and a Tunze DOC skimmer. But couldn't find convenient models of those ;) Also you can see some of the lower bits of the plumbing here. In the sump overflow comes into it's own fairly tall section, then the large section is for fuge, followed by the skimmer, and then a set of baffles for bubble reduction and finally the return section.
Fish Stand Mock-Up 5.jpg

Now a nice wide-open view without the facing on it. You can see more of how the plumbing is arranged. I'm planning on a Herbie overflow, in the last pic and this pic you can see for example the 2 overflow lines, with the ball valve on the main siphon, and the return line to the opposite end of the DT. As well as the siphon break for the return. I'm using 1" rigid PVC for most of the build. I still need to add a couple unions to make servicing this easier. Also note the dark gray bits under the DT, and Sump. These are rubber pond-membranes, that I will be cutting and siliconing into place. They will be waterproof, and keep any drips/spills or leaks (hopefully I won't see the latter lol) off the stand itself, keeping the wood from being damaged from water. Also keeping a bit of a safety net from spills/dripping onto the floor as I rent. I'm debating if I should put a small line from the membrane under the DT down to the sump membrane, as it's got more capacity. Then again it's not exactly for any catastrophic leaks, only spills/drips and minor trickling leaks that may occur. I can put a water sensor in each membrane to detect it early on, and then cope with it somehow.
Fish Stand Mock-Up 6.jpg

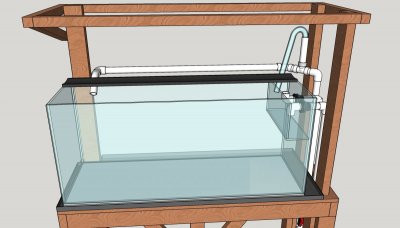
Closeup of the DT again showing plumbing and the light fixture
Fish Stand Mock-Up 7.jpg

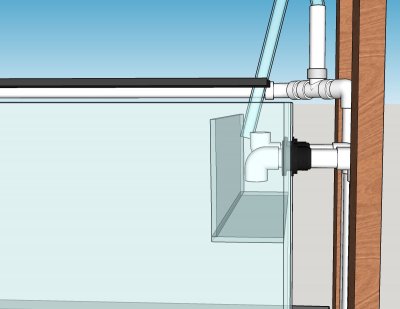
And finally a close-up of the overflow/wier box itself.
Fish Stand Mock-Up 8.jpg

So as per usual, any feedback or input would greatly be appreciated. Anything I'm doing wrong, or that I should adjust. As now is the time to correct it.

The stand is hopefully coming in the house this week, and later this week I hope the drill arrives so I can drill the glass, order the panes for the wier, and get the plumbing all done!

Thanks again for following along, and thanks in advance for any advice/suggestions!
 

DeniseAndy

7500 Club Member
View Badges
Joined
Sep 12, 2011
Messages
7,802
Reaction score
10,681
Location
Milford, Ohio
Rating - 0%
0   0   0
Man, I wish I could do those concept drawings. I have been using powerpoint to make concept art for a new tank. :

Looks great from what I can tell and read. Cannot wait to see it built. I like the trays under to catch water. It will help with the little drips we all have working in the tanks.
 

webbrage

Active Member
View Badges
Joined
Apr 9, 2016
Messages
178
Reaction score
67
Location
Broward
Rating - 0%
0   0   0
look ****** your good at the sketching looks really detailed. I think its gonna be a killer tank i like that style hiding everything on one side going up
 
OP
OP
Glasswalker

Glasswalker

Active Member
View Badges
Joined
Mar 24, 2016
Messages
232
Reaction score
244
Rating - 0%
0   0   0
Man, I wish I could do those concept drawings. I have been using powerpoint to make concept art for a new tank. :

Looks great from what I can tell and read. Cannot wait to see it built. I like the trays under to catch water. It will help with the little drips we all have working in the tanks.
It's actually not that hard, I use an app called Sketchup, available for Windows and Mac I believe. There is a free version which works fine for stuff like this. It has a "3d Warehouse" that you can search and import objects from (where I found the pump,skimmer, and standard tank sizes, as well as the Schedule 40 PVC pipes/fittings). The 2x4s I just made as a block 2"x4". There are a ton of tutorials on how to use sketchup out there and the learning curve is quite low (compared to most CAD or 3D Software).

look ****** your good at the sketching looks really detailed. I think its gonna be a killer tank i like that style hiding everything on one side going up
Hey thanks! Yeah, the design was my wife's favorite, so she gave me a hand sketch of what she wanted, and I did the engineering of the stand and modeled it up in 3D for her approval ;) lol.

The final look will be slightly better than the plan, I intend to add trim around the tank viewing window, and the edges of the stand for example, but that will likely be added at a later date. And I'm contemplating putting crown moulding around the top of the tank, and baseboard around the bottom... Still not sure on some of the "fine details" like that.

Ultimately the design is complete though, covers all the frame/panels and plumbing I need, and everything is 100% to scale, so I can be sure it will all fit properly and so on. Now I know exactly what to buy for fittings for example.
 
OP
OP
Glasswalker

Glasswalker

Active Member
View Badges
Joined
Mar 24, 2016
Messages
232
Reaction score
244
Rating - 0%
0   0   0
Another quick update:

The Drill arrived! So hopefully in the next week I can get the time to drill the tank! That's the last big hold-up to finishing it off and getting to the stage of aquascaping and putting water in it. I still have to order the glass for the overflow, but was waiting until I've drilled it successfully.

My next round of budget becomes available to me on the 15th, at which point I'll probably order the rest of the bits I need to get going:
- Plumbing
- Glass
- Rock
- Sand
- Other minor misc bits

One thing I've been debating... Is if I should go the live rock & live sand route, or go with 100% dead/dry rock/sand, aquascape it dry, and cycle it that way. My wife has of course been scaring herself with the horror stories of hitch hikers that she's found online, I am pretty sure it won't be a big problem, but the advantage of going dry/dead to start is that it is a 100% controlled environment, and with proper quarantine procedures I can control what gets introduced to the tank. With Live Rock/Sand, there is some/minimal risk I will introduce something nasty. That said the live route has advantages as well... Any additional suggestions/feedback would be very welcome as always.

I think right now I'm leaning towards:
- 100% "clean" substrate (non-live)
- 99% dry rock
- Aquascape it dry
- Add 1-2 pieces of carefully inspected live rock

Thoughts?
 

Bronc

Valuable Member
View Badges
Joined
Mar 1, 2016
Messages
1,348
Reaction score
2,234
Location
Tulsa, OK
Rating - 0%
0   0   0
Another quick update:

The Drill arrived! So hopefully in the next week I can get the time to drill the tank! That's the last big hold-up to finishing it off and getting to the stage of aquascaping and putting water in it. I still have to order the glass for the overflow, but was waiting until I've drilled it successfully.

My next round of budget becomes available to me on the 15th, at which point I'll probably order the rest of the bits I need to get going:
- Plumbing
- Glass
- Rock
- Sand
- Other minor misc bits

One thing I've been debating... Is if I should go the live rock & live sand route, or go with 100% dead/dry rock/sand, aquascape it dry, and cycle it that way. My wife has of course been scaring herself with the horror stories of hitch hikers that she's found online, I am pretty sure it won't be a big problem, but the advantage of going dry/dead to start is that it is a 100% controlled environment, and with proper quarantine procedures I can control what gets introduced to the tank. With Live Rock/Sand, there is some/minimal risk I will introduce something nasty. That said the live route has advantages as well... Any additional suggestions/feedback would be very welcome as always.

I think right now I'm leaning towards:
- 100% "clean" substrate (non-live)
- 99% dry rock
- Aquascape it dry
- Add 1-2 pieces of carefully inspected live rock

Thoughts?
I went with live sand and got live rock and pre made saltwater from my LFS. (I only have a 25g tank). This was perfect for me as my tank cycled in a week and I knew I could trust everything. I'm loving the hitchhikers that came with the live rock.
 

webbrage

Active Member
View Badges
Joined
Apr 9, 2016
Messages
178
Reaction score
67
Location
Broward
Rating - 0%
0   0   0
yea its pretty beneficial to go live, like you said you can't beat the hitchhikers
 
OP
OP
Glasswalker

Glasswalker

Active Member
View Badges
Joined
Mar 24, 2016
Messages
232
Reaction score
244
Rating - 0%
0   0   0
I ultimately decided to go dry rock/sand but with live rock seed. (one or two pieces of live rock to seed the life).

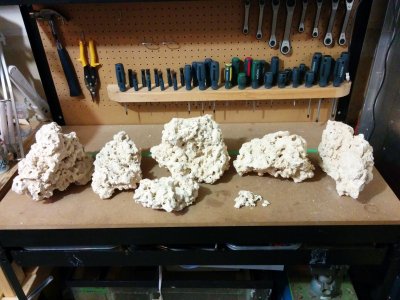
I went out and picked up my first 50lb box of Marco Rock today from LFS. Very reasonable price (about $3/lb). It was entirely med/large pieces, zero rubble, only a tiny amount of break-off.

Also got a couple bags of Aragonite substrate.

Will be drilling the tank this Saturday. So if that goes well, things will really get rolling over the next week or two!

Anyway, I was excited to see the rock, so took a couple pics. I setup my workbench as a mock-up of the tank. It's exactly the same length, and used green painters tape to mark the back glass:
IMG_20160414_194341.jpg

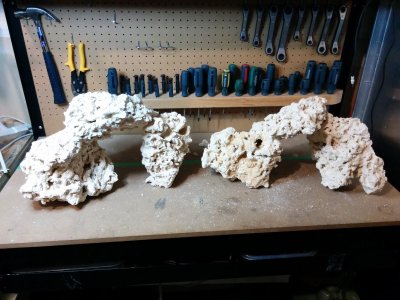
And here is a quick arrangement, not my final setup, but just an idea of what I'm thinking so-far:
IMG_20160414_200202.jpg

Going for rule of thirds, for good appealing looks, and want to have some raised areas to put higher light corals later, and have lots of neat areas for fish to swim through. With lots of sand bed open. I intend to tweak these rocks (carve some up a bit to make more cave like structures and so on). And pick up one or two more rocks to flesh out the design.

More to come this weekend!
 

DeniseAndy

7500 Club Member
View Badges
Joined
Sep 12, 2011
Messages
7,802
Reaction score
10,681
Location
Milford, Ohio
Rating - 0%
0   0   0
Looks good. I would soak that rock in a tub with flow and water for over two weeks. I have experience with the rock and it is great except can leach a lot. Just make sure to cure it a while first. You can even do this in fresh water. Just put rock in tub with flow and change water every day for two weeks. This will help get some of the phosphates out.
 
OP
OP
Glasswalker

Glasswalker

Active Member
View Badges
Joined
Mar 24, 2016
Messages
232
Reaction score
244
Rating - 0%
0   0   0
So first round of updates from this weekends activities.

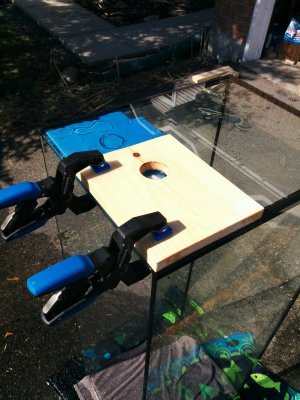
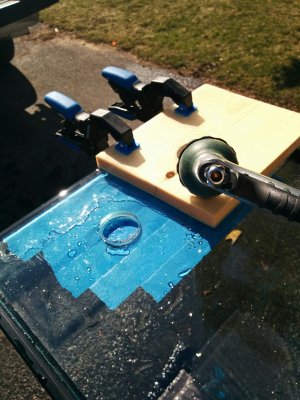
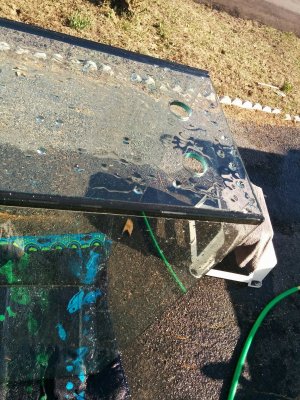
Round 1: WOOT! Drilling went off without a hitch! No cracks or issues, and glass didn't shatter, so clearly not tempered. Drilling was easy, nice clean holes, and already have the 1" bulkheads mounted!

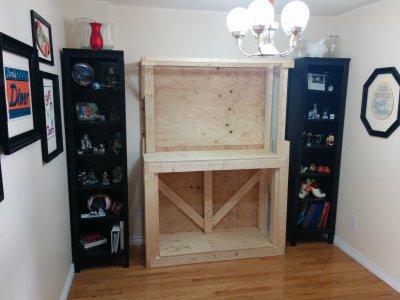
In addition I got the stand moved into the house, into it's new home. And the tank is all ready to go on the stand once I pick up the Pond Membrane tomorrow, along with all the plumbing!

Here are pics of the drilling activities, and the stand in the house:

Starting to drill the first hole (made a Jig, and drilled wet with blue painters tape on inside of glass, worked very well!):
IMG_20160416_155219.jpg

Drilling second hole, you can see the water hose used for a constant flow of water while drilling:
IMG_20160416_163148.jpg

Finished Holes!
IMG_20160416_164952.jpg

And the stand in the house:
IMG_20160416_173307.jpg

More to come tomorrow!
 
OP
OP
Glasswalker

Glasswalker

Active Member
View Badges
Joined
Mar 24, 2016
Messages
232
Reaction score
244
Rating - 0%
0   0   0
Ok, so didn't get as much done as I'd like Sunday... I did manage to get all the plumbing purchased though, and the pond membrane, and started mounting that on the stand (at least under the DT) so that I can get the DT up on the stand and run all the plumbing.

I'm adhering the membrane to the stand using construction adhesive, and will then use silicone to seal the seams where I had to cut/join it.
Just doing the back sides which will be behind the tank. The front sides will need the facing panels to support it. So I'll finish it once I add those. But this way the liner is in-place and I can get the tank up on it and then I can finish the rest afterwards.
IMG_20160418_001721.jpg
 

Lilly45nano

Active Member
View Badges
Joined
Oct 13, 2015
Messages
143
Reaction score
55
Location
CT
Rating - 0%
0   0   0
Looking good....are you planing on a finish to protect the back of the stand? Hate to see you place and hook up the tank and forget to protect the wood from the moister that is bound to happen;)
 
OP
OP
Glasswalker

Glasswalker

Active Member
View Badges
Joined
Mar 24, 2016
Messages
232
Reaction score
244
Rating - 0%
0   0   0
Actually probably not. I'm going to be venting the hood/sump chamber with fans, and I'll have humidity/temperature monitoring in there (controlling the fan speed). It's good quality ply, not MDF, so moisture won't affect it as much (but it still can affect it).

I don't believe in the lifetime of this tank (Reality is inside of 5 years I'll likely have upgraded to much bigger lol) I don't think the wood back will be my main concern ;) (the wood is actually there just to protect the wall behind it lol).

So no, don't plan on any kind of finish on that wood.

That said, I could be completely wrong, and it could become a major problem. But if I see any signs, it won't be that hard to add some more pond-liner and just staple it up to the wood back to cover it up in the future if it proves necessary. :)

But thanks for the suggestion and your concern! ;)
 

SABOB

Community Member
View Badges
Joined
Dec 17, 2013
Messages
62
Reaction score
9
Rating - 0%
0   0   0
Read this during lunch today......Your attention to detail in all the planning and building is impressive.Will continue to follow your adventure.
 

When to mix up fish meal: When was the last time you tried a different brand of food for your reef?

  • I regularly change the food that I feed to the tank.

    Votes: 28 27.2%
  • I occasionally change the food that I feed to the tank.

    Votes: 35 34.0%
  • I rarely change the food that I feed to the tank.

    Votes: 31 30.1%
  • I never change the food that I feed to the tank.

    Votes: 7 6.8%
  • Other.

    Votes: 2 1.9%
Back
Top