Navigation
Install the app
How to install the app on iOS
Follow along with the video below to see how to install our site as a web app on your home screen.
Note: This feature may not be available in some browsers.
More options
You are using an out of date browser. It may not display this or other websites correctly.
You should upgrade or use an alternative browser.
You should upgrade or use an alternative browser.
First build, some questions, and documenting my build
- Thread starter Glasswalker
- Start date
- Tagged users None
- Joined
- Mar 24, 2016
- Messages
- 232
- Reaction score
- 244
@SABOB
Hey, thanks for following along!
@Lilly45nano
I like the clean look, so I've purchased an all black background for it, which I'll be attaching once I've finished installing the wier/overflow box.
Combined with the hood and enclosed stand design, the background will completely hide the remainder of the stand. The only panel you'll be able to see through is the plumbed end, but due to refraction I suspect that will be minimal. I'll let that end grow in coralline, but I'll try to keep the other 3 sides all clean (back and 2 viewing sides). I really like how the lighting and color of the corals and such "pop" so vividly on tanks with plain black background and clean glass... (and yes I realize that means more work to keep it clean lol)
- Joined
- Mar 24, 2016
- Messages
- 232
- Reaction score
- 244
Another update... Getting the plumbing together now.
A quick pic of assembling some of the sections for the overflow and return. (please excuse the glare from the lights, it's a quick phone pic).
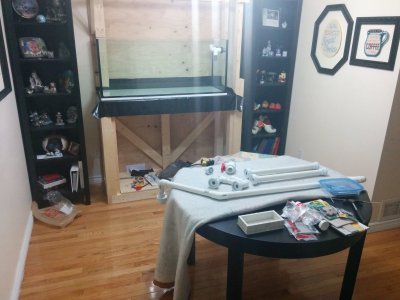
It's all dry-fit for now, my can of primer is impenetrable lol... So exchanging it and will do the solvent welding likely later this week.
I've called to order the glass for the weir/overflow, and I've started soaking/rinsing my dry substrate. Sometime this week, or this weekend I'll finish my rock work (pick up one-two more pieces, finish my carving, and power wash them, followed by a long soak in tap water with a powerhead for a few days).
I was hoping I'd have water in the tank this weekend, but now it's looking like it will be the following weekend. Which works out ok, basically I'll get the tank full of water 1st of may I expect
A quick pic of assembling some of the sections for the overflow and return. (please excuse the glare from the lights, it's a quick phone pic).

It's all dry-fit for now, my can of primer is impenetrable lol... So exchanging it and will do the solvent welding likely later this week.
I've called to order the glass for the weir/overflow, and I've started soaking/rinsing my dry substrate. Sometime this week, or this weekend I'll finish my rock work (pick up one-two more pieces, finish my carving, and power wash them, followed by a long soak in tap water with a powerhead for a few days).
I was hoping I'd have water in the tank this weekend, but now it's looking like it will be the following weekend. Which works out ok, basically I'll get the tank full of water 1st of may I expect
- Joined
- Mar 24, 2016
- Messages
- 232
- Reaction score
- 244
@Lilly45nano
lol, it's a Wombat.
Backstory:
I like to randomly inject nonsense into my conversations sometimes. I find it keeps people on their toes, and I find it tremendously amusing
So sometimes I would use random fruits/vegetables or inanimate objects, or random animals as the subject of this nonsense... One which I tended to use often was the Wombat (Random "exotic" animal from Australia area). The reality is I honestly had no idea what a wombat was other than that it was a furry marsupial
Anyway one day a friend asked me "Do you even know what a Wombat looks like?", to which I had to honestly answer "no". So that prompted me to hit up Wikipedia and google to learn all about wombats. On a particular google image search I stumbled onto this picture (the full version if I remember correctly is someone holding the wombat up like you'd lift a small child from around the torso under the arms, and it was somewhat angry). But in the cropped in context it looks thoroughly amusing like it's smiling/laughing...
So I've used it as an avatar ever since then lol...
- Joined
- Mar 24, 2016
- Messages
- 232
- Reaction score
- 244
Quick update, this pic is actually from Monday, but been so busy didn't have a chance to post it. All the pipe dry fit on the dining table.
Last night I finished solvent welding it all together.
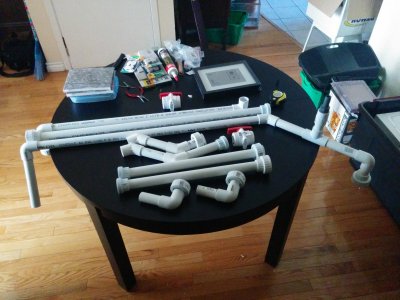
As you can see each run is broken up into 3 segments, separated by unions: display end, vertical run, and sump end.
For the 2 overflow pipe the display end is the elbow and Union solvent welded into the bulkhead on the outside, and the friction fit elbows for the overflow itself I side the weir box. And the sump end is just a set of 45s to direct the water into the sump tank inlet end.
For the return, the sump end inudes the adapter for the main pump, on a LE gth of large diameter clear flex pipe, which then mounts to a long horizontal run. And the display end is the long run. With siphon break for the return flow into the left-hand end of the DT.
The vertical runs are loose within the plumbing hole through the frame, however they are permenant, because the Union ends don't fit out. Also the vertical runs have the ball valves for the main siphon and return lines.
But with this method the plumbing should be easy to service going forward.
So it's all cured now, so once I'm done installing the weir box, I'll hook all the plumbing up finally, and secure it in place using strapping in the stand to both support its weight, and keep it from moving around and spilling water lol.
Oh, and one more thing, picked up about 15lb more of Marco rock from LFS, got a couple really neat pieces. Will be finishing the final rock work likely this weekend, so expect some more pics of that when I'm done
More to come soon!
Last night I finished solvent welding it all together.

As you can see each run is broken up into 3 segments, separated by unions: display end, vertical run, and sump end.
For the 2 overflow pipe the display end is the elbow and Union solvent welded into the bulkhead on the outside, and the friction fit elbows for the overflow itself I side the weir box. And the sump end is just a set of 45s to direct the water into the sump tank inlet end.
For the return, the sump end inudes the adapter for the main pump, on a LE gth of large diameter clear flex pipe, which then mounts to a long horizontal run. And the display end is the long run. With siphon break for the return flow into the left-hand end of the DT.
The vertical runs are loose within the plumbing hole through the frame, however they are permenant, because the Union ends don't fit out. Also the vertical runs have the ball valves for the main siphon and return lines.
But with this method the plumbing should be easy to service going forward.
So it's all cured now, so once I'm done installing the weir box, I'll hook all the plumbing up finally, and secure it in place using strapping in the stand to both support its weight, and keep it from moving around and spilling water lol.
Oh, and one more thing, picked up about 15lb more of Marco rock from LFS, got a couple really neat pieces. Will be finishing the final rock work likely this weekend, so expect some more pics of that when I'm done
More to come soon!
Last edited:
- Joined
- Mar 24, 2016
- Messages
- 232
- Reaction score
- 244
Ok another quick update. I'll be busy tonight and Saturday so won't get much done. Hoping I can get some good progress on Sunday thought.
So last night I:
Also I'm hoping Saturday to finish the rock carving, and get the rocks power-washed and soaking for a couple days just to take the worst of any phosphate leeching out of them, then I'll be ready to put them and the already rinsed sand into the tank, finish my aquascaping and start transferring the RODI into the system.
I'll do my salt mixing in the tank for the first time around.
Anyway a couple quick phone pics to keep you all happy for a couple days until I can get some more major work done
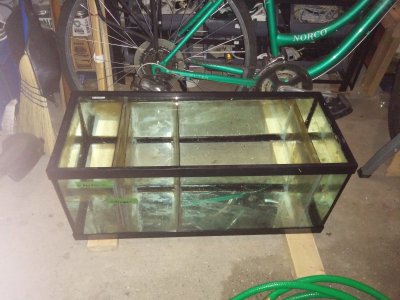
Here is the partially washed sump, holding water now soaking:
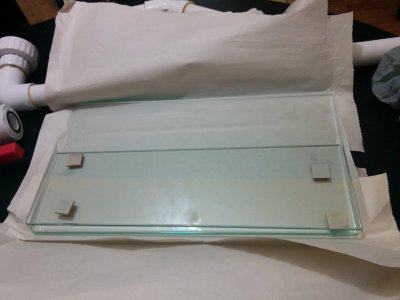
And here is the glass for the overflow/weir box:
And finally, here is the plumbed side (right side) of the DT on the stand, showing the overflow plumbing, and the vertical runs sitting in the stand "slot". Ready to be connected up once the sump is installed and weir is finished/cured:
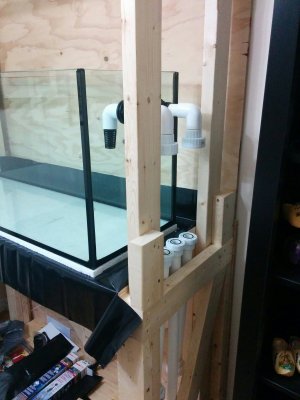
(front most pipe is the main siphon, rear most is the emergency drain, and middle (much longer) is for the return (because it reaches up above the DT to be run back to the back wall of the stand, and then along the back wall to dump into the lefthand side of the DT).
Hopefully more to come Sunday!
So last night I:
- Transferred my first 25gal of RODI water from my friend into a holding tub, heavy duty, black, with lid. So it should be fine there until I can use it. He's filling another 5x 5gal jugs for me this weekend.
- Did a first pass at washing my sump. It's a used sump my friend picked up from another reefer along with some random gear. He bought a full system just for a bit of livestock and all the spare parts. The sump still needs a good scrubdown, but I got the worst of it cleaned up. Realized several of the acrylic baffles are loose with bad silicone joints. The tank itself is sound though, and is full of water now to soak (and not showing any leaks). So I'll just fix up a few of the silicone joints, and add a few baffle braces in place and it should work out fine.
- Also my plumbing is all cured, so I took a quick pic of the side of the tank with the overflows and vertical runs through the stand in place.
- Picked up my glass from the glass shop for the weir box/overflow. So ready to install that.
Also I'm hoping Saturday to finish the rock carving, and get the rocks power-washed and soaking for a couple days just to take the worst of any phosphate leeching out of them, then I'll be ready to put them and the already rinsed sand into the tank, finish my aquascaping and start transferring the RODI into the system.
I'll do my salt mixing in the tank for the first time around.
Anyway a couple quick phone pics to keep you all happy for a couple days until I can get some more major work done
Here is the partially washed sump, holding water now soaking:

And here is the glass for the overflow/weir box:

And finally, here is the plumbed side (right side) of the DT on the stand, showing the overflow plumbing, and the vertical runs sitting in the stand "slot". Ready to be connected up once the sump is installed and weir is finished/cured:

(front most pipe is the main siphon, rear most is the emergency drain, and middle (much longer) is for the return (because it reaches up above the DT to be run back to the back wall of the stand, and then along the back wall to dump into the lefthand side of the DT).
Hopefully more to come Sunday!
- Joined
- Mar 24, 2016
- Messages
- 232
- Reaction score
- 244
So just checking in, didn't get nearly as much done this weekend as I would like.
Basically just started on the pond liner in the sump compartment. And picked up some of the hardware to mount/adjust the plumbing which requires support (mainly on the return line). Was hoping to get started on the glass overflow box, but haven't started that yet. Hopefully tonight.
But don't worry, more pics definitely coming soon.
Also my GFCI cord came in today, and my Power Heads. So I've now basically got everything I need to get things rolling. Just need to find the time to finish off the last couple time-consuming tasks, then we can get into the home-stretch of the build (aquascaping, and adding water to the tank, to get the cycle going!)
Stay Tuned! Same Wombat Time! Same Wombat Channel!
So just checking in, didn't get nearly as much done this weekend as I would like.
Basically just started on the pond liner in the sump compartment. And picked up some of the hardware to mount/adjust the plumbing which requires support (mainly on the return line). Was hoping to get started on the glass overflow box, but haven't started that yet. Hopefully tonight.
But don't worry, more pics definitely coming soon.
Also my GFCI cord came in today, and my Power Heads. So I've now basically got everything I need to get things rolling. Just need to find the time to finish off the last couple time-consuming tasks, then we can get into the home-stretch of the build (aquascaping, and adding water to the tank, to get the cycle going!)
Stay Tuned! Same Wombat Time! Same Wombat Channel!
Well.....Get a on it please
- Joined
- Mar 24, 2016
- Messages
- 232
- Reaction score
- 244
OK, finally got some progress... 
Last night I managed to finish installing the overflow box... Surprisingly my first experience with silicone... And was totally unprepared for how hard it was to work with lol... Results didn't turn out as nice as I would like, and got some on spots I didn't want to... Will use razor blade to clean up tonight...
Also got done:
Here is a quick phone lic of the overflow box:
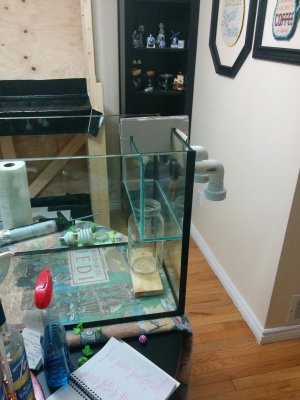
And for the record NO that Windex was never used on the tank. My wife just put it there after cleaning the mirrors in the bathroom lol...
Last night I managed to finish installing the overflow box... Surprisingly my first experience with silicone... And was totally unprepared for how hard it was to work with lol... Results didn't turn out as nice as I would like, and got some on spots I didn't want to... Will use razor blade to clean up tonight...
Also got done:
- Printed more feet for the rocks
- More cleanup on sump, it's just about ready
- Finished siliconing and sealing the membrane on the stand for under the DT.
Here is a quick phone lic of the overflow box:

And for the record NO that Windex was never used on the tank. My wife just put it there after cleaning the mirrors in the bathroom lol...
- Joined
- Mar 24, 2016
- Messages
- 232
- Reaction score
- 244
@Bronc
Yeah, it was a bit of a pain. Now I know for next time though, repairing some silicone on the baffles in the sump tonight, so I'll take a slightly different approach I think
@Lilly45nano
Lol, sure , though we're hoping we can enjoy this for 3+ years (we're signing a 3 year lease on our house, which we rent... After that we hope to buy our own place, and that's likely when we'd be looking at upgrading to something bigger).
I'm in Canada (specifically Ottawa, Ontario, our national Capital). Nearest US city would be Ogdensburg NY which is about 1hour drive from here.
Yeah, it was a bit of a pain. Now I know for next time though, repairing some silicone on the baffles in the sump tonight, so I'll take a slightly different approach I think
@Lilly45nano
Lol, sure
I'm in Canada (specifically Ottawa, Ontario, our national Capital). Nearest US city would be Ogdensburg NY which is about 1hour drive from here.
- Joined
- Mar 24, 2016
- Messages
- 232
- Reaction score
- 244
So another quick update, no new pics yet, was too busy, and not much to "look at" in the stuff I got done:
- Finished rinsing the rest of my substrate
- Began the rock work, but still nothing final yet lol
- Ran/Tested the electrical to the stand, still need to permanently mount everything though (everything is on GFCI of course)
- Removed supports from overflow box. Silicone appears to be cured now.
- Finished the final "wash" of the used sump. It's not as "clean" as I'd like, but it's good enough lol...
Coming up over the next couple days:
- Install the background on the tank
- Finish rock work
- Wash the rocks
- Put the tank back on the stand
- Repair the sump baffles silicone work
- Begin the final aquascaping in the tank
- Pick up second batch of RODI water
- Possibly (if all goes REALLY well) begin putting first bit of RODI water into the DT...
You're making me feel like my plans for my new tank are woefully inadequate, lol. Everything's looking great!
One thing, and I don't know what other reefers here's thoughts are, but I picked up the Aquatic Life RO Buddy RO kit, with the add on DI resin, for less than $100 on Amazon (price is higher now than when I bought). I hooked it up in my laundry room off a faucet splitter, and zip-tied it to a shelf unit over a storage bin to catch any leakage. Waste line goes into the washer drain, and I have 50 feet of output hose coiled up on a hook hanging from the shelf as well. When I need to top off my tank, I just turn the toggle to allow water to go to the filter and pull the hose around to fill my mixing container next to the tank. When it's full, I coil the tubing back up and flip the toggle back so no water goes into the filter.
I took the output water to be tested by a friend with a TDS meter and it registered 0, so to my mind the only issue with this cheap little RO/DI setup is that it only outputs 50g/day. But for a tank your size that'd be more than enough.
You're making me feel like my plans for my new tank are woefully inadequate, lol. Everything's looking great!
One thing, and I don't know what other reefers here's thoughts are, but I picked up the Aquatic Life RO Buddy RO kit, with the add on DI resin, for less than $100 on Amazon (price is higher now than when I bought). I hooked it up in my laundry room off a faucet splitter, and zip-tied it to a shelf unit over a storage bin to catch any leakage. Waste line goes into the washer drain, and I have 50 feet of output hose coiled up on a hook hanging from the shelf as well. When I need to top off my tank, I just turn the toggle to allow water to go to the filter and pull the hose around to fill my mixing container next to the tank. When it's full, I coil the tubing back up and flip the toggle back so no water goes into the filter.
I took the output water to be tested by a friend with a TDS meter and it registered 0, so to my mind the only issue with this cheap little RO/DI setup is that it only outputs 50g/day. But for a tank your size that'd be more than enough.
If you wouldn't mind I would like to see a pic of this set up....thank you!
Great thread!! Your research ahead of time is excellent. It will save you tons of grief later. I have the little buddy RODI system and love it'
- Joined
- Mar 24, 2016
- Messages
- 232
- Reaction score
- 244
So yesterday finished my preliminary rock work. Made several "adjustments" to the rocks (carved/split and so on).
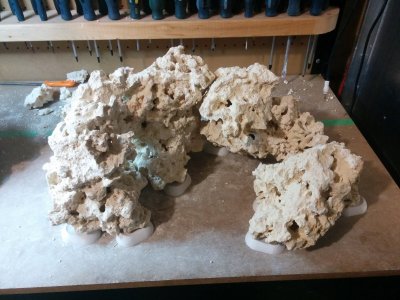
This is our current "plan" for the aquascaping. Now we're getting the tank up today and hoping to move the rocks/sand into the tank, and I'll get more photos of it's final layout.
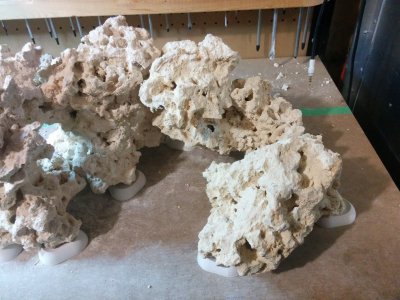
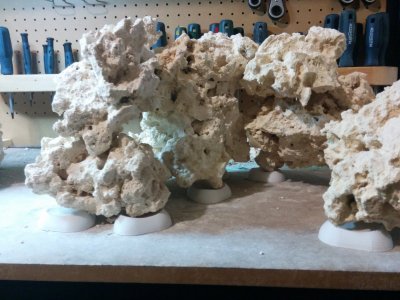
Note the little white "feet" I printed on my 3D Printer to support the rocks. This provides a stable base for the rocks, which is smooth/flat and not hard against the glass. I can place rocks directly in without sand, and then add sand later, letting the critters dig all they want without disturbing rock layout. (note, the plastic should be fully covered by substrate in the tank once it's finally setup)
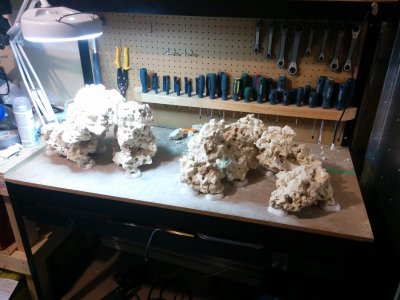
First off, here is an overview of the whole tank layout. Workbench is identical to tank width, green tape in background is rear glass of tank. So we used this as a staging area.
We went for an "Arch" on the left, with a "Cradle" on the right. with a nice open space between. From top down this provides an S shaped swim area the full length of the tank, and should allow for good flow around. The work light in the pic is just slightly higher than the water level should be, so ample room above the rocks. as well. My current LED lighting puts about 40-50 par at 12" of depth, so on top of those rocks will only be about 4-6 inches of depth, so I should be able to handle medium light LPS and Softies no problem at all. But we'll see, worse case I can supplement my lighting
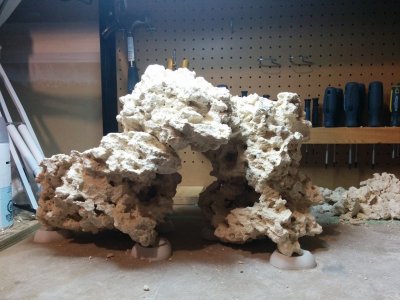
Here is a close-up of the arch (ignore the rubble in the background, it's going in the fuge lol) The righthand rock has a tunnel carved through it, and left-hand has a bit of a shelf on the front which you can't see well from this angle. Both of these base rocks were carved a fair bit to create nice shaping, and Tunnels/caves for fish/critters. The back opens up a fair bit also giving a nice sheltered area under the cover rock.
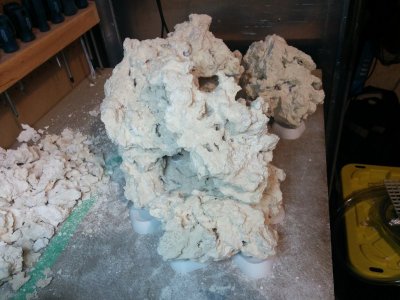
Here is the "Nest" general overview. Right-hand side fits under the overflow box, with lots of clearance. So kept it low, and it builds up more towards a taller height on the left. There is a tunnel, and a bit of a cave in there. In addition this is made up of more medium/small rocks, and so they were setup in a way to allow lots of small holes through and such.
Close-up of the left end of the nest, showing the cave/tunnel through it.
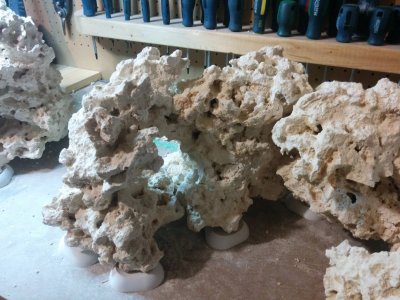
Tunnel opening from the other side. The cavity inside is actually a little larger than either opening
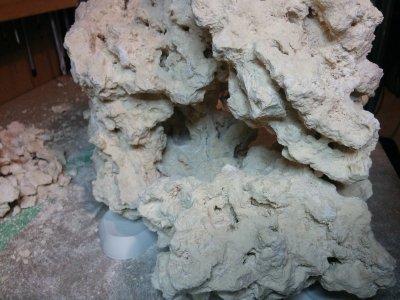
Another good angle on the opening on the left
This angle just shows a bit of a pass-through on the right. The end-most rock and the neighbouring rock create a bit of a channel on the right that can be swam through. With a bit of an overhang/cave near the center rear (slightly right offset) of the cradle.
This angle shows a couple of the small holes through the rocks
Anyway, hoping today to finish setting up the DT, and getting the rock/sand finally in it. So hopefully more to come shortly!
This is our current "plan" for the aquascaping. Now we're getting the tank up today and hoping to move the rocks/sand into the tank, and I'll get more photos of it's final layout.
Note the little white "feet" I printed on my 3D Printer to support the rocks. This provides a stable base for the rocks, which is smooth/flat and not hard against the glass. I can place rocks directly in without sand, and then add sand later, letting the critters dig all they want without disturbing rock layout. (note, the plastic should be fully covered by substrate in the tank once it's finally setup)
First off, here is an overview of the whole tank layout. Workbench is identical to tank width, green tape in background is rear glass of tank. So we used this as a staging area.
We went for an "Arch" on the left, with a "Cradle" on the right. with a nice open space between. From top down this provides an S shaped swim area the full length of the tank, and should allow for good flow around. The work light in the pic is just slightly higher than the water level should be, so ample room above the rocks. as well. My current LED lighting puts about 40-50 par at 12" of depth, so on top of those rocks will only be about 4-6 inches of depth, so I should be able to handle medium light LPS and Softies no problem at all. But we'll see, worse case I can supplement my lighting

Here is a close-up of the arch (ignore the rubble in the background, it's going in the fuge lol) The righthand rock has a tunnel carved through it, and left-hand has a bit of a shelf on the front which you can't see well from this angle. Both of these base rocks were carved a fair bit to create nice shaping, and Tunnels/caves for fish/critters. The back opens up a fair bit also giving a nice sheltered area under the cover rock.

Here is the "Nest" general overview. Right-hand side fits under the overflow box, with lots of clearance. So kept it low, and it builds up more towards a taller height on the left. There is a tunnel, and a bit of a cave in there. In addition this is made up of more medium/small rocks, and so they were setup in a way to allow lots of small holes through and such.

Close-up of the left end of the nest, showing the cave/tunnel through it.

Tunnel opening from the other side. The cavity inside is actually a little larger than either opening

Another good angle on the opening on the left

This angle just shows a bit of a pass-through on the right. The end-most rock and the neighbouring rock create a bit of a channel on the right that can be swam through. With a bit of an overhang/cave near the center rear (slightly right offset) of the cradle.

This angle shows a couple of the small holes through the rocks

Anyway, hoping today to finish setting up the DT, and getting the rock/sand finally in it. So hopefully more to come shortly!
Similar threads
- Replies
- 9
- Views
- 202
- Replies
- 6
- Views
- 225
- Replies
- 12
- Views
- 240
- Replies
- 4
- Views
- 180


