Your set up always amazes me, you really did took it to another levelMine is till running sting aswell have not touched it since started except filling the 5 gallon bucket 1x
Navigation
Install the app
How to install the app on iOS
Follow along with the video below to see how to install our site as a web app on your home screen.
Note: This feature may not be available in some browsers.
More options
You are using an out of date browser. It may not display this or other websites correctly.
You should upgrade or use an alternative browser.
You should upgrade or use an alternative browser.
How to automate a phytoplankton culture
- Thread starter sixty_reefer
- Start date
- Tagged users None
I wanted to “how long it’s been running for, but I don’t remember so I did not wanna be wrong. I may look back at some posts to try to figure it out and get back to you.Your set up always amazes me, you really did took it to another levelhow many months is it running now?
That’s a lot of phytoplankton in 5 monthsSo mine has been running nonstop since August 20 with no intervention besides filling the 5 gallon saltwater reservoir one time
Which SPs. are you culturing in those vessels?So mine has been running nonstop since August 20 with no intervention besides filling the 5 gallon saltwater reservoir one time
Whatever Poseidon’s reef sellsWhich SPs. are you culturing in those vessels?
Mine is till running sting aswell have not touched it since started except filling the 5 gallon bucket 1x
FordTech, where did you get the DIY REACTORS from? I’ve been follow sixty~Reefer reading up on all this. Currently building a new tank and want to incorporate something like this for my new tank. That’s awesome to see you’ve been running it successfully!
edit:
I found something that may work on Amazon
Clscea Aquarium DIY Brine Shrimp Incubator Hatchery Kit Simple https://a.co/d/benyeIx
Last edited:
For what it’s worth in this picture circled in yellow is the only thing that was bought. Everything else I fabricated from acrylic and things around the house and strip lights from Amazon. The parts circles are Fauna Marin DIY reactor. also here is the acrylic 6inch tube I used but had to cut bottoms off.FordTech, where did you get the DIY REACTORS from? I’ve been follow sixty~Reefer reading up on all this. Currently building a new tank and want to incorporate something like this for my new tank. That’s awesome to see you’ve been running it successfully!
edit:
I found something that may work on Amazon
Clscea Aquarium DIY Brine Shrimp Incubator Hatchery Kit Simple https://a.co/d/benyeIx

DIY Reactor - Fauna Marin
Aquarium fish, inverts, corals, and supplies from BIGShowFrags featuring saltwater fish, aquariums and more. Come visit BIGShowFrags.com for all your aquarium fish needs.
Last edited:
- Joined
- Oct 28, 2018
- Messages
- 84
- Reaction score
- 221
@sixty_reefer I've just ordered some TNC complete for phyto culturing after reading this thread, forgive me if you've already mentioned it but what would you dose per litre to grow phyto?
This is in a "normal" culture set up rather than your genius automated system.
Thanks!
This is in a "normal" culture set up rather than your genius automated system.
Thanks!
Same as others, 1ml per litre worked well for me.@sixty_reefer I've just ordered some TNC complete for phyto culturing after reading this thread, forgive me if you've already mentioned it but what would you dose per litre to grow phyto?
This is in a "normal" culture set up rather than your genius automated system.
Thanks!
- Joined
- Oct 28, 2018
- Messages
- 84
- Reaction score
- 221
Thanks!Same as others, 1ml per litre worked well for me.
Hey sixty, thank you so much for this thread!! Thinking of using the pacific sun phyto reactor, but use your continued method. Just to be clear on the fertilizer added component:
You dose 1ml per litre at the end of 7 days? Not at all during the week, just one time? In the meantime you add saltwater as soon as you dose the live phytoplankton to keep the volume the same in the reactor. So say you have a new tank, accimilizing it to phyto, and only use a little phyto in that weeks time. You would then just dose the fertilizer at the above ratio for the small amount you did over those 7 days?
Thanks so much in advance.
It’s 1ml per litre of the total culture, you still need to keep the culture alive, if you were only using 24ml for example and dose fertiliser accordingly with the 24ml used the hole culture is at risk of starvation and crash if that makes senseJust to clarify my question: you dose the fertilizer (1ml per litre) per the amount used that week 1 time every 7 days. Not per the entire volume of the container every week.
Hey Aubie1983, have you found a pacific sun reactor in north America yet? I've been searching forever..Hey sixty, thank you so much for this thread!! Thinking of using the pacific sun phyto reactor, but use your continued method. Just to be clear on the fertilizer added component:
You dose 1ml per litre at the end of 7 days? Not at all during the week, just one time? In the meantime you add saltwater as soon as you dose the live phytoplankton to keep the volume the same in the reactor. So say you have a new tank, accimilizing it to phyto, and only use a little phyto in that weeks time. You would then just dose the fertilizer at the above ratio for the small amount you did over those 7 days?
Thanks so much in advance.
Is this a private party? Can I reserve a seat for later?
Just finished glueing up a version of this.
I'm wondering if this can be used for freshwater phyto.. like Haematococcus pluvialis.. and replace a brine shrimp tanks ato.. hmm..
Based off of an external bell siphon.

 sugarlandaquaponics.wordpress.com
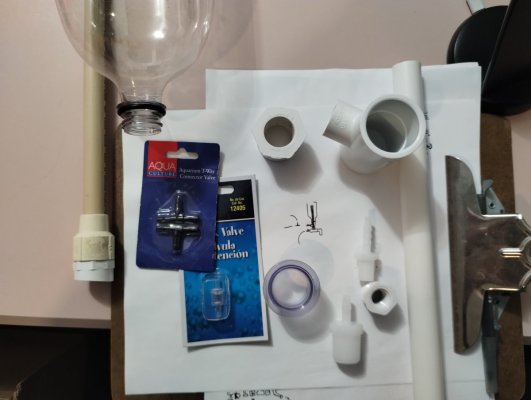
Parts:
2 liter bottle
1s x 1/2fpt x 1s PVC tee
1s x 1/2s PVC bushing
1s x bottle thread bushing (https://www.bottlebushing.com/)
1/2 PVC adapter s/mpt
1/2 CPVC adapter s/fpt
1/2mpt x 1/4fpt bushing
1/4mpt x 3/16 barb
1/2 PVC pipe
1/2 CPVC pipe
3/16 3 way
3/16 check valve
(Ignore the 1/2mpt-1/4 barb, the missing 1/2 tee and the "flush through" in my doodle, I'm probably not doing that)
Still need a doser, 3mmx5mm (I believe that fits 3/16), for pumping in water. I see kaomer on Amazon for like 12$ like this one..
Drilled the 1/2s x 1s bushing with a 13/16 bit + a little sanding to get the 1/2 PVC pipe to push through.
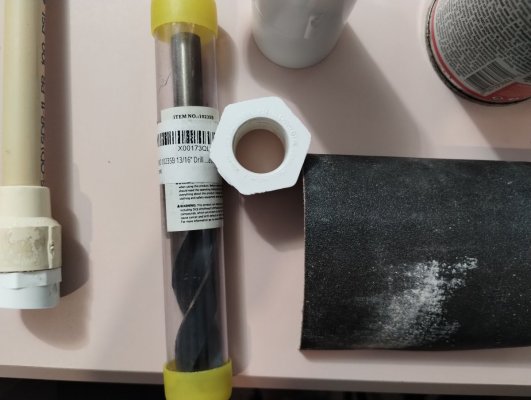
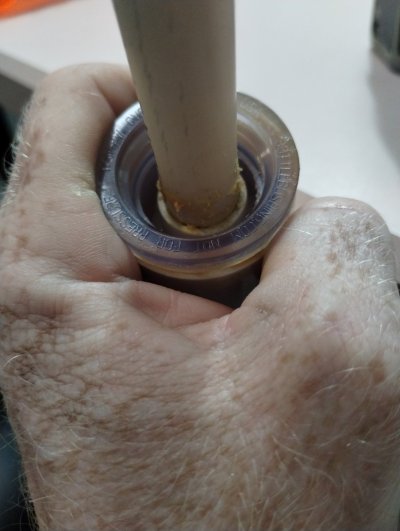
1/2 pvc pipe is too tight going through the soda bottle. 1/2 cpvc pipe has smaller o.d. and leaves a small gap in the bottles opening. So I'm using cpvc as the internal stand pipe. But attaching both pieces with adapters won't fit in the tee. So I modified the PVC 1/2 npt/s adapter.
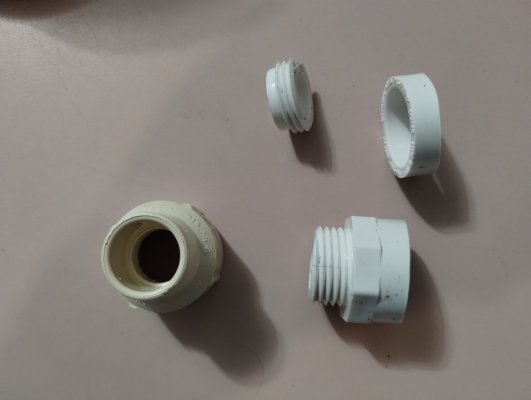
Glue CPVC pipe to the corresponding adapter. Slide the modified bushing on to the 1/2 PVC pipe then glue the modified adapter. Apply glue to the pvc pipe below the adapter and slide the modified bushing back up. The modified bushing that was once tighter than a clams a..butt, slides much easier with the glue. A little glue on the threads and screw the adapters together. Glue in the bottle bushing. Not the cleanest glue job..
For the 1/2 side of the tee, I used a 1/2mpt 1/4fpt bushing to a 1/4mpt to 3/16 barb fitting.
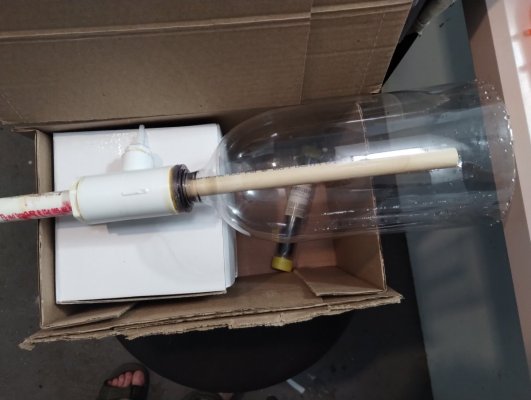
Now to go back building my brine shrimp tank.. and get around to testing this..
Just finished glueing up a version of this.
I'm wondering if this can be used for freshwater phyto.. like Haematococcus pluvialis.. and replace a brine shrimp tanks ato.. hmm..
Based off of an external bell siphon.

External Bell Siphon – Aquaponics
I have seen a lot of videos and information about Bell Siphons in the Aquaponics setup. It’s an absolutely fabulous setup. But, there are two thing that kept bothering me. One it takes up spa…

Parts:
2 liter bottle
1s x 1/2fpt x 1s PVC tee
1s x 1/2s PVC bushing
1s x bottle thread bushing (https://www.bottlebushing.com/)
1/2 PVC adapter s/mpt
1/2 CPVC adapter s/fpt
1/2mpt x 1/4fpt bushing
1/4mpt x 3/16 barb
1/2 PVC pipe
1/2 CPVC pipe
3/16 3 way
3/16 check valve
(Ignore the 1/2mpt-1/4 barb, the missing 1/2 tee and the "flush through" in my doodle, I'm probably not doing that)
Still need a doser, 3mmx5mm (I believe that fits 3/16), for pumping in water. I see kaomer on Amazon for like 12$ like this one..
Drilled the 1/2s x 1s bushing with a 13/16 bit + a little sanding to get the 1/2 PVC pipe to push through.

1/2 pvc pipe is too tight going through the soda bottle. 1/2 cpvc pipe has smaller o.d. and leaves a small gap in the bottles opening. So I'm using cpvc as the internal stand pipe. But attaching both pieces with adapters won't fit in the tee. So I modified the PVC 1/2 npt/s adapter.

Glue CPVC pipe to the corresponding adapter. Slide the modified bushing on to the 1/2 PVC pipe then glue the modified adapter. Apply glue to the pvc pipe below the adapter and slide the modified bushing back up. The modified bushing that was once tighter than a clams a..butt, slides much easier with the glue. A little glue on the threads and screw the adapters together. Glue in the bottle bushing. Not the cleanest glue job..

For the 1/2 side of the tee, I used a 1/2mpt 1/4fpt bushing to a 1/4mpt to 3/16 barb fitting.

Now to go back building my brine shrimp tank.. and get around to testing this..
Is this a private party? Can I reserve a seat for later?
Just finished glueing up a version of this.
I'm wondering if this can be used for freshwater phyto.. like Haematococcus pluvialis.. and replace a brine shrimp tanks ato.. hmm..
Based off of an external bell siphon.

External Bell Siphon – Aquaponics
I have seen a lot of videos and information about Bell Siphons in the Aquaponics setup. It’s an absolutely fabulous setup. But, there are two thing that kept bothering me. One it takes up spa…sugarlandaquaponics.wordpress.com

Parts:
2 liter bottle
1s x 1/2fpt x 1s PVC tee
1s x 1/2s PVC bushing
1s x bottle thread bushing (https://www.bottlebushing.com/)
1/2 PVC adapter s/mpt
1/2 CPVC adapter s/fpt
1/2mpt x 1/4fpt bushing
1/4mpt x 3/16 barb
1/2 PVC pipe
1/2 CPVC pipe
3/16 3 way
3/16 check valve
(Ignore the 1/2mpt-1/4 barb, the missing 1/2 tee and the "flush through" in my doodle, I'm probably not doing that)
Still need a doser, 3mmx5mm (I believe that fits 3/16), for pumping in water. I see kaomer on Amazon for like 12$ like this one..
Drilled the 1/2s x 1s bushing with a 13/16 bit + a little sanding to get the 1/2 PVC pipe to push through.

1/2 pvc pipe is too tight going through the soda bottle. 1/2 cpvc pipe has smaller o.d. and leaves a small gap in the bottles opening. So I'm using cpvc as the internal stand pipe. But attaching both pieces with adapters won't fit in the tee. So I modified the PVC 1/2 npt/s adapter.

Glue CPVC pipe to the corresponding adapter. Slide the modified bushing on to the 1/2 PVC pipe then glue the modified adapter. Apply glue to the pvc pipe below the adapter and slide the modified bushing back up. The modified bushing that was once tighter than a clams a..butt, slides much easier with the glue. A little glue on the threads and screw the adapters together. Glue in the bottle bushing. Not the cleanest glue job..

For the 1/2 side of the tee, I used a 1/2mpt 1/4fpt bushing to a 1/4mpt to 3/16 barb fitting.

Now to go back building my brine shrimp tank.. and get around to testing this..
Do you have more photos or a video of this working?
Not installed yet. I have the majority of the brine shrimp build, just shy of a few parts. I'm going to use chlorella as it is nearly bulletproof and have experience with. Found haematococcus in whole cell powdered form (oddly sold as red spirulina).Do you have more photos or a video of this working?
Currently waiting on speedpak delivery.. ~January 7
Have you got any videos of this working? Looks complex.Is this a private party? Can I reserve a seat for later?
Just finished glueing up a version of this.
I'm wondering if this can be used for freshwater phyto.. like Haematococcus pluvialis.. and replace a brine shrimp tanks ato.. hmm..
Based off of an external bell siphon.

External Bell Siphon – Aquaponics
I have seen a lot of videos and information about Bell Siphons in the Aquaponics setup. It’s an absolutely fabulous setup. But, there are two thing that kept bothering me. One it takes up spa…sugarlandaquaponics.wordpress.com

Parts:
2 liter bottle
1s x 1/2fpt x 1s PVC tee
1s x 1/2s PVC bushing
1s x bottle thread bushing (https://www.bottlebushing.com/)
1/2 PVC adapter s/mpt
1/2 CPVC adapter s/fpt
1/2mpt x 1/4fpt bushing
1/4mpt x 3/16 barb
1/2 PVC pipe
1/2 CPVC pipe
3/16 3 way
3/16 check valve
(Ignore the 1/2mpt-1/4 barb, the missing 1/2 tee and the "flush through" in my doodle, I'm probably not doing that)
Still need a doser, 3mmx5mm (I believe that fits 3/16), for pumping in water. I see kaomer on Amazon for like 12$ like this one..
Drilled the 1/2s x 1s bushing with a 13/16 bit + a little sanding to get the 1/2 PVC pipe to push through.

1/2 pvc pipe is too tight going through the soda bottle. 1/2 cpvc pipe has smaller o.d. and leaves a small gap in the bottles opening. So I'm using cpvc as the internal stand pipe. But attaching both pieces with adapters won't fit in the tee. So I modified the PVC 1/2 npt/s adapter.

Glue CPVC pipe to the corresponding adapter. Slide the modified bushing on to the 1/2 PVC pipe then glue the modified adapter. Apply glue to the pvc pipe below the adapter and slide the modified bushing back up. The modified bushing that was once tighter than a clams a..butt, slides much easier with the glue. A little glue on the threads and screw the adapters together. Glue in the bottle bushing. Not the cleanest glue job..

For the 1/2 side of the tee, I used a 1/2mpt 1/4fpt bushing to a 1/4mpt to 3/16 barb fitting.

Now to go back building my brine shrimp tank.. and get around to testing this..
Similar threads
- Replies
- 4
- Views
- 340
- Replies
- 2
- Views
- 168
- Replies
- 7
- Views
- 290
- Replies
- 6
- Views
- 524
TOP 10 Trending Threads
-
- Question
- Replies
- 43
- Views
- 793
-
- Poll
- Replies
- 48
- Views
- 516
- Replies
- 111
- Views
- 1,344
- Replies
- 20
- Views
- 346
-
- AMS: Article
- Replies
- 37
- Views
- 2,287
- Replies
- 100
- Views
- 3,676
- Replies
- 28
- Views
- 440
-
- Poll
- Replies
- 64
- Views
- 1,190
- Replies
- 20
- Views
- 235


