Another DIY overflow advice

OP
OP
wickette

wickette

Active Member
View Badges
Joined
Mar 1, 2019
Messages
140
Reaction score
51
Rating - 0%
0   0   0
Also, if you don't care about looks, for the Weir, use a 3" x 1-1/2" x 3" and turn the top into a grill w/ a short 3" pipe (about an inch or cut to fit) and a knockout cap with holes or use a 3" drain grate. It's how mine is now w/ the second white part. I do have a secondary siphon going into that white 3" PVC Tee but that's for safety because I want 2 siphon tubes going akin to modified herbie design.
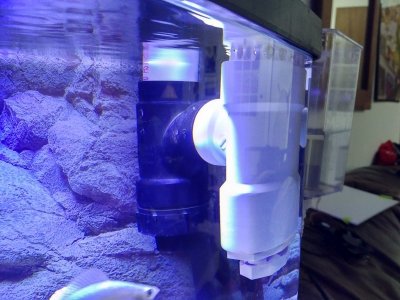
2of3.jpg

I cant totally tell whats going on here, is this essentially 2 weirs connected to each other ?
 

Hermie

Valuable Member
View Badges
Joined
Oct 25, 2018
Messages
2,444
Reaction score
2,615
Location
Georgia OTP
Rating - 0%
0   0   0
Would two 3/4" over flows with 1.5" weirs be better, Im pretty sure I have enough parts to do that
Thin wall or regular PVC? You have to do the pi formula for area of a circle using the inner diameter of 3/4" pipe.

It's all about calculating areas using inner and outer diameters when we are talking about tight clearances. Personally, I would not trust 3/4" pipes to push 600gph because they can clog easier than 1" pipes. Calculations + common sense = success.

3/4" regular pvc = area of 1.73 in-square
1.73 x 2 pipes = 3.46 inches square

I had 1" cpvc giving 2.88 in-square of area pushing it at ~400 gph
(thinks for a minute)

You could try 3/4" if they both have separate 1-1/2" intakes and I believe it'd work for you. The real problem is that you need to know your siphon tubes have no bubbles because that can severely affect flow. The only way to know for sure is to use clear pipes. or use 45 degree bends instead of 90 degree bends so you can have a "true apex" to the curve where you initially suck the bubbles out to create your siphon effect. There may be other ways to ensure that, but I'd definitely use 45 degree bends instead of two 90-degree elbows given the chance when making a siphon tube

U can get an internal box for $20 or $30 so I’m not sure what your talking about.
That's great. That's less than 1/3 of the parts that are needed. :rolleyes:
 

Hermie

Valuable Member
View Badges
Joined
Oct 25, 2018
Messages
2,444
Reaction score
2,615
Location
Georgia OTP
Rating - 0%
0   0   0
I cant totally tell whats going on here, is this essentially 2 weirs connected to each other ?

The black part was the first overflow I made and it was connected to a pipe turned into a weir instead of that large white Tee you see.
Eventually, I added the white tee so I had a 3" weir instead of 1-1/2"
Further, I added a second siphon tube to the whole thing which feeds from that 3" white weir. The second tube is an eshopps replacement u Tube but it now functions as my main siphon. I trust clear pipe way better than the CPVC I used to have.
 

Hermie

Valuable Member
View Badges
Joined
Oct 25, 2018
Messages
2,444
Reaction score
2,615
Location
Georgia OTP
Rating - 0%
0   0   0
Honestly you are pushing it with 3/4" pvc and 1-1/2" weirs if you want 600gph

My recommendation is 2" weirs whether you use 3/4" pvc (hopefully thin wall) or 1" thin wall or 1" CPVC
If you don't use 2" weirs, you will just have to test 1-1/2" and see if it works.

Another important note:
your siphon tube must have enough space at the bottom of the reservoirs for water to flow around (in or out). It cannot be restricted by touching the bottom, so your U Tube has to be in a sweet spot where it's lower than your outlets but high enough off the bottom for free flow of water. Very important because this distance affects how "safe" your siphon is in case you move the tube up or down accidentally.

Marked in blue here, you want this space as "long" as possible, because it lets you move your siphon tube up and down for whatever reason while still being "underwater," for example when the system is shut off
cOTghGd.jpg
 
OP
OP
wickette

wickette

Active Member
View Badges
Joined
Mar 1, 2019
Messages
140
Reaction score
51
Rating - 0%
0   0   0
Thin wall or regular PVC? You have to do the pi formula for area of a circle using the inner diameter of 3/4" pipe.

It's all about calculating areas using inner and outer diameters when we are talking about tight clearances. Personally, I would not trust 3/4" pipes to push 600gph because they can clog easier than 1" pipes. Calculations + common sense = success.

3/4" regular pvc = area of 1.73 in-square
1.73 x 2 pipes = 3.46 inches square

I had 1" cpvc giving 2.88 in-square of area pushing it at ~400 gph
(thinks for a minute)

You could try 3/4" if they both have separate 1-1/2" intakes and I believe it'd work for you. The real problem is that you need to know your siphon tubes have no bubbles because that can severely affect flow. The only way to know for sure is to use clear pipes. or use 45 degree bends instead of 90 degree bends so you can have a "true apex" to the curve where you initially suck the bubbles out to create your siphon effect. There may be other ways to ensure that, but I'd definitely use 45 degree bends instead of two 90-degree elbows given the chance when making a siphon tube


That's great. That's less than 1/3 of the parts that are needed. :rolleyes:

If I go 3/4" I have 100' of 3/4" polytubing Id use a heat gun to create a true U shape, no 45 or 90 degree angles, less chance of bubbles accumulating. Not as good as clear, but the next best thing.
 

Hermie

Valuable Member
View Badges
Joined
Oct 25, 2018
Messages
2,444
Reaction score
2,615
Location
Georgia OTP
Rating - 0%
0   0   0
If I go 3/4" I have 100' of 3/4" polytubing Id use a heat gun to create a true U shape, no 45 or 90 degree angles, less chance of bubbles accumulating. Not as good as clear, but the next best thing.
I use a check valve, air hose and a syringe to create the siphon, just making sure that the air hose is at the "top" of the tube. Of course ppl can use their mouth too, I don't want aquarium water in mine. Also, once you get the siphon going, you can "clear" any bubbles by quickly pumping the tube up and down a few times. It's also possible to just put ziplock bags over the ends of the tube and submerge the whole thing under water, then put it into place and remove the bags, but that can allow some bubbles to get in the tube when removing the ziplock bags.
 
OP
OP
wickette

wickette

Active Member
View Badges
Joined
Mar 1, 2019
Messages
140
Reaction score
51
Rating - 0%
0   0   0
Why not an Eshopps PF-800?

31a670e7eeab639c2f6714f898d03aba.jpg

...I did buy a marina breeder box to make something this design at first, but Im pretty sure drilling/gluing bulk heads has a higher chance of failing. and on this type of design the over flow pipe is only a few inches a side, pvc style it over a foot to a side... again less chance failure. I could "buy" this... but wheres the fun in that.
 
OP
OP
wickette

wickette

Active Member
View Badges
Joined
Mar 1, 2019
Messages
140
Reaction score
51
Rating - 0%
0   0   0
I use a check valve, air hose and a syringe to create the siphon, just making sure that the air hose is at the "top" of the tube. Of course ppl can use their mouth too, I don't want aquarium water in mine. Also, once you get the siphon going, you can "clear" any bubbles by quickly pumping the tube up and down a few times. It's also possible to just put ziplock bags over the ends of the tube and submerge the whole thing under water, then put it into place and remove the bags, but that can allow some bubbles to get in the tube when removing the ziplock bags.

I have 2 identical 800gph pumps, its how I got the syphon going on the current DIY canister filters intake tube. Its been 5 months and I havent need to prime it since the first time.
 

Crustaceon

Valuable Member
View Badges
Joined
Feb 15, 2019
Messages
2,444
Reaction score
3,357
Rating - 0%
0   0   0
...I did buy a marina breeder box to make something this design at first, but Im pretty sure drilling/gluing bulk heads has a higher chance of failing. and on this type of design the over flow pipe is only a few inches a side, pvc style it over a foot to a side... again less chance failure. I could "buy" this... but wheres the fun in that.

It’s fun if you like shopping, lol.
 
OP
OP
wickette

wickette

Active Member
View Badges
Joined
Mar 1, 2019
Messages
140
Reaction score
51
Rating - 0%
0   0   0
ok, I made a weir style w/o the weir (so it should just be a siphon not an over flow, I used pvc tape for the test, getting 80gph with a 1.25" pipe... so did something wrong. even submerged the entire thing to ensure no air bubbles.

the two x 3/4 polytubing floating in two interconnected 1.5" housing/pvc over flow box works better, but way too big in my tank just the intake is much bigger than all the hardware currently in the tank.

edit: Ill try the the diy equivalent of the eshopps pf -800 tomorrow
 
Last edited:

Hermie

Valuable Member
View Badges
Joined
Oct 25, 2018
Messages
2,444
Reaction score
2,615
Location
Georgia OTP
Rating - 0%
0   0   0
ok, I made a weir style w/o the weir (so it should just be a siphon not an over flow, I used pvc tape for the test, getting 80gph with a 1.25" pipe... so did something wrong. even submerged the entire thing to ensure no air bubbles.

the two x 3/4 polytubing floating in two interconnected 1.5" housing/pvc over flow box is works better but way too big in my tank.

yea... the prebuilt ones are way better looking lol and take up less space
 
OP
OP
wickette

wickette

Active Member
View Badges
Joined
Mar 1, 2019
Messages
140
Reaction score
51
Rating - 0%
0   0   0
weir method mach 1, anything blatantly wrong? All the straight pvc pipes were cut to 13"

53764564_409335443151037_672214681640763392_n.jpg
 

Hermie

Valuable Member
View Badges
Joined
Oct 25, 2018
Messages
2,444
Reaction score
2,615
Location
Georgia OTP
Rating - 0%
0   0   0
how can you ensure full siphon? Also, when the pump is turned off doesn't that mean it drains down to the bottom of the tube in the tank?
 
OP
OP
wickette

wickette

Active Member
View Badges
Joined
Mar 1, 2019
Messages
140
Reaction score
51
Rating - 0%
0   0   0
how can you ensure full siphon? Also, when the pump is turned off doesn't that mean it drains down to the bottom of the tube in the tank?

I used a 75 gallon rain barrel outside for the test (which is why it looks so dirty now), the whole thing was submerged before the first attempt, used the garden hose to get the siphon going the second time, ran 3/8" tubing into the over flow and sucked the air out of it the 3rd try. It should have in theory been full flow until it the water level dropped to the bottom of the intake, capping the output before starting gave it a 2 second rush of water, then back to a very gentle flow.
 

Hermie

Valuable Member
View Badges
Joined
Oct 25, 2018
Messages
2,444
Reaction score
2,615
Location
Georgia OTP
Rating - 0%
0   0   0
I used a 75 gallon rain barrel outside for the test (which is why it looks so dirty now), the whole thing was submerged before the first attempt, used the garden hose to get the siphon going the second time, ran 3/8" tubing into the over flow and sucked the air out of it the 3rd try. It should have in theory been full flow until it the water level dropped to the bottom of the intake, capping the output before starting gave it a 2 second rush of water, then back to a very gentle flow.

An issue I had was that I thought I had full siphon but I didn't, that's the problem with opaque tubes... also, generally you want the siphon tube's outlet to be in a "vat" of water that's larger than the tube's diameter, by having it all connected like yours, it's easier for the flow to get messed up and air to enter the tube from the outlet side.

If it works... it works
 
OP
OP
wickette

wickette

Active Member
View Badges
Joined
Mar 1, 2019
Messages
140
Reaction score
51
Rating - 0%
0   0   0
Tomorrow DIY eshopps knock off. Drilling the bulkhead through the bottom of the cylinder, hanging the breeder box inside the tank, drilling intake holes across the top of the breeder box, Ill try it with a 1.25" pvc overflow pipe, or 2 3/4" poly over flow tubes, I have a ton of 1/2" ID clear poly tubing, they wont keep the U shape, but I can zip tie 2 of them to a 3/4" pvc overflow tube to keep its shape, even if that doesnt get a full siphon probably more likely to flush out the bubbles of a narrow diameter. opinions?

53466106_2328550810710871_880832620575850496_n.jpg
 

Rocks reef

Community Member
View Badges
Joined
Aug 14, 2017
Messages
97
Reaction score
90
Rating - 0%
0   0   0
Why are you so opposed to drilling the tank? There is a reason why Hang on tank overflows are going to the way side. Too many people report failures or can't get them tuned right. Drilling a hole in the tank is very easy and you can get an overflow box rated for your pump for pretty cheap. You have already spent more in PVC pipe/parts than what you would have spent on a drill bit and overflow box.
 

Reef-junky

2500 Club Member
View Badges
Joined
Dec 5, 2017
Messages
2,888
Reaction score
4,374
Rating - 0%
0   0   0
Why are you so opposed to drilling the tank? There is a reason why Hang on tank overflows are going to the way side. Too many people report failures or can't get them tuned right. Drilling a hole in the tank is very easy and you can get an overflow box rated for your pump for pretty cheap. You have already spent more in PVC pipe/parts than what you would have spent on a drill bit and overflow box.

I tried to tell them but they are dead set on using that PVC crap. Like u said there’s a reason people aren’t using PVC overflows.
 
OP
OP
wickette

wickette

Active Member
View Badges
Joined
Mar 1, 2019
Messages
140
Reaction score
51
Rating - 0%
0   0   0
Why are you so opposed to drilling the tank? There is a reason why Hang on tank overflows are going to the way side. Too many people report failures or can't get them tuned right. Drilling a hole in the tank is very easy and you can get an overflow box rated for your pump for pretty cheap. You have already spent more in PVC pipe/parts than what you would have spent on a drill bit and overflow box.
there are fish in the tank... lots of them.
 

Reefing threads: Do you wear gear from reef brands?

  • I wear reef gear everywhere.

    Votes: 37 15.9%
  • I wear reef gear primarily at fish events and my LFS.

    Votes: 13 5.6%
  • I wear reef gear primarily for water changes and tank maintenance.

    Votes: 1 0.4%
  • I wear reef gear primarily to relax where I live.

    Votes: 30 12.9%
  • I don’t wear gear from reef brands.

    Votes: 135 58.2%
  • Other.

    Votes: 16 6.9%
Back
Top